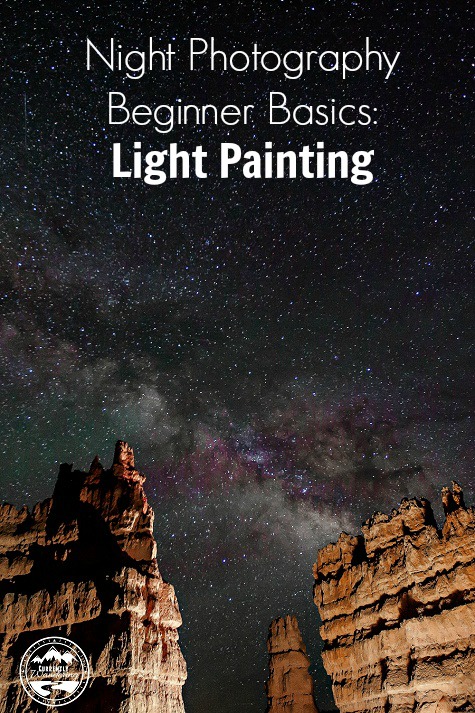
Beautiful Nightscapes usually have some foreground elements. This can often be a silhouette, but being able to see elements in the foreground can be very helpful as well. One of our favorite images capture in Bryce National Park was enhanced with some light painting. Consider both images, and see which you like more.
.jpg)
Foreground Subject
You’ll need to choose what you want to light in the foreground of your image. In this image, we lit the rocks, but dead trees, barns, or even people can make interesting foreground subjects. You will want to compose your image so that your main feature of the foreground (rocks, trees) doesn’t block the main feature you are capturing in the sky. If you are including the Milky Way, make sure the foreground works well with the sky for a great image. It will frequently be impossible to re-arrange your foreground objects (if they are rocks and trees), so you’ll end up moving your camera to change your composition.
Light Source
The light source you use doesn’t have to be large. Remember that you’ll be doing a long exposure. The light you cast on an object has time to accumulate. You can use nearly any flashlight, light panel, or even a strobe or speedlight triggered manually. The key is that you want the light to diffuse and spread. A tightly focused circle of light can be difficult to paint with, as some areas will be too bright and others too dark. Our favorite light source (and the one used for this particular image) is a rather cheap LED panel light. We have two of the NEEWER panel lights (though only one was used for painting), though I might buy some YONGNUO LED panel lights if these die. Both lights are in the $30 range, and include some diffusion filters to change the color cast.
We used these lights handheld and hand operated for painting. They cast a bright light when all the way on, and have a variable output.
Painting Time
The painting on this image was actually done in two separate pieces. The right side of the photo was painted first, at a length of about 7 seconds. Then I turned off the light, and moved further up the trail and painted the left side of the image from the side, for a length of about 2 seconds. During my time painting, I usually move the light around to create softer edges and wrapped lighting. For the left side of the image, I didn’t have much time to move it around because of the short time it was on.
When you light paint by hand, you can control how bright your light painted objects are by leaving the light on for longer or shorter, and also by changing the intensity of the light source. This takes some experimentation, and review of the image. First, figure out what length of exposure you need for your night sky, (see our Camera Settings post), and then try different light painting times and techniques to achieve what you want. You might often want to paint from a different location then the camera rests, which is best done with a friend. For this image, I was running the light around, and Jess was behind the camera. The distance between us was a good 100 yards or so, which made communication difficult. We were far out of cell range, but a couple of handheld radios would have worked well. We forgot ours, but won’t in the future. There was a bit of yelling into darkness (and echoing around the canyon) as we did our best to communicate.
Direct Painting VS Reflected Painting
There are two main methods of painting your foreground: direct or reflected. Direct lighting is accomplished by pointing your light directly at your subject. If you use direct light, try to diffuse your light source through a piece of plastic. Moving your light source around during your lighting time can also help to soften the light. When moving your light source, consider changing both the angle of the light AND the position. By moving the light from side to side and up and down, you can ‘wrap’ the light more softly around the edges of your foreground. Review your images to see how best to modify your technique.
The best lighting is often reflected lighting. In this technique, you will shine the light at a different surface, causing the light to reflect onto the subject you wish to paint. Reflected light is much softer, having been scattered by the imperfect surface. You will want to make sure that both your light and the reflection surface are NOT visible in your final image. This works best when you can position yourself behind a small hill or rock. You might even be able to stand behind the camera, directing your light at an out of frame surface to reflect onto your main subject. Be creative here! Every location and subject will require a new way of lighting.
In our image, we used both direct and reflected light. I first spent about 7 seconds reflecting light against rocks behind a small hill. That light reflected onto the rock formations opposite. The reflection both softened the light and helped it spread out over a large area. During the reflected light portion of my antics, I was waving the LED light panel around quite fiercely.
The left portion of the foreground received no light from my first paint, being closer to the camera then the other rocks. After my first paint, I turned off the light and (carefully!) ran around the corner in the dark. I then turned the light on for about 2 seconds to light that section. Reflected light will always require more time for a similar exposure, being more diffused and usually further from the subject.
Color Cast
Both of the lights linked above come with white and tinted diffusers. The white light is a bit brighter, but is quite cool. We actually used no diffuser for our first paint, and then attached the tinted diffuser for the second paint. The reflected light was bouncing off rocks that were brown and cream colored, and the light adopted the same tone via reflection. In our first attempts, the second paint cast a very cool light on the left side of the image. Adding the tinted diffuser to the second paint brought the color temperature much closer to that of the first. (We did further correct the color temperature in post-processing.)
Color casts can also be added by just about anything translucent and colored. Cheap kitchenware lids and plastic grocery bags are two commonly available items you can experiment with.
Wash, Rinse, and Repeat
I can promise you that you won’t get it right the first time. Light painting is an imprecise technique, and you will need multiple tries to get it right. Patience and good communication will yield some excellent pictures, and quite a few that are not quite right. Celebrate your successes, and continue shooting!


[…] Night Photography Beginner Basics: Light Painting […]