About Us

Welcome!

Hi there! We are the Curren Family. We traveled full time in our Airstream from 2013-2017 and now split our time between our small condo in Teton Valley, ID and the road.

As avid, outdoor, travel and adventure enthusiasts we are here to provide tips, advice, and inspiration to help you develop healthier and stronger family relationships.

Follow Us

Email Subscribe

Author Archives:

Gear Review: Sawyer Mini – Cheap and Easy Water Filter for Backpacking or Emergencies

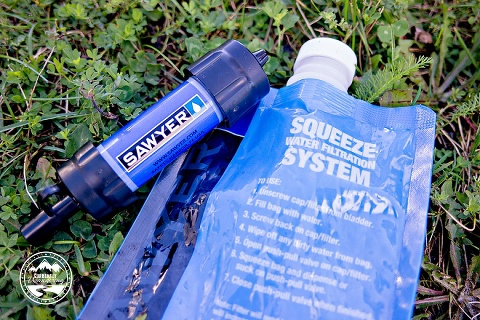
While we would have loved to receive this item for free to review, we actually spent money to purchase it. This post contains Amazon affiliate links which help to fund the blog in a small, small way. Thanks for helping us out! Most backpacking requires a way to filter water. Despite looking clean and clear, most…

1 comment
Add a comment...

Your email is never published or shared. Required fields are marked *

My Favorite Alternative Sport

In one of my church meetings this past Sunday (Elders Quorum, for Mormon readers), everyone in the room introduced themselves by name and answered a question to help us get to know everybody. Last Sunday in the same group, they asked everybody what their favorite meal was. This time, we all shared our favorite alternative…

Solar Power Upgrade Part 4 – The Wire Panel

With the solar mounted on top (part 1, part 2) and the wires run to the forward compartment (part 3), there was only one thing left to do. The next step in my project was to connect it all up! Underneath Cara’s bed is the wiring panel where the battery is connected to the rest of…

5 comments
Add a comment...

Your email is never published or shared. Required fields are marked *

  • Alright! Now I know that I can do this myself. Nice series of articles. Really liked the pictures.

    I do have a portable 200w fold out that I charge with and a know that the angle of the panels and the declination makes a big difference as well, but we can’t keep moving our Airstream around to follow the sun. Do you believe you will ever add the tilt up brackets? I know Rich Luhr and he just has 2 panels (flat mounted) on his 31 footer and has never had to use a generator (or carry one). So, it is a detail and I’m not sure that I’ll consider it either. We are not big consumers of Amp hour.

    Actually, our Zamp Solar 200w fold out charges our two stock 27 batteries up after a night of use. I know I’ll go over-kill on as many panels as I can fit on our 2015 27ft Serenity… so I’ll probably just run with them flat. Not even sure how I’d tilt them as we don’t carry a ladder.

    Great article. Please f/u with an article on how the user interface works in real life, the amount of Ah you collect, your storage capacity as you use it with your particular habits, what you might have done differently or options for others, etc…

    Thanks for spending the time reporting,

    DaveReplyCancel

  • Garrett Tershel

    Agreed, great group of articles. We are considering going full time out onto the road and this would be a huge consideration. Like the previous comment stated if you could document actual usage and storage that would be great. I work online and have need for electricity. I would like to do some boondocking and this would help make that happen.ReplyCancel

  • Thanks for an outstanding series of articles about your DIY solar setup, much appreciated.ReplyCancel

  • Thanks for an outstanding series of articles about your DIY solar setup. It’s a very professional-looking job. Much appreciated. One day we hope to do the same, upgrading our dealer-installed 150 Watt Zamp system to something *much* more capable.ReplyCancel

  • […] II – Self-Install Combiner Box Solar Power Install Part III – Self Install Running Wire Solar Install Part IV – The Wire Panel Adding Bigger Batteries Installing a 2000 Watt Pure-sine Inverter Automatic Transfer Switches Cost […]ReplyCancel

Solar Power Upgrade Part 3 – Self Install Running Wire

At the conclusion of Part 2, we had panels mounted on the roof and wired up to the combiner box. We connected the 6 gauge wire to the combiner box and dropped it behind the fridge. The next phase of this project involved running the wire from behind the fridge to the forward compartment. In…

4 comments
Add a comment...

Your email is never published or shared. Required fields are marked *

  • Dave

    Alright, an update. This really is going to be good series. It is putting everything together, literally and figuratively, I have been reading about for my solar project.

    Please, continue with all of the pictures. They’re great.ReplyCancel

  • […] the solar mounted on top (part 1, part 2) and the wires run to the forward compartment (part 3), there was only one thing left to do. The next step in my project was to connect it all […]ReplyCancel

  • […] Power Install Part I – Panel Mounting Solar Install Part II – Self-Install Combiner Box Solar Power Install Part III – Self Install Running Wire Solar Install Part IV – The Wire Panel Adding Bigger Batteries Installing a 2000 Watt […]ReplyCancel

Signs and Footprints

A few weeks ago, we found ourselves hiking the Sound of Silence Trail in Dinosaur National Monument. It had been a rainy few days, but we found ourselves with a few hours of sunshine and set out on the trail. We were blessed with visitors from Jess’s family, and had a wonderful time chatting as…

Partners & Affiliates

We've tried and tested many companies and only bring you the best! By clicking on our links we receive a small kickback and it doesn't cost you anything. Thanks so much for your support!

©2019 Peak Ventures LLC. All rights reserved. Republication in part or entirety requires a link back to the original post AND permission from the author. 

Occasionally we will partner with a company or brand and/or provide affiliate links on our site. All opinions are always our own and generally we've vetted things pretty well before presenting them to our readers. 

We are not professionals and although we provide trip reports or adventure ideas please research and do your own due diligence before embarking on any trip.