Categories
Airstream Accessories Tips & Tricks

E-Bags: The Best Way to Organize Clothes for Traveling

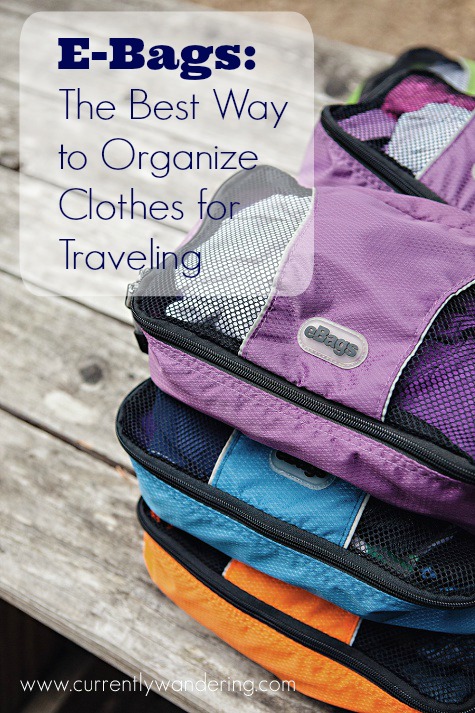
Two years ago when we did a 5 week trip to California I had a lightbulb moment. We had packed all our clothes loosely into duffle bags, and about 6 days in I seriously couldn’t find anything as the clothes were jumbled, rumpled, and scattered pretty much everywhere. It was a disaster. In desperation I started looking around on Amazon for a solution to my problem and I found it: eBags Packing Cubes. These things are a lifesaver for packing clothes!

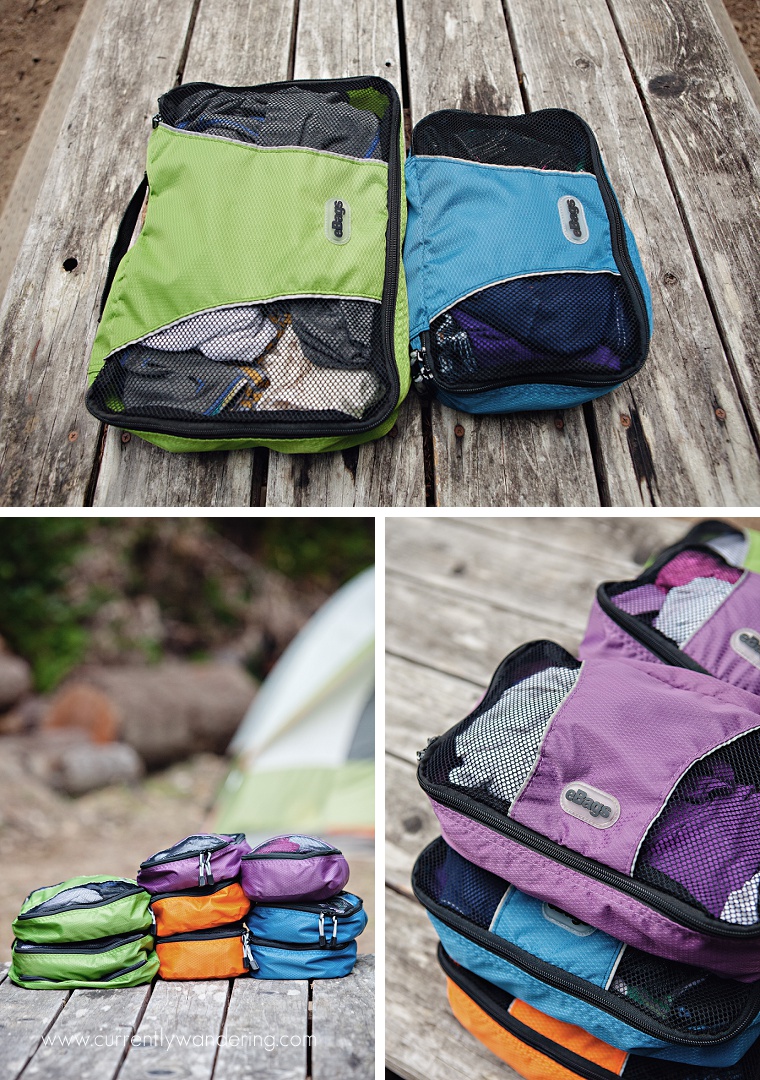
I bought two different variety packs, as I wasn’t sure which sizes we would need. After organizing a bit and seeing how many clothes really fit into the small, medium, and large bags, I made another couple orders of the small bags in different colors as those were the most conveniently sized for kid clothes.

Amazon links to: small bags, medium bags, & a 3 pc variety pack

Our new system is great. Each kid has their own set of 3 color-coordinated E-bags: Rachel is purple, Andrew is orange, and Cara is blue – turns out those are their favorite colors so everyone is happy! We typically put underwear, socks, and pajamas in one, shorts and pants in the second, and shirts in the third. Depending on how long the trip is, you can combine shirts & pants and even just take 2 bags instead of all three. The kids each know their color and its easy for them to pull out the right set of clothes rather than rifling through the whole duffle bag looking for their shirt.

For adult clothes, we tried both the medium and large and I’ve settled on medium. Large is too, well, large. Unless all you wear are jeans and then those work great in the large ones. I’m less concerned about Sam and I having our own color, so we typically mix the green with some other black ones we already owned.

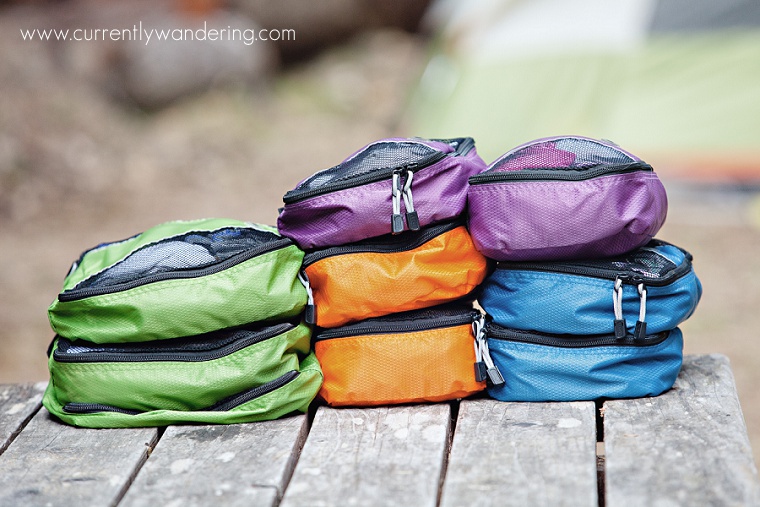
How does this work in the Airstream, you ask? Easy. We still use them. Since our closet is so small, all our “other” season clothes are packed away under the beds. Each kid has their off season clothes in their own color coordinated bag and then they are all tossed into one of our large, white bins. When we have a cold spell (or hot spell in the winter), the kids can go back there and pull out their long sleeved shirts or an extra pair of long pants. I also put Cara’s Sunday skirts in a medium bag under the bed as well. They don’t wrinkle, are super difficult to hang, and kind of bulky for drawers, but they fit great under the bed and we only need them once a week anyway.

They are also useful when we do leave the Airstream for a few nights. Recently, we spent a week at Camp Noyo with family and we used our packing cubes and our duffle bag to take our clothes with us. Worked great!

If you are frustrated with a pile of clothes while traveling, definitely check these out!

Categories
Airstream Accessories Daily Life Solar & Power

Wandering Wifi

During our first 6 month round of travel, I managed to keep connected with just a loose Verizon Hotspot, with service through Millinicom. When I say ‘loose’ I literally mean the hotspot was usually sitting on the table. I also had a Wilson SleekV 4G cradle booster, and a tiny magnetic antenna that I could mount in the window. I only pulled out and used the booster when I had a low signal.

After meeting Kyle and seeing his sweet setup, I decided it was time for an upgrade. Now that it is all installed, it’s time for a report.

Gear List

  • Pantech hotspot
  • Wilson Sleek-V booster cradle
  • PepWave SoHo (with DC power adapter)
  • 2 Roof mounted antennas
  • DC power distribution

Outside Antennas

IMG_20140610_113947
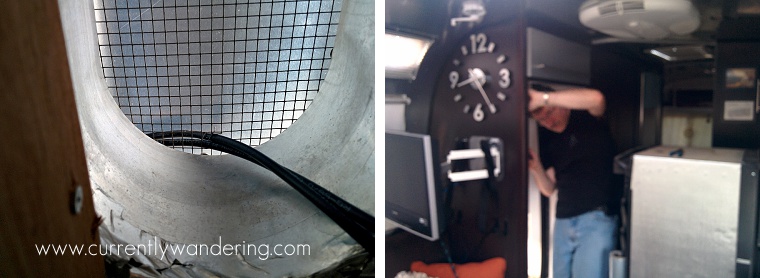
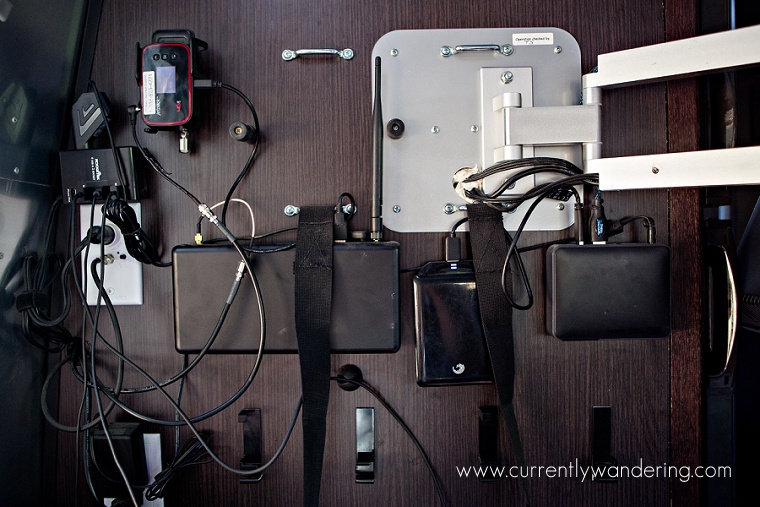
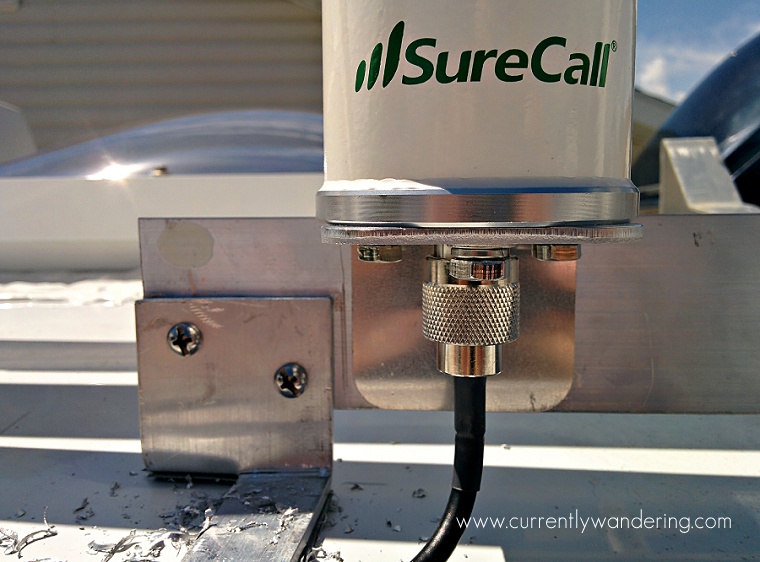
I wanted to mount the antennas on the roof, both to avoid the futz factor of an internal antenna, and to help the signal escape this faraday cage I call home. Kyle had his antennas mounted to his solar panels, but I didn’t have those yet, so I improvised. Using a piece of 1/4 by 2.5 in aluminum bar from the hardware store, I cut a horizontal piece and two ‘feet’ The feet were attached to the roof with outdoor adhesive tape, and the horizontal bar attached to the two feet and the vertical bar supporting the TV antenna. The new antennas were then screwed to this horizontal bar. Bolts with threadlocker were used on all connections. Using adhesive tape and the existing support for the TV antenna allowed a secure connection without drilling a mounting hole in the Airstream.

Cable Run

IMG_20140609_202953

Running the antenna cables took some thought. I ended up running them along the roof and down the vent above the fridge. To access the small area behind the fridge, I (with the help of my Father-in-law) removed the fridge. Removing the fridge mostly involves a hunt for the screws and bolts holding it in place. After those were removed, it slid right out. We set it on some cardboard on the Airstream floor while we worked inside it’s enclosure.

We were able to remove a thin wooden panel, cut a small hole in the mesh covering the fridge vent, and run the cable down the wall and out the existing hole behind the TV.  The antenna cables are 10 feet long, giving me just enough room to make it work.

Then, of course, we put the fridge back into place and reconnected it to the AC, DC, and propane. And it still worked! We ended up using some foil tape on hand to seal the back panel to the side walls, so you might want that handy if you attempt this stunt yourself.
Gimme The Power!

We now had some additional power requirements behind the TV. I found a DC splitter that also had USB ports in place, and this worked well. We have a 12V connector for the PepWave, and USB power connections for the booster cradle, and our two cellphones which sit in brackets to charge while we sleep.

The Pantech hotspot connects to the PepWave via USB, which provides both power and a network connection.

Industrial Strength Velcro

With everything hooked up and working, it was time to secure it to the wall. I used industrial strength velcro for this job, and it has worked very well. The velcro allows for things to be moved or adjusted, and has held securely while towing.

Amazingly, all this gear fits in the space behind the TV, making it nearly invisible unless you look for it.

Wandering Wifi - How We Get Internet While Traveling

And that, folks, is the wall of awesome.

Categories
Airstream Accessories Solar & Power

With Power Comes Great Freedom – We Have a Generator!

SAMSUNG CSC

It is now easy to see how stressful it was to always make sure we stayed at campgrounds with electric hook-ups.

“Big Sur? Ummm… maybe we could make it one night?”

“That boondocking spot looks awesome, but I don’t think we’d last very long.”

Some of the best campgrounds we’ve seen or heard about are tucked away with no utility hookups. Or the best campsites within a campground are the non-hookup/tent sites.  As a self-contained trailer that should be no problem, but our power consumption is such that we drain our batteries easily after only 1 or 2 nights. Powering laptops (the big one), the furnace fan (also huge), and other miscellaneous devices and lights really takes a toll. We also don’t have an inverter in the Airstream, so none of the regular, three pronged outlets will work while we are on battery power (hairdryer & blender probably being my top two appliances). We do, however, have DC USB plugs for our phones and tablets, and one DC power cord that we share between our two laptops. So, we can get power to those, just not for very long until we are drained.

We contemplated the solar vs. generator question long and hard and decided that while solar might be a cleaner, more environment conscious way of getting power, it is also more of a financial commitment and more logistically complicated, and we weren’t ready for that. So, we bought a generator. After talking with multiple other full time families, we settled on the popular Honda EU2000i and we absolutely love it. Quiet, efficient, small (comparatively), starts easily and runs great.

The best thing about having this guy is that we no longer worry about what utilities the campground will have. Coupled with a few water jugs to schlep water from a spigot, we can now go 4 or 5 days easily before we run out of gray water tank space. We immediately put it to use and stayed in Samuel P. Taylor State Park near Point Reyes National Seashore back in March of 2014. As a reward for our portability, our site was beautiful, covered with shade from the tall redwood trees and it drizzled rain on and off with some serious cloud cover. We loved being in a beautiful place where solar power would not have met our needs.

Is solar out of the question? Not at all. Pulling the generator out of the truck and plugging it in is a bit of a chore, but so is constantly tilting solar panels to match the angle of the sun (not to mention climbing up on top to clean them!). We imagine a future with both. We’d love at least one solar panel on top of the Airstream to keep our batteries topped off. However, we don’t want to have to leave the Redwood Forest because our shady spot isn’t pulling in enough power. We will likely end up with both, to give us the best possible options as we travel.

Categories
Airstream Accessories

Gear Review: Anderson Levelers & an X-Chock

**Updated May 2017**

When we bought the Airstream, we inherited a set of standard yellow triangle wheel chocks and some spare 2×6 boards to use when leveling on uneven terrain. It worked, and we didn’t give it a lot of thought for several months. Once our set up starting getting on our nerves, we upgraded to the lego-like wheel blocks and a wheel chock we found through the airforums. It did great for awhile, but we kept seeing friends with better set-ups, and honestly? The wheel chock wasn’t all that great.

The Airstream tends to rest against one or more of the chocks, and it often required moving the Airstream a little backwards, or a little forwards, to get it unstuck when headed out. Once or twice, we’d even bent the bolt through the chock, and we were just sick of it.

For Christmas one year, we decided it was time to finally upgrade and we decided on Anderson Levelers an X-Chock both available on Amazon (perfect).

The Anderson levelers took some getting used to but it didn’t take long. They are basically like a small ramp you drive up onto until you are level, and then slide the triangle piece underneath to hold it. Once we add the x-chock, the rig simply doesn’t move. Its fabulous. We can also get much higher on the Anderson Levelers than we could with our yellow lego-blocks. There have been more than a few times where we’ve gone all the way up on them!

We’ve also kept our set of lego-like wheel blocks. They store easily in the bumper and are great for when we need something under our stabilizers, or even under the front jack. We’ve also used the Anderson Levelers as a ramp to get up high on a set of 4 lego-blocks per wheel! That site was really un-level for sure and it was quite the achievement!


SAM_0813-Edit copy

We are so happy with our upgrade, I just wish we had done it sooner!

Categories
Airstream Accessories Homeschool Most Popular Posts

How To Get Free or Discounted Admission to Museums All Over the United States

How to Get Free or Discounted Admission to Museums All Over the US

One of our road schooling resources has been regular visits to children’s museums, zoos, and science centers. We get into most of these places for free or at a steep discount as a result of nation wide reciprocal programs. These reciprocal programs were an awesome find in our first few months of traveling. About a year and a half ago we bought a family season pass to our local Planetarium on a Groupon deal for $49. Best. Decision. Ever. Unknown to me at the time, the Clark Planetarium is a participant in the Association of Science and Technology Centers Passport Program (ASTC). Many science centers across the United States have opted to participate in this program and offer free admission to members. This is great for full-time travelers like us, because we tend to visit a lot of the cities where they are located.

In addition to science centers, the Association of Children’s Museums (ACM), and the Association of Zoos and Aquariums (AZA) also have reciprocal programs. They tend to be 50% off admission instead of free, but any discount is better than none if you are going anyway. Since we are typically in a city only for a few days, we have opted to participate in the ASTC, and the AZA programs. There are a few Children’s Museums that are on the ASTC list as well (Houston and San Francisco to name two) so that works out for us. Plus, we just don’t have time to do EVERYTHING.

Durham Museum of Life and Science_009

North Carolina Museum of Life and Science, Durham

How It Works

1. Buy a membership at your local participating ASTC, ACM, or AZA Museum. Utah, or Salt Lake City, more specifically has 5 ASTC museums to choose from. Most bigger cities have only 1 or 2. We started out with the Clark Planetarium pass, and then when we came up for renewal, we chose Thanksgiving Point because we will be spending a couple of months in Utah this summer and its my favorite museum. We also have a pass to Hogle Zoo which is a member of the AZA reciprocal program (both passes, indecently, bought online and mailed to us as we were out of state).

2. Use the Program List to find other participating museums where you will be visiting. I tend to star these on our Google Map so I know its something I want to visit when we are in the area.

3. Bring your membership card and ID to the out-of-town museum for free admission. There are times I’ve forgotten my membership, but was able to call MY museum on the phone, hand the phone to the out-of-town museum employee and have them verify my member status.

IMG_20131125_151419_1

Jacksonville Zoo, Florida

A few of things to note: The program does NOT apply to museums within a 90 mile radius of home. This includes both the museum you have a membership to AND your home address. I had this genius idea to buy a membership outside of Utah so that I could visit ALL of the participating museums when we got home. Unfortunately that wouldn’t work as they’d check my ID and see that I actually lived there. So disappointing.

Free admission doesn’t generally include extra exhibits, IMAX shows, simulators, parking, or other expenses.

The BIG museums are generally not on the list. Indianapolis Children’s Museum, the San Diego Zoo, and the Monterrey Bay Aquarium are notable absent.

Science Centers , Children’s Museums, and Zoos are a fantastic way to entertain my kids for the day. Most of the time, we will spend anywhere from 2-6 hours exploring. To see a map and my thoughts on the ones we have visited, visit my Pinterest Map.

IMG_3748-Edit

Perot Museum of Nature and Science: Dallas, Texas

We love visiting places designed to teach and interest kids. Our kids love to set out and explore and find the hands-on exhibits. If you have kids and travel, having these passes will save a bundle!

Links:

Association of Science and Technology Centers (ASTC) Travel Passport Program List
Association of Children’s Museum’s (ACM) Reciprocal Network
Association of Zoos and Aquarium’s (AZA) Reciprocal List