Categories
Hiking Most Popular Posts Outdoor Adventures Tips & Tricks

6 Tips for Helping Kids Hike Without Whining

6 Tips to Help Your Kids Hike Without Whining! We really struggled with this for FOREVER but things are finally getting better!

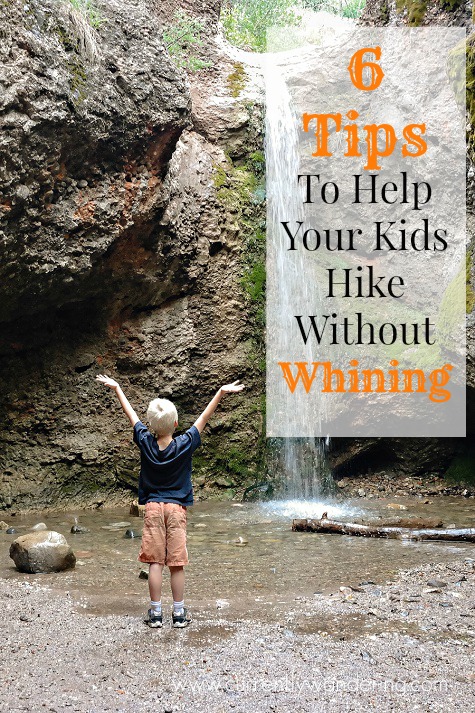
I’m ready for my kids to be long distance hikers. I realize they are still little (8, 6, and 4 years old) but I MISS hiking. Pre-kid and even when Rachel was little and would fit in a backpack, we would take a Saturday and do 8-13 mile hikes OVER mountain passes. It was glorious. Even better will be the day when they can go backpacking, as that is definitely our favorite way to go camping.

That said, we are starting small, but I feel like its a good time to start. Lately, our hikes have been maybe 1 to 1.5 miles tops including lots of whining from the kids about how hard it was, how tired they were and everything in between. As we started prepping them for their first 5 mile hike in Great Basin National Park we decided to try a few things and luckily for us, a lot of them worked! Time will tell how these play out and maybe in the future we’ll be able to add more items to this list!

1. Prep them beforehand. This was huge. I don’t think we had ever sat our kids down and said, “We are going to do a long hike. Its going to be FUN. We LOVE hiking and are excited about it. We know you guys can do it and we expect you to without any whining”. Cara loves to hike with me, but she knows that I will get frustrated and walk away if all she does in whine. She has to be mommy’s HAPPY hiking buddy.

2. Snacks with a goal. Bring some snacks that they love. Recently I discovered a granola bar recipe that everyone can’t get enough of. We brought some with the stipulation that we got to eat them when we got to the top. We had other small fruit snacks and other things that we spaced out along the way, but that was a HUGE motivating factor for them.

3. Bribe them. We recently started a new chore system that involves the kids earning tickets and then being able to redeem them at the family store on Monday nights. They get 1 ticket per happy hiking mile. Sam and I use Endomondo or a step tracker so we know how long we have hiked, and the kids know they only get tickets if there’s no whining. Andrew, cleverly, even negotiated for 2 tickets per mile for any hike 4 miles or longer. Sneaky little guy. There have been times where the two oldest earn more tickets than Cara because she had a particularly loud tantrum in the middle of the trail.

4. Play Games. This doesn’t always work, but occasionally we get a good 30 minutes out of playing I-Spy with the kids. Someone will start and then whoever guesses what they are spying gets to go next. Since a lot of the places we hike are either Red Rocks, or trees & dirt we generally include clothing, shoes, and anything super small on anyone hoping no one will guess it.

5. Listen to Music. Maybe this totally contradicts enjoying nature, but it really works for us. We don’t listen to music the whole time, or if there’s ever anyone near us on the trail as we don’t want to ruin their experience. I pull up the Frozen soundtrack on my phone and just carry it in my hand while we walk along. All the kids sing along (okay, I was singing too) and it lasts us a good 45 minutes on some of the steeper sections. Totally helps pass the time.

6. Have a destination. This one even helps me. If we aren’t hiking TO something its a lot harder to motivate anyone up the trail. There needs to be a lake, or a glacier, or something interesting at the “top” whether the trail is a loop or an out and back. If the trail is varied enough maybe this one doesn’t matter as much, but when we are just hiking through trees it gets a little tedious. Knowing there will be something to look forward to keeps them moving.

For many people, especially kids, learning to hike long distances is a mental exercise. The biggest obstacle that we encounter is boredom. Once they are bored, the whining starts. Finding ways to occupy their minds and keep them distracted as we hike has been our greatest success! Physically I believe they are capable, but mental training tends to be a bit more difficult. We are hoping to make a lot more progress this summer as we continue to travel!

Categories
Most Popular Posts Night Photography

Night Photography Beginner Basics: The Gear

The Night Sky can be a beautiful thing, and long exposure nighttime photography can expose that beauty to anyone with the right (affordable) equipment. As complete beginners in this area, we thought we could share what we have learned as we enjoyed a week in Bryce Canyon recently and spent a few of our nights there capturing the beautiful Milky Way. What started as one post on the topic became very long, and so this is the first post in a series about celestial photography. We’ll include tips and information, mixed with the beautiful pictures that we captured during our visit.

To get the topic going, let’s talk about the gear that you’ll need to get started.

Camera

You’ll need a camera that allows you to set manual settings, and ideally has a connection for a cable release. Most Canon / Nikon SLRs work, and you may find plenty of others that do as well. Check out the Canon 5D Mark III or the Fuji X-T10.

16-35mm lens

Wide angle lens

You can use a longer lens for shooting stars, but you will be happier with a lens in the 16 to 32mm range. This is particularly true if you have a cropped sensor on your camera. In general the wider the better. This Canon 16-35 mm f/2.8L II USM on Amazon is a great one!


Cable ReleaseCable Release on Amazon

A cable release isn’t strictly required if your camera allows you to set a long exposure in the 12 to 30 seconds range. I’ve found that a cable release is still useful for a few reasons, and they are not very expensive. A cable release can minimize camera shake, can offer more settings options then the camera itself, and can often serve as an intervalometer for time-lapse photography work. The cable release that we use cost less than $20 and runs on two AAA batteries.

7155unjkrBL._SL1500_Tripod

You need a good tripod. It must be sturdy and allow you to point the camera in all sorts of odd angles. A ball-head on top of the tripod is common, and allows plenty of high angles. Some tripods allow setup very close to the ground. This can be very useful when composing an image with trees or rocks in the foreground of the image. As you might be hiking to your photography spot, a reasonably light tripod is nice as well. We use a Dolica tripod purchased from Costco, very similar to this one available on Amazon.

Something Heavy

Most tripods have a hook directly under the center column that allows you to hook a weight to add to the tripod stability. In most cases, your camera bag or a backpack can serve nicely in this function. A stable tripod will minimize any camera movement that will blur a long exposure.

Clothing, Food, and a Friend

Since you’ll be going out at night, I’ll also mention that you’ll need good temperature appropriate clothing, good shoes, a few flashlights, and some food and drink. Having a friend along is both fun and can help you get some amazing pictures with their help.

In our next post in this series, we’ll talk about camera settings so stay tuned!


The Milky Way really does look like this! Check out our basic beginner tips for capturing the night sky. 01

Categories
Most Popular Posts Selling Our Stuff

Top 10 Reasons Its All Worth It

We closed on the selling of our house last month and then promptly wrote out a rent check so we could stay and finish up some work projects and other commitments. Kind of strange to be renting our own house, but it worked out for the best so we can’t complain. Most importantly, we are mortgage free!! We all have mixed feelings about this: Cara is still insistent that we sell the Airstream and move the house to a campground; Rachel and Andrew will miss their friends and all the great memories we made. I will miss our garden and the flower beds I so painstakingly put together. Sam has had a great work space in the garage. We’ve definitely called this pile of brick & mortar our HOME. It will be missed. A lot.

At the same time, we look forward to new adventures. There are many reasons we made this decision, so I thought we could detail out the Top 10 Reasons Selling Our House and Almost Everything In It To Travel Full Time is Worth It. Ready? Here we go:

1. Not Stuck In One Place All the Time

This is only advantageous if your are not a “nester”. Apparently we aren’t one house/one neighborhood kind of people. We like new and exciting places and don’t mind a continuous string of new experiences. My brother, on the other hand, loves to come home to his bed, his house, his normal life after a vacation. Totally fine, just not our style.

2. We Get to See Each Other ALL Day

Once again, this definitely can have its up and downs. Generally its pretty up though. In the few short weeks we’ve been at the “Lehi house” (as my kids have dubbed it) I rarely see Sam. We get to the end of the day, and I feel like we haven’t spoken or seen each other at all. My kids are always off playing with friends and we just have less family time. It makes me sad as we’ve grown accustomed to being in each other’s space and we LIKE it. Crazy, right?

3. Small House, Big Backyard

We couldn’t afford the real estate to give us this kind of acreage. Our backyard is ever changing, ever exciting. Mountains, beaches, desert, trees! We get to have it all, right outside our door. Yes, our house is small, but we try not to spend too much time in it anyway.

4. Education for our Kids

I can’t even begin to imagine the types of things our kids are learning without even realizing it. I imagine that years into the future we will still be reaping the benefits of their on the road education. Real life experiences in historical places, plant identification, geography, and just learning about our amazing country in general.

5. Piles of Nature

I have always been a tent camper. Growing up, we’d love to go spend time in the “great outdoors”. I still love it. Yes, its a little dirty, there’s generally some bugs, but how beautiful! We get to explore, admire, and travel in this beautiful land that our Heavenly Father created for us.

6. Jr. Ranger Badges

These have certain bragging rights. I love watching my kid’s hats fill up with shiny gold badges. Its so fun to see others’ responses when they wear them around the National Parks we visit. A lot of them take work (some are easy) and I’m super proud of my kids for working so hard to earn them.

7. Seeing Friends & Family

We love visiting people!  We have many college friends scattered all over the country, and its been fun to visit as we travel through. Between those friends, photography friends, and family we have plenty of people to see. Prior to traveling full time, we rarely made it to see many of them because of the logistical difficulty of getting there.

8. Making New Friends

Even though they only get to play for a day or two, my kids are really good at making new friends. They waste very little time being shy, but rather they jump right in and start playing! I’ve also enjoyed the many people we’ve met in various campgrounds, National Parks, or other places.

9. Decide What Is Really Important in Life

Packing up our life into a small storage unit really has forced us to decide what’s important. Not just what kinds of things we want because they are convenient, but what we really can’t live without or replace. We also made the decision that spending time together and traveling is more important than dance class, or soccer, or any other activities our kids could currently be doing.

10. Intentional Living

We’ve written about this before, but we can’t get complacent. I love it. I love being forced to choose every day what we are going to do. Yes, we still have the occasional lazy day, but those are few and far between. Most days we are intentional deciding where we want to go, what we want to see and how we want to spend our time.

We love traveling and the benefits its had on our family. We know its not forever, but we’ll enjoy it while it lasts!

Categories
Bedroom Remodel Most Popular Posts

Airstream Remodel: Queen to Twins Part 2

In Part 1 of this post, we removed most of the queen, , and cut the bottoms and the tops of the beds to fit the space we needed. Now, to build the rest of the beds! Before we dive in, please enjoy this shot of me looking manly at the miter saw.

Queen to Twin Part II_009

We were very lucky in this project to have my Father, Paul, out to help for a few days. He modified a needed trip to Salt Lake City to squeeze in some help for us, and we are grateful! The project progressed much better, and faster, then it would have without his help.

Our first order of business was to cut the vertical supports for the beds. We used 3/4 inch prefinished maple plywood for these pieces. We cut out the main supports for both sides at the same time, batching parts of the process where it would help. Our plans involved several notches to allow for trim, support in the front corner, and the hinge of each bed.

We removed the centers of each support to save weight, and the savings added up. I weighed the removed centers, and it was roughly 50 lbs of weight that would NOT be added to the Airstream. The removed middle weighed more then the surrounding piece! I relied upon the engineering knowledge (and extensive experience) of my Father to leave the right amount of material to provide the necessary support. The straight lines of the middle pieces were plunge cut with a skilsaw, and the corners finished with a jig saw. We routed the inside edges to make storage access a little less sharp.
Queen to Twin Part II_001
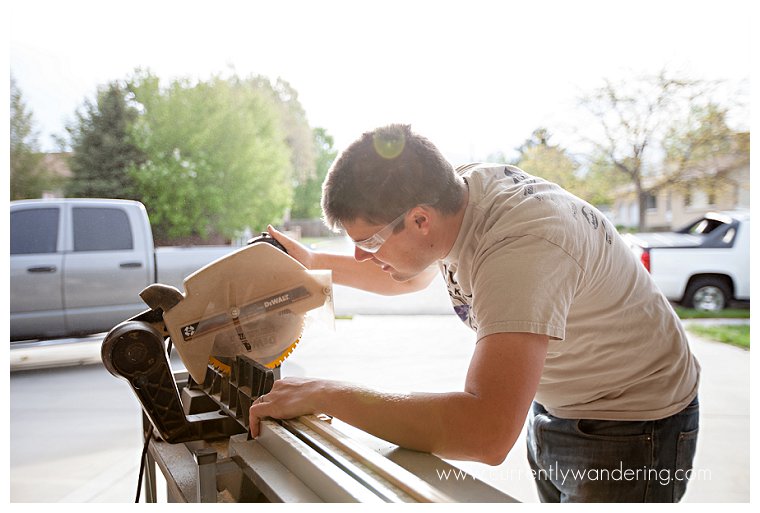
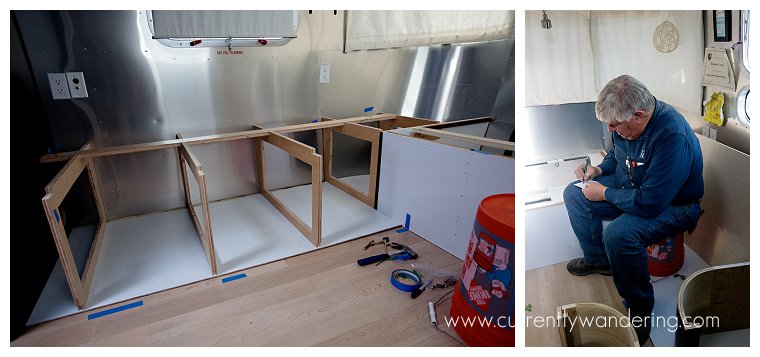
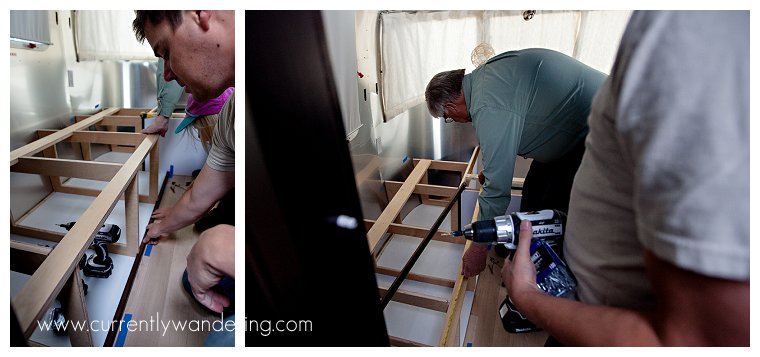
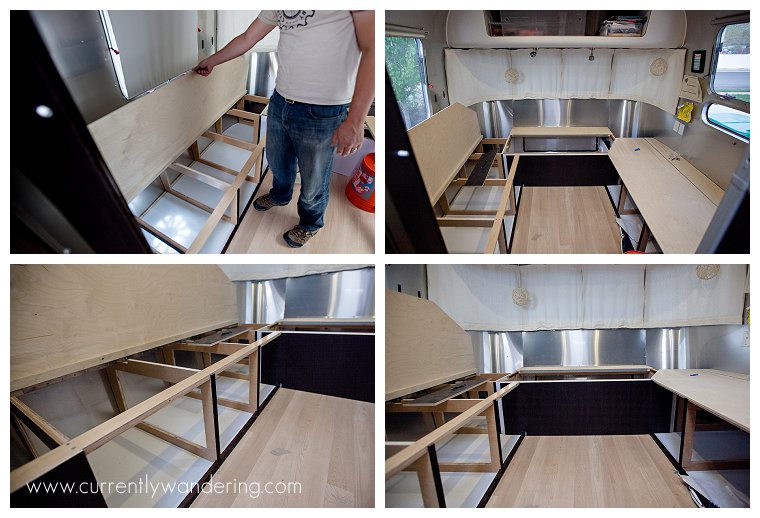
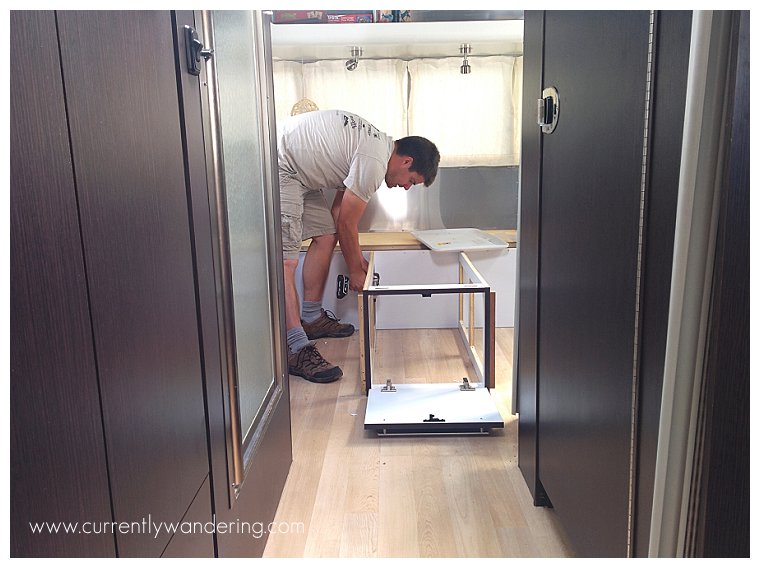
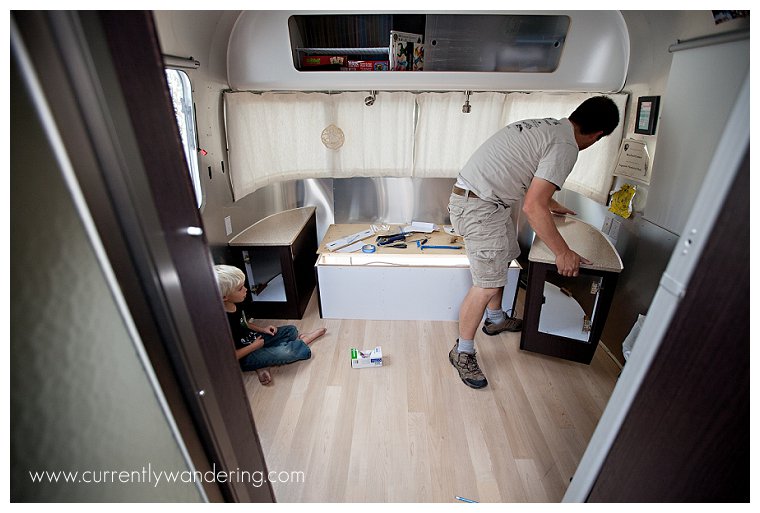
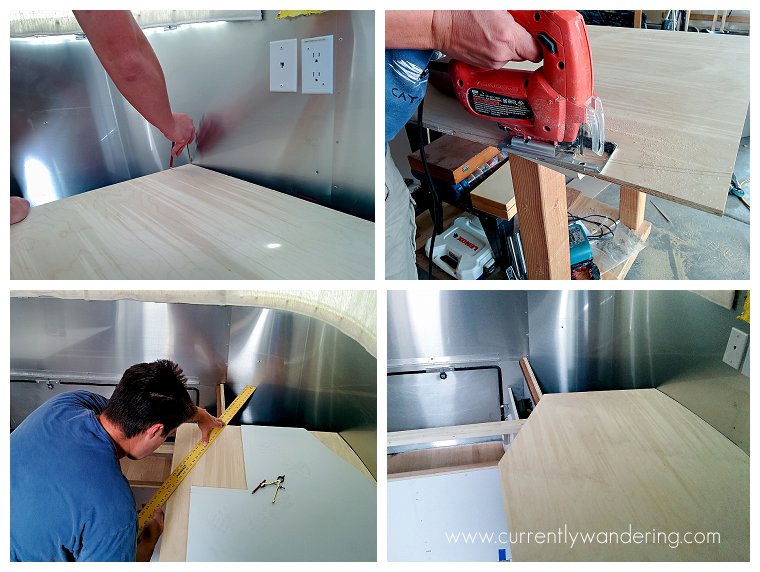
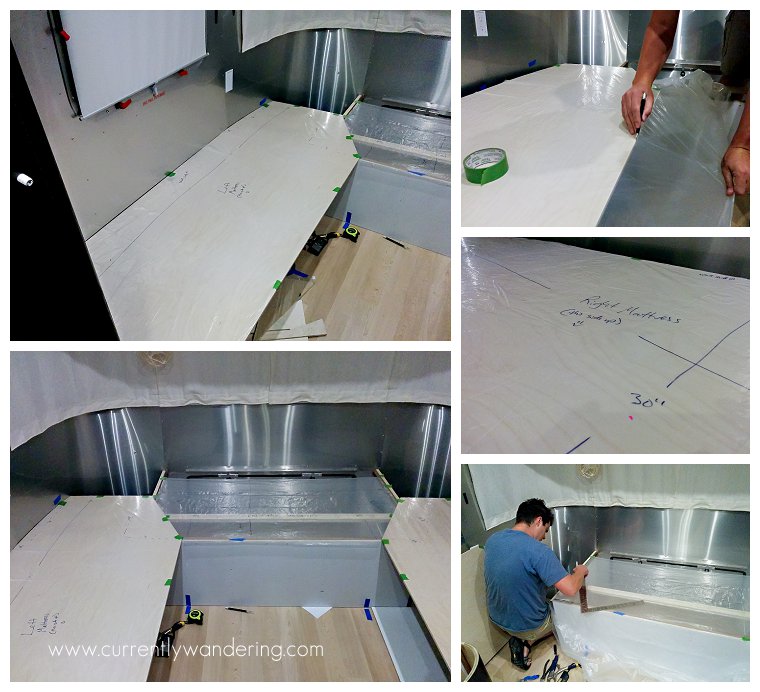
Custom work requires lots of custom fitting. We scribed and cut the back of each piece to fit the curve of the Airstream. Note the blue tape visible on the leftmost support: each piece was fit and placed in order. You can see a temporary support attached where the bed hinge will be placed, as well as the empty front notch of each support.

The beds were formed by attaching the bottom 1/4 melamine to the vertical supports with screws. This allows the entire unit to be carried in and placed in the right spot as a single unit. This picture was taken during a test fit.
Queen to Twin Part II_006

In the middle of our workday, our previously ordered mattresses arrived. Each mattress was ordered the right size and shape to fit into it’s place. The mattresses arrived with all the air removed. As we opened the packaging, the foam began to expand to it’s proper shape and thickness.

Queen to Twin Part II_010Queen to Twin Part II_011

We spent a little more than minimally necessary, and bought a three layer mattress: memory foam, air foam, and then a sturdy foam on the bottom. I’m sure they have more formal names, but that’s what we are going with for blogging purposes. They are comfortable, and we like the zippered covers they came with. The mattresses were purchased from mattressinsider.com and cost roughly $900 for all three, custom cut from our previously made templates, and shipped. As a side note, we are extremely happy with this company. They have great customer service, walked Jess through all of our options and made recommendations. They even saved our templates should we want to order custom mattress protectors or sheets!

Queen to Twin Part II_014

We decided in the middle of the first day that some trim would finish out the job nicely. I had planned on using some gel stain on some oak or poplar to match the wenge interior (dark wood) on our International CCD Airstream, but hadn’t done the purchasing yet. We took a break and drove up to MacBeath Hardwood in Salt Lake City an bought a 5 foot piece of 4/4 wenge to use as trim. At over $22 a board foot, wenge is not cheap, but you’ll see later that it was worth it.

Working that wenge was a joy. We cut off just the segments we needed (note the DARK sawdust on the garage floor) and planed it down to the desired size. One coat of finish was all it needed, and we let it dry overnight.

Queen to Twin Part II_003

The next morning, we began the final assembly of the first bed, including cutting and installing the lower trim piece you see in the picture. This piece hides the front edge of the 1/4 melamine bottom, and sticks up enough to prevent the storage bins from sliding out from under the bed while towing.

Queen to Twin Part II_008

The bottom trim was secured with finish nails and brads, both through the bottom and into the 3/4 vertical supports. You can also see here that we had finished the mdf bottom of the 1/4 melamine as a moisture prevention step. Time will tell if that was enough.

Queen to Twin Part II_018

After the first bed was in place, we made quick work of the second bed for the other side. We cut and mounted the hinges to the 3/8 baltic birch plywood bed top, and secured them in place. The back of the bed top was secured to the vertical supports to hold those corners in place, and the front corner was supported with a strip of 3/4 maple. In addition to the bottom trim, each 3/4 vertical support received a piece of wenge trim to hide the front edge of the plywood.

The last major piece shown here is the covering of the white panel you see in the first picture, just behind the orange bucket. That melamine plywood was part of the original queen, but that piece was under the middle of the bed, and not visible. It was glaring white and ugly. When we removed the queen, we removed the end tables as well. Each end table had a section of wenge veneer plywood that we reused to cover the end. We cut the usable sections of the plywood, then used biscuit joints (unglued) to align the edges together. We screwed those panels in from the inside of the storage compartment. The seam between the two panels is nearly undetectable, and the finished effect is perfect.

Queen to Twin Part II_022

Between the wenge trim on the beds, the wenge panels at the end, and the relocated heater vent (not shown), it is very difficult to tell where the original work ends and the rework begins.

You’ll notice that the beds in the pictures do not yet have gas springs as a lift assist…. because I have not yet installed them!

Continue reading Part III!

Categories
Bedroom Remodel Inside the Airstream Most Popular Posts

Airstream Bedroom Remodel: Queen to Twins, Part 1

Within  a day or so of returning home, we started our largest Airstream Project Ever. We are pulling out the queen bed, and replacing it with two twin beds and a toddler bed, leaving the walking space down the middle.

We got the party started by removing the queen bed. The bed itself is screwed into the floor in a few places, and then just screwed together. It all came out pretty easily after you find the screws.

IMG_20140412_115319_1

We left the back part of the queen bed in place as a foundation for the toddler bed at the end. We also removed the end tables, as we have plans to better use that space. With the bulk of the bed removed, it felt oddly spacious back there.

Airstream Remodel_001

With the space cleared, it was time to start planning. Also, Andrew was able to fit through the tiny gap between the hinge and remaining support.

Airstream Remodel_002

We needed to order mattresses as soon as possible, so I used the removed pieces of the bed as a spacer to prop up the plywood, then cut and fit the new bed top to fit the curves of the Airstream. We are using 3/8 baltic birch plywood for the tops of the bed. At the front (hitch end) of the trailer, the twin beds will meet the toddler bed at the corners. The mattresses will be cut at an angle to fit together.

Airstream Remodel_004

We researched mattress companies and options, and found one that would give us good quality multi-layer mattresses. After describing the shape we needed, they recommended that we cut a layer of plastic to the shape and size we needed. We cut and marked the mattress sizes, and sent them off in the mail.

Airstream Remodel_011

The remainder of the work will be done over the next few days, as we build in the rest of the beds and storage space underneath. Stay tuned!

Continue reading Part II!