Categories
Musings of Sam

Ditching Suburbia

blog-dsimageWe were recently interviewed by Michael Boyink for his Ditching Suburbia project, and our conversation has led me to a few realizations about our town travel and our motivations to travel.

Many of the travelers that we know, and those interviewed for the same project came to travel because of their dissatisfaction with the typical ‘suburban’ life. We were not unhappy with our life in Lehi, and nothing there ‘drove’ us away. Our desire for travel came by observing what travel did for our family on smaller, more typical trips. In the summer of 2012, we spent 5 weeks away from home on an extended vacation. Our experience opened our eyes to the flexibility that we had, and led us to consider what we could gain for our family with such flexibility. Those thoughts led to a small working vacation in Colorado over New Years at the end of 2012, and ultimately to an extended house-swap in Virginia the second half of 2013.

Our drive to Virginia took 18 days, and again opened our eyes to the effects of travel upon our family. It wasn’t a dissatisfaction with normal life that led us to travel, but a realization that there was something better. Typical suburban life seems to fit the needs of many. What I think is most important is that folks find what works best for them, instead of adopting a lifestyle simply because it seems to be what everybody else does.

I’m excited for the Ditching Suburbia project, and I’m looking forward to seeing the results!

As a side note, we have been following the Boinks on Instagram for months (and they us), and it was amazing how well we have come to know fellow travelers without actually meeting up with them. Social media can be a time suck and should not be a replacement for real-live human interaction, but it has been a powerful tool for us. Seeing both the adventure and struggles of other travelers has given us hope, courage, and even a warning here and there.

Categories
Night Photography

Night Photography Beginner Basics: Light Painting

Night Photography Beginner Basics! How to Use Light to Make Your Images Even Better!

Beautiful Nightscapes usually have some foreground elements. This can often be a silhouette, but being able to see elements in the foreground can be very helpful as well. One of our favorite images capture in Bryce National Park was enhanced with some light painting. Consider both images, and see which you like more.

IMG_7735-Edit

Foreground Subject

You’ll need to choose what you want to light in the foreground of your image. In this image, we lit the rocks, but dead trees, barns, or even people can make interesting foreground subjects. You will want to compose your image so that your main feature of the foreground (rocks, trees) doesn’t block the main feature you are capturing in the sky. If you are including the Milky Way, make sure the foreground works well with the sky for a great image. It will frequently be impossible to re-arrange your foreground objects (if they are rocks and trees), so you’ll end up moving your camera to change your composition.

Light Source

The light source you use doesn’t have to be large. Remember that you’ll be doing a long exposure. The light you cast on an object has time to accumulate. You can use nearly any flashlight, light panel, or even a strobe or speedlight triggered manually. The key is that you want the light to diffuse and spread. A tightly focused circle of light can be difficult to paint with, as some areas will be too bright and others too dark. Our favorite light source (and the one used for this particular image) is a rather cheap LED panel light. We have two of the NEEWER panel lights (though only one was used for painting), though I might buy some YONGNUO LED panel lights if these die. Both lights are in the $30 range, and include some diffusion filters to change the color cast.

We used these lights handheld and hand operated for painting. They cast a bright light when all the way on, and have a variable output.

Painting Time

The painting on this image was actually done in two separate pieces. The right side of the photo was painted first, at a length of about 7 seconds. Then I turned off the light, and moved further up the trail and painted the left side of the image from the side, for a length of about 2 seconds. During my time painting, I usually move the light around to create softer edges and wrapped lighting. For the left side of the image, I didn’t have much time to move it around because of the short time it was on.

When you light paint by hand, you can control how bright your light painted objects are by leaving the light on for longer or shorter, and also by changing the intensity of the light source. This takes some experimentation, and review of the image. First, figure out what length of exposure you need for your night sky, (see our Camera Settings post), and then try different light painting times and techniques to achieve what you want. You might often want to paint from a different location then the camera rests, which is best done with a friend. For this image, I was running the light around, and Jess was behind the camera. The distance between us was a good 100 yards or so, which made communication difficult. We were far out of cell range, but a couple of handheld radios would have worked well. We forgot ours, but won’t in the future. There was a bit of yelling into darkness (and echoing around the canyon) as we did our best to communicate.

Direct Painting VS Reflected Painting

There are two main methods of painting your foreground: direct or reflected. Direct lighting is accomplished by pointing your light directly at your subject. If you use direct light, try to diffuse your light source through a piece of plastic. Moving your light source around during your lighting time can also help to soften the light. When moving your light source, consider changing both the angle of the light AND the position. By moving the light from side to side and up and down, you can ‘wrap’ the light more softly around the edges of your foreground. Review your images to see how best to modify your technique.

The best lighting is often reflected lighting. In this technique, you will shine the light at a different surface, causing the light to reflect onto the subject you wish to paint. Reflected light is much softer, having been scattered by the imperfect surface. You will want to make sure that both your light and the reflection surface are NOT visible in your final image. This works best when you can position yourself behind a small hill or rock. You might even be able to stand behind the camera, directing your light at an out of frame surface to reflect onto your main subject. Be creative here! Every location and subject will require a new way of lighting.

In our image, we used both direct and reflected light. I first spent about 7 seconds reflecting light against rocks behind a small hill. That light reflected onto the rock formations opposite. The reflection both softened the light and helped it spread out over a large area.  During the reflected light portion of my antics, I was waving the LED light panel around quite fiercely.

The left portion of the foreground received no light from my first paint, being closer to the camera then the other rocks. After my first paint, I turned off the light and (carefully!) ran around the corner in the dark. I then turned the light on for about 2 seconds to light that section. Reflected light will always require more time for a similar exposure, being more diffused and usually further from the subject.

Color Cast

Both of the lights linked above come with white and tinted diffusers. The white light is a bit brighter, but is quite cool. We actually used no diffuser for our first paint, and then attached the tinted diffuser for the second paint. The reflected light was bouncing off rocks that were brown and cream colored, and the light adopted the same tone via reflection. In our first attempts, the second paint cast a very cool light on the left side of the image. Adding the tinted diffuser to the second paint brought the color temperature much closer to that of the first. (We did further correct the color temperature in post-processing.)

Color casts can also be added by just about anything translucent and colored. Cheap kitchenware lids and plastic grocery bags are two commonly available items you can experiment with.

Wash, Rinse, and Repeat

I can promise you that you won’t get it right the first time. Light painting is an imprecise technique, and you will need multiple tries to get it right. Patience and good communication will yield some excellent pictures, and quite a few that are not quite right. Celebrate your successes, and continue shooting!

Categories
Faith

How to be welcoming at church

provo-meetinghouse-767805-print

Full-time travel as an active Latter Day Saint family provides us with plenty of experience visiting new congregations. Each week, we walk into a new building, meet new people, and visit new classes. We’ve had all kinds of experiences and we’ve learned a few things about effective ways to welcome people into church. Some of our suggestions are specific to the LDS faith, but I’m sure this can be easily adapted to the particulars of any faith.

Say Hello

Introduce yourself. There are plenty of ways for this, and you’ll likely find ways that are comfortable for you. “Hi, my name is Sam. Are you visiting today?” “I’m not sure I recognize you. My name is Sam.”

Introducing yourself is particularly easy if you happen to find yourself sitting nearby.

It is a fairly common practice in Sunday School and in Priesthood and Relief Society meetings to welcome visitors and ask them to introduce themselves. When this happens, it becomes easier for other members in the meeting to strike up a conversation. Leaders, please don’t forget this. If you’ve been talking to a visitor and are sitting by them, you might find it easy to introduce them to the rest of the group.

During the last 6 months or so, it has become a common practice for the Full-time Missionaries to greet new folks at the door of the chapel just prior to Sacrament Meeting. In one case, we even found ourselves being greeted by the Bishop as we entered the chapel. In these situations, I feel comfortable and at ease.

Guide Them

Visitors are not going to know where different meetings are held. This can be particularly confusing on 5th Sundays or other days with an irregular meeting schedule. Pointing out the location of Sunday School can take the worry away, and even encourage them to stay if they were unsure. If they have kids, point out the direction of the primary room. If you can, walk with them and show them the way.

Visitors unfamiliar with the meeting structure might not even know there are other meetings. Offering to help and guide can help them feel accepted. In one ward, a mother with kids approached after Sacrament Meeting, and asked if they could show the kids where the primary room was.

One time that is frequently forgotten is the transition to Priesthood and Relief Society after Sunday School and after Priesthood opening exercises. Often the next meeting is in the same room, but it helps to know. If you see someone new, or if a visitor is introduced, guide them to the next room after the meeting.

Invite Them

If you are aware of any activities in the following week, invite the visitors to attend. Even if they are traveling, they may still be in town. Even if they can’t attend, they will appreciate the invite. We’ve been invited to after church ‘linger longer’ meals, BBQs, and even service projects. Firesides are another great activity. If they have kids, they may also be interested in youth activities during the week.

You’ll notice that all of these points involve being brave and opening your mouth. It isn’t as difficult as you think, and the benefit you can bring to someone else’s life can be profound. As active members, we don’t depend on the welcome-ness of people at church to keep us coming back. For visitors of other faiths, recently moved-in families, or others returning to church after time away, a welcoming environment can be very encouraging and helpful.

Categories
Featured Destination Hiking National Parks Oregon Outdoor Adventures

Visiting Wizard Island at Crater Lake National Park – Oregon

Crater Lake NP_28

Our adventures can be pretty spontaneous. Sometimes that also means expensive, but the two don’t neccessarily go together. We arrived at Crater Lake National Park in the afternoon, pulled over into a longer RV parking spot, and walked over to the Mazama campground kiosk to check in. There was a bit of a line, so Jess grabbed the park pamphlet to peruse while we waited. Hiking suggestions, viewpoints, fun things to do, history of the park, and then we saw it. Boat tours of the lake.

“Babe,” she whispered. “We could actually go out onto the lake.”

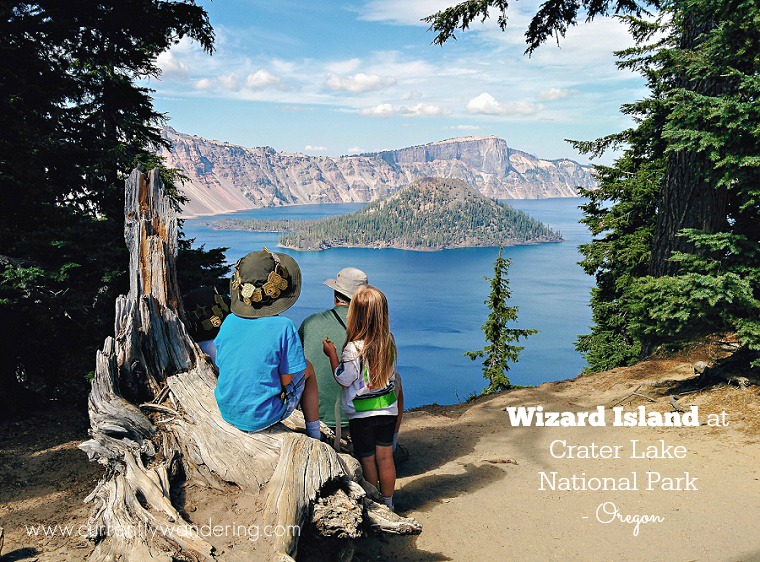
Not only onto the lake, but onto the island in the middle of the lake. Yeah, this was going to be good.

When We Visited: August 27-29, 2014
Ages of Kids: 8, 7, 4
Where We Stayed: Mazama Campground
What Was Awesome: The Wizard Island Boat Tour!
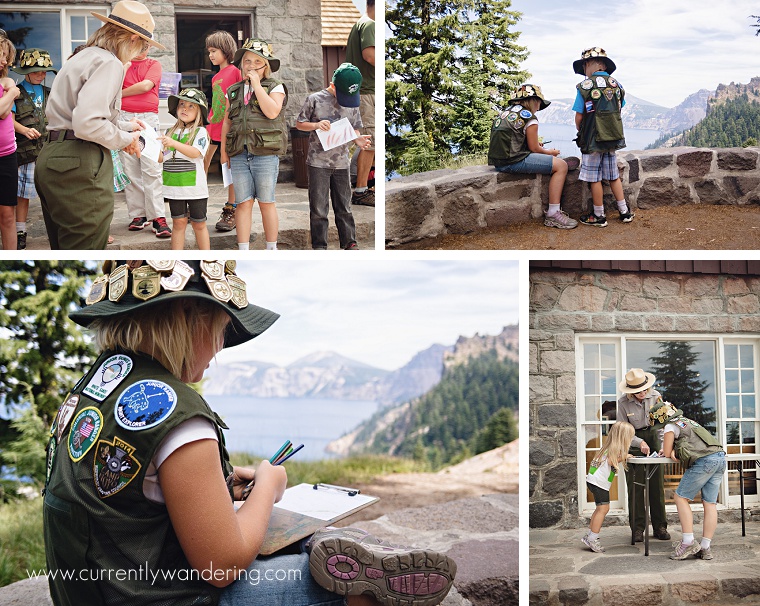
Jr. Ranger Double-Duty: This park has both a badge AND a patch. The badge we earned by completing the self-guided booklet as usual. The patch we earned by attending one of their Jr. Ranger programs led by a park ranger. It was super fun as the kids got to design their own Crater Lake postcards and mail them to friends & family!

Our turn in the line came to check in, and we secured our spot for two nights. A few circles through the campground loops revealed a few things. First, we were unlikely to reach the wifi from the lodge from any available sites. Second, it was beautiful. We found a nice pull through that would fit us, and then ignored the DO NOT ENTER sign and drove through the loop backwards to pull into the site. After some quick setup and dinner, we picked an evening hike.

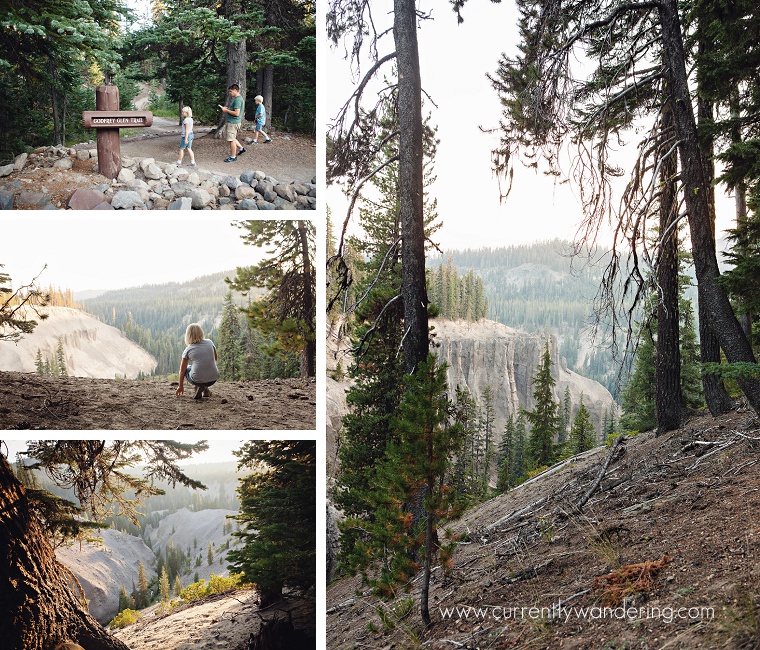
Evening hikes are one of our favorite evening activities. As often as we can, we find a place to explore for an hour or so between dinner and bedtime. We chose the Godfrey Glen Trail, a 1 mile loop trail only a few miles up from campground. We were entirely alone on the hike, and we find that to be both common and preferable for our evening hikes. The trail snaked through the forest, and over to the cliff edge where the soft pumice landscape showed some interesting erosion. Though the rock material was different, this reminded us a bit of a less vibrant Cedar Breaks National Park in Utah.

Crater Lake NP_02

The next morning, I woke up early and hauled my groggy self over to the lodge to get some work done. I found some empty tables behind the restaurant that were not in use, and set up for a work morning. The wifi was not zippy, but it was stable, and I my morning was good.

Jess and the kids headed up to the visitors center and rim for some exploring while I worked. After lunch, we all headed back up together for some exploring and a Junior Ranger activity. Jess had come back that morning all sorts of even more excited about the boat tours of the lake, and we decided it a worthy activity. I headed to the lodge to procure some tickets, and the kids set about coloring the landscape onto some postcards to mail to friends.

During our time at Crater Lake, we met so many people astonished at the number of badges the kids had earned. The kids were quite energized from the experience, seeing perhaps a glimpse of how rare and wonderful their experiences are. It was encouraging to Jess and I as well, as the journey and task isn’t always free from complaint and frustration.

Crater Lake NP_18

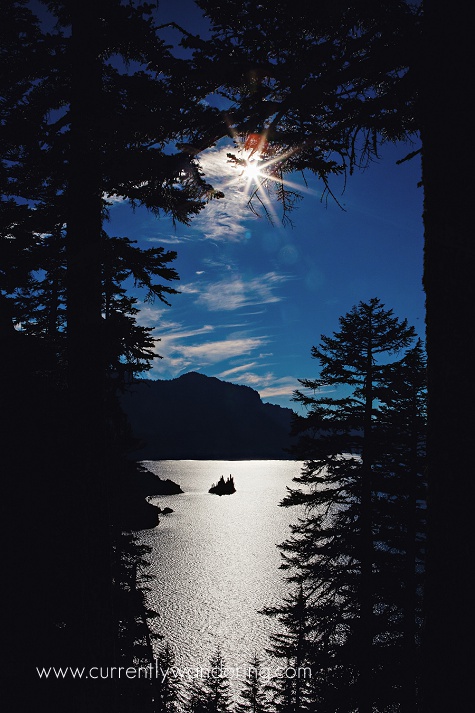
Junior Ranger badges & patches added to the collection, we headed out along the Rim Trail to Discovery Point. The water of Crater Lake is all snowmelt, and there are no above-ground exists. As a result, there is very little sediment in the water. The color of the water is an unbelievably vibrant blue, captivating us during our wander along the rim. Our hike was beautiful, and with the exception of one Cara meltdown, a relaxing hike. We were tired after the hike so headed out in the truck next, driving counter clockwise along East Rim Drive.

The highlight of the East Rim Drive was our stop at the Phantom Ship Overlook. The angle of the sun presented the Phantom Ship overlook in stark contrast to the glare of the sun. The rocks of the Phantom Ship are among the oldest in the entire area, and we managed some amazing captures during our stop there. Our view there was so spectacular that we remained unimpressed with the next few overlooks, and found a nice spot for dinner at the picnic area just past the Mount Scott trailhead.

Right there in the parking lot we discovered another rare gem: We have found and experienced the nicest, cleanest pit toilet that we have ever happened upon. It was so awesome, it got posted to my Instagram account.

Crater Lake NP_47

We rarely do ‘touristy’ activities when we wander, and even more rarely do we do expensive activities. This boat trip to Wizard Island cost over $200, but was worth it. Because of the boat tour, we needed to extend our stay by one night. I visited the campground booth after we returned from our drive, and was a little worried when the guy told me that he was all full that night, and couldn’t do anything till the next morning. Our boat trip was early enough that we would have nearly no time to pack up the Airstream and move it if we couldn’t get a spot. I fretted and worried but it turned out just fine. The lady at the booth the next morning extended our stay, and we took off around the lake headed to our tour.

Crater Lake_67

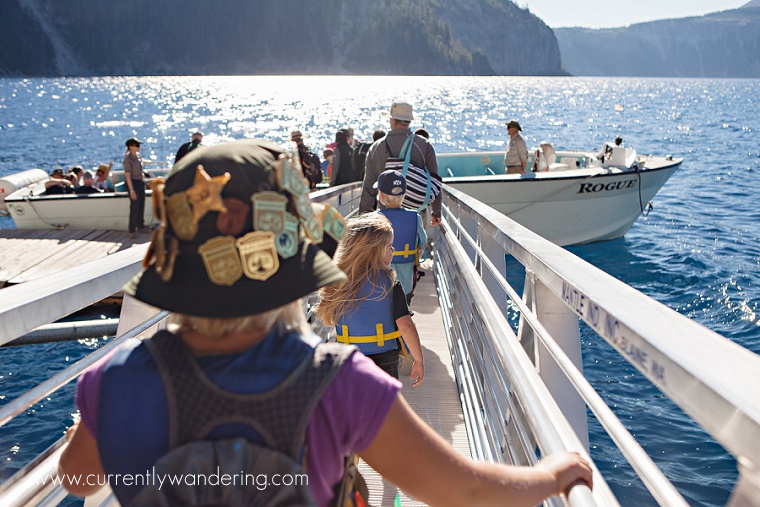
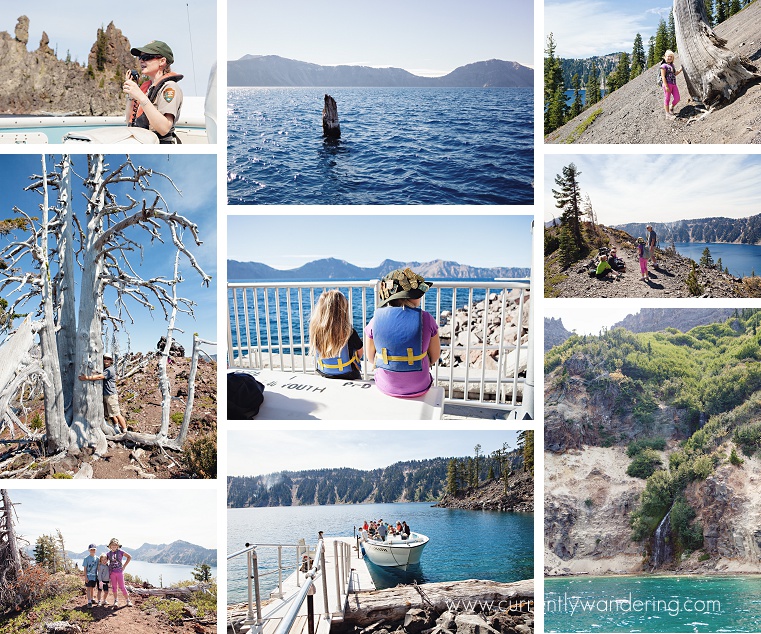
The boat tours leave from Cleetwood Cove on the north side of the lake. We hiked down the mile trail to the boat docks. Our trip included a ranger guided tour around the lake, which turned out to be quite fun. Our first stop was a visit to the “Old Man of the Lake”, a vertically floating log that migrates around the lake. It had floated into the beginning of our tour, giving us a rare chance to see it up close. The tree fell into the lake at some point long ago, with it’s roots wrapped around a large bolder. The bolder has since fallen off the bottom, but the log continues to float in it’s vertical orientation. Our ranger explained the geology of now gone Mt. Mazama, the mountain formed the the lost peak that covered crater lake. The peak collapsed into an empty chamber below the mountain after an eruption, forming the area now filled by the lake.

Our main stop on our boat tour was Wizard Island, a cinder cone that formed after the mountain collapsed. We had a few hours on the island, which we used to hike to the top and have some lunch. The sides of the cone were steep on the upper slopes which gave Rachel a bit of a fright, but we all made it both up and down.

We filmed a Wandering Update video on top of Wizard Island. Check it out on Youtube!

After boarding the boat, we made a few other stops, most notably circling the Phantom Ship. It was interesting to see up close, looking very much weather beaten and eroded after centuries of wear.

Crater Lake NP_103

The last leg of our lake tour was our hike back to the rim from the boat docks at Cleetwood Cove. The hike up took much longer than the hike down that morning. Andrew made a friend of an older gentleman and his wife, and proceeded to talk their ears off the entire trail.

Our time at Crater Lake was wonderful. We left tired, a little sore, and very grateful to have had such wonderful adventures. Jess and Rachel have decided that Crater Lake is their new favorite National Park, and there is little complaint from the rest of us.

Categories
Video Washington

Wandering Update: Pizza in a Train

We we left Alder Lake, we made another stop by the peach stand in Elbe, Washington. And then we spotted a pizza place in a train. Lunchtime!

We’ve started a series of video Wandering Updates posted on Youtube. Many will be featured here, but the best way to catch those is to subscribe to our Currently Wandering Channel on Youtube.