Categories
Airstream Accessories Outdoor Gear Photo Gear

Gear Review: Samsung NX300 Camera + 20mm f/2.8 Pancake Lens

Samsung Gear ReviewSome people are surprised to find that we have a smaller “point and shoot” type camera in addition to our 5D Mark II. We have this camera for multiple reasons, the first one being that it is hardly a typical “point & shoot”.

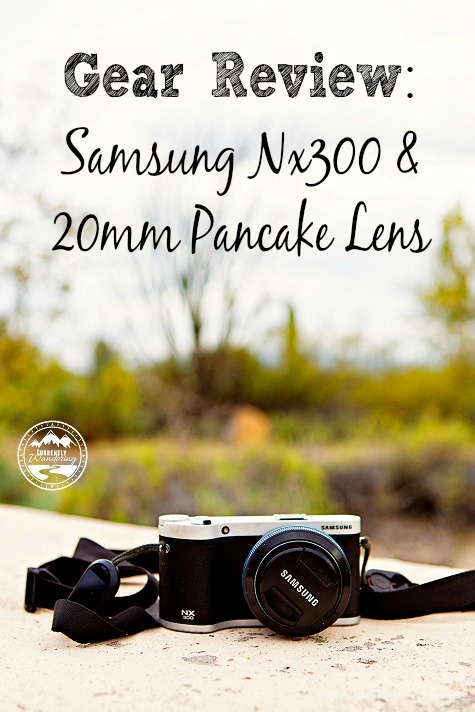
The Samsung NX300 is a 20.3 MP camera with smart features, interchangeable lenses, shoots RAW, and has a full manual mode.

For me, it has the power of a DSLR while being compact enough that I can slip it into my purse. I LOVE  the image quality from this camera, and can edit the RAW images right alongside images from my 5D Mark II no problem.

We bought the body only + the 20mm 2.8 pancake lens. It was a huge decision and I went back and forth for at least a week before deciding. In the end, we knew we wanted a replacement for our camera phones, not necessarily to replace the zoom of the 5D Mark II. On the Samsung’s cropped sensor, the 20mm just about mimics our camera phones. Plus, it’s flat and small which was another requirement.

IMG_3280-Edit copy

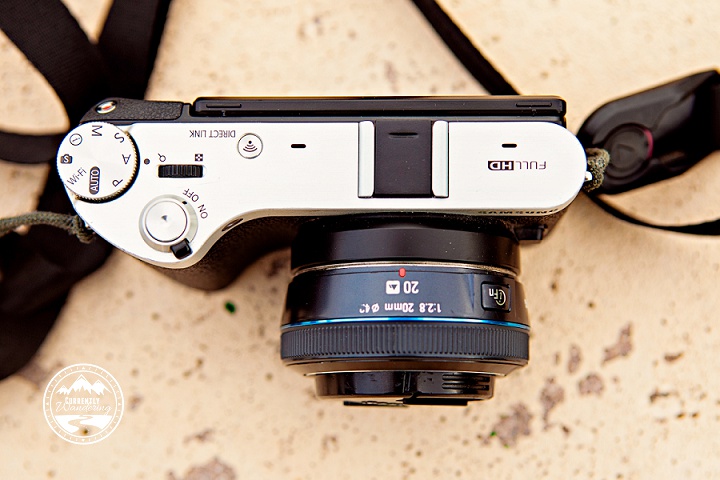
The Samsung Nx300 also has a built in direct link WiFi feature making it perfect for transferring images to our phones and then posting to Instagram. We bring up the app on our phones, hit the Direct Link button on top of the camera, and then select which images we want to send.

We leave the camera in RAW + jpg mode so that when I download images from the card I can edit the RAW, but we can transfer the JPGs to our phones for posting to social media. A little much? Probably. But then again, I am an OCD photographer. 🙂

The tilting touchscreen is also a plus, but our only regret is that it doesn’t swing all the way around for selfie photos. Yeah, maybe not that big of a deal, but I think Sam would do more of his YouTube videos with this instead of his phone if he could actually see himself while recording (you know, make sure he’s centered in the frame and all that).

IMG_3284-Edit copy

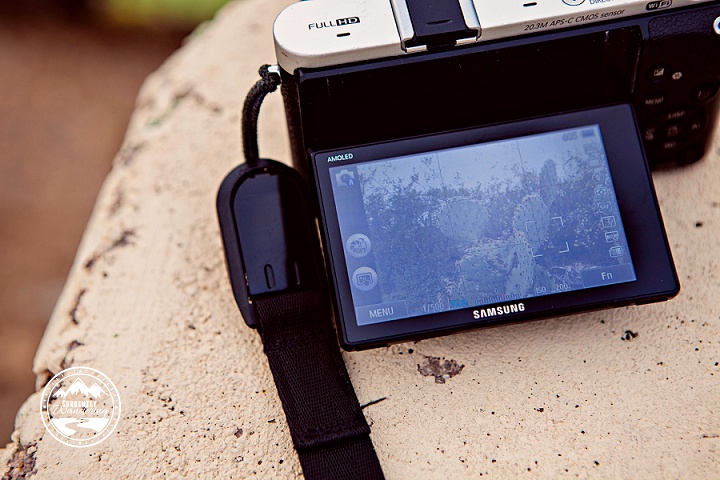
We also ditched the stock camera strap pretty immediately and use our Peak Design Leash strap exclusively. It’s awesome (if you get one for any camera, use code jcurren for 10% off!).

For those of you that feel you aren’t “professional” photographers, or don’t care to shoot in manual mode, the NX300 also has an array of Auto modes, as well as Aperture & Shutter Priority. We typically stick it in auto or even Program mode before handing it off to someone for a photo of all of us. Works great!

Example images:

Cascade Head Hike_13

For a small, lightweight, easy to use and powerful camera we love the NX300 and definitely recommend it for everyone!

Affiliate links to Amazon (you pay the same price, we get a few pennies for books):
Samsung NX300
Samsung 20mm 2.8 pancake lens
32 GB Micro SD Card

Categories
Airstream Accessories Solar & Power

Power Upgrade: Drop-in Multi-stage Converter Upgrade for the Airstream

IMG_20150128_113838
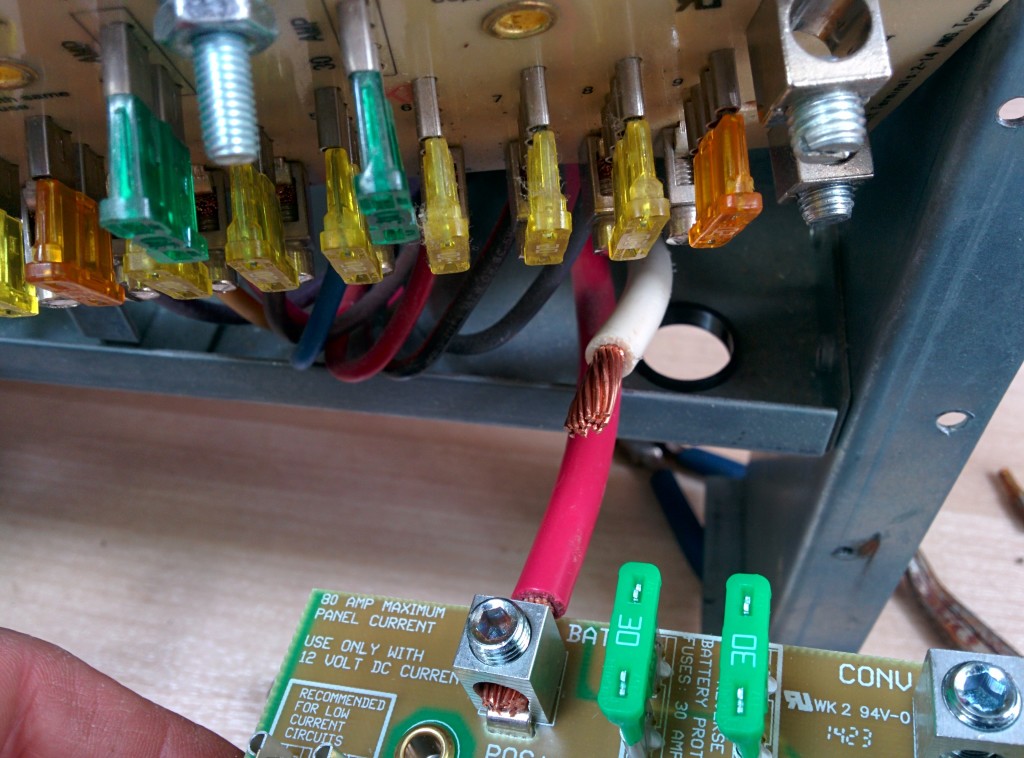
For some insane reason, our Airstream came from the factory with a single-stage charger. When connected to shore power (or a generator), the converter provides both 12V DC power to the Airstream, and also charges the house batteries. As a single-stage converter, it has only one mode: charge.

This single charge mode is neither fast nor smart. It takes a few days to charge the house batteries fully, and then will continue applying the charge, causing the flooded cells to boil and the electrolyte liquid to evaporate.

A bit over a year ago, I had replaced our two Group 24 flooded batteries, and in the following year, our lovely single-stage converter had boiled enough liquid out of the batteries to cause a significant decrease in capacity. I set out to resolve the issue, first with a new set of batteries, and then a converter upgrade.

Our Airstream came with a Parallax 7355 power center. The unit has both a converter in the lower section, and AC and DC distribution panels in the upper section. I found a new converter designed to be a drop-in upgrade to the converter portion of the power center. The Progressive Dynamics 55 amp (PD4655V) unit was the right drop in replacement. I found it first over at bestconverter.com, but I couldn’t get them on the phone to ask about shipping time. I ended up ordering the unit from Amazon (Prime Shipable!) and had it shipped to Heather and Jeff (AudreyAirstream) who lived nearby. (Thanks again!)

Installation

I didn’t install the unit till we were in Death Valley, where I pulled out my tools to do the drop in replacement. In hindsight, this was a bad plan. If anything went pear-shaped, the nearest hardware store was quite a drive. Nothing bad happened during the install, and it worked fine.

The back side of the power panel, with screws to loosen to allow slack in the wires.

I used only a screwdriver (with a few assorted tips) and a pair of pliers for the install. The instructions included with the new converter were pretty clear. I removed the old converter, and then moved all the wires from the old DC distribution board to the new DC distribution board. This was the most difficult part, because the old board had the connections on the bottom of the front panel, and the new board had the connections on the top of the distribution panel. Wrangling the huge-gauge wire was a little hard, but manageable.

The only thing I did different from the instructions was pull out the whole power center unit (only a couple of screws) so that I could loosen the clamp around the wires to the battery. With loose wires, I could manipulate them into their new routing path around the top of the board. Getting the new distribution board screwed back into place took some finagling, as I needed to get the wires positioned just right, and the large-gauge wire was difficult to bend.

Done

After finishing the wire connections, I reconnected the battery and started up the generator. It worked! The new converter board has a LED light on it which indicates it’s status. Constant means bulk charging mode, fast blink means trickle charge (last 90%), and a slow blink means float mode.

It is worth noting that the LED is on all the time, even if no AC is connected and no charging is occurring. For the past few weeks, the light has operated as my poor-man’s battery monitor, at least in the higher stages of charging.

So that’s all there is to it! For only $200ish, I have can reduce my generator time and avoid cooking my batteries.

Categories
Airstream Accessories Inside the Airstream

Airstream Accessories We Love – Jambox, Reading Lights, Wall Clock, Garbage Can

Accessories We Love

We’ve updated a few accessories over the past few months, and it’s time to share some of the changes we’ve made. These are all items that we use regularly and love. All links are affiliate to Amazon (where we buy A LOT of stuff). You pay the same, but we get pennies for our Percy Jackson addicted children to buy books. Total win-win.

JamboxJambox

The Airstream has a cool built in sound system that even came with an external speaker. The tech is firmly rooted in 2005, however. The remote speaker is Mono, and requires either an AC plug or a zillion D batteries. We ditched the external speaker for a Jawbone Jambox, and it serves the need nicely. This also saves the power draw of the main sound system in the Airstream. We’ve had other bluetooth speakers before, and nearly anyone would work. The rubber top and bottom of the jambox make it not slide around, because sometimes we get lazy and don’t put it away during drives.

garbage canKitchen Trash Can

Under the sink, there is a built in garbage can. Over the first few months of travel, we decided we didn’t like it, and Jess came up with this Simplehuman Brushed Stainless garbage can. We place it in front of the pantry drawers, and it is short enough to fit under the drawers as they slide open. And of course, it’s silver! This is also nice and stable during drives, as it lives on the floor. In the space opened up by not using the under-sink garbage can, we hide an electric heater, an outside tablecloth, and an athletic roll.

reading lightsReading Lights

Our bed reconfiguration left us without reading lights in convenient locations for the kids. We found some cheap reading lights as replacements, and they have been perfect. In addition to saving battery life while boondocking, the kids have better light and can read without keeping each other awake. Better yet, these were cheap, and we can stuff them with the same rechargeable batteries we already keep on hand.

41kDopNSqnLWall Clock

This clock was actually our first Airstream customization, way back in Virginia. The real magic of this clock is how I mounted it to the wall. I cut a piece of a plywood  to fit just inside of the round clock. I used command strips to stick this to the wall, and the clock friction-fits right to it! Battery changes are easy, and we’ve never had a problem with the clock while driving.

We did modify this clock by cutting the tick marks in half, and cutting the hand wands a little shorter to fit in the space above our television (you can kind of barley see it in this post here). We love it, and I’d buy the same clock again!

eneloop


Eneloop Rechargeable Batteries

Jess has over fifty of these AA batteries from her wedding photography days. We’ve had to add a few more Eneloop AAA batteries for reading lights, dream lights, toothbrushes, and other kid’s toys. They work great, don’t loose their charge, and store easy.


charger

Battery Charger

To go along with batteries we needed something to charge them with. Jess also picked this Titanium Fast 16 Bay Charger up from a photography friend, and it works great. You can charge the batteries one at a time and it holds both AA and AAA batteries. Best feature? It also has a DC plug so no worries if we aren’t plugged into shore power.


These are all some additions we’ve made since we bought the Airstream. You can check out the kitchen post here as well. Happy shopping!


Categories
Airstream Accessories

Airstream Gear: Getting Cranky

Our Airstream has 4 stabilizers that we used when parked to keep it from moving around. Many folks use a power drill and bit to run these up and down, but I prefer to assign that job to my kids, who don’t have enough chores anyway.

This leads us to the crank: stored in our bumper compartment, the crank is what we use each time we move. When we bought the Airstream, the previous owner included a swivel-head crank. Within a few months, the pin connecting the socket to the crank handle broke, and I replaced it.

IMG_20140910_191000

As full time travelers, we use our travel gear much more often than normal weekend folks. Tools used a few times a year by a normal traveler get used 50 to 100 times by a full-time traveler. Within a few months, the pin broke on the new crank, and I started getting cranky.

Finding a replacement pin turned out to be an exercise in frustration, as the pin was a custom part that was completely un-findable. I rigged a temporary pin by bending an extra allen wrench into place and holding it in place with some tape.

I ended up replacing the pin with a screw and nut I bought at the hardware store. I bought a 10 pack of each, and simply replaced the pin every 4 to 6 weeks when it broke. That was 10 months ago, and I just used my last screw and bolt.

I’m tired of the constant repair. The crank is otherwise in good shape, but if the stupid pin won’t hold up, it isn’t much use to me. I’ve decided to replace my crank with a non-swivel model, in the hope that fewer moving parts will also require less repair and replacement. The new crank provides less leverage then the old one, but I’ll be happy to deal with that if it remains in working condition longer than a few weeks.

Early reports from the kids (the primary crankers in this operation) indicate probable success. We’ll see how they do long term!

Categories
Airstream Accessories

Wake-up Time

SAMSUNG CSC

We’ve always kept a clock in the kids bedroom. When Rachel was little, we bought a digital clock and covered the minutes with a piece of black construction paper and some tape. We taught her what a ‘7’ looked like on the clock, and it became a rule that she couldn’t get out of bed till 7. We have maintained this rule, and we love it.

Moving into the Airstream presented a little bit of a challenge. We bought a similar small alarm clock, but it was AC powered. When we spent time boondocking, we rarely have the generator running, as nearly everything in the Airstream runs directly off DC power. For the first 8 months of travel, the kids had no clock, and everybody missed it.

I’m happy to declare that we found the PERFECT clock. It is battery powered and backlit, and always works, no matter where we are. The clock has a low-power backlight and uses sensors to turn off the backlight during the day. We don’t know exactly how long the batteries (2 AA) will last, but it has been a few weeks already with no trouble. We carry plenty of rechargeable batteries and a charger, so swapping the batteries is easy.

The kids no longer wander in at early hours to bug us. They usually just find a book and read till we all get up. Everybody is happy again!