Categories
Tow Vehicle

New Brakes – A worthy purchase

As we traveled north of Crescent City and across the border into southern Oregon, I began to notice some odd sounds from the front brakes. I knew the brakes were probably due for replacement, and I arranged for some work in Grants Pass, OR.

Finding a place for vehicle repairs is something I do very different on the road. At home, I had a regular mechanic, whom I trusted and did great work. If I needed specific work, he was able to refer me to someone he trusted. On the road, I have tended to visit and use larger chain suppliers for routine work. They are much easier to find, and I can return to any location for any warranty issues. My choice for the brakes was Les Schwab. As usual, the minor signs of wear belied the damage done, and the I needed new rotors in addition to the usual replacement parts. All told, I was just under $900 out the door for the work.

Did I overpay? Probably. But hunting down a mechanic or comparison shopping would have cost me time that I would have otherwise spent working. As I have no end to my current list of my projects, time spent working is worth preserving, even at a little cost.

Mostly, I’m grateful.

Brake problems are very serious when your rig weighs 15 thousand pounds, and we have driven our share of hills recently. Sometimes I catch a brief glimpse of the protection sent from on high to guide us and protect us in our travels, and this is definitely one of those times.

I’m sure that the increased hilliness of our travel accelerated the wear on the brakes, and I was unprepared and not careful enough to watch them. In particular, the wear on the front and rear brakes was about even, no doubt to the additional load on the truck while towing the Airstream. Regular vehicles usually need the front brakes replaced twice as often as the rear, but I suspect towing we will see more even wear.

In the future, I’ll be more careful and more watchful of my brakes.

Categories
Finances & Money

How Much Does It Cost to Live in an Airstream – July Summary

How Much Does It Cost to Live in an Airstream July Summary
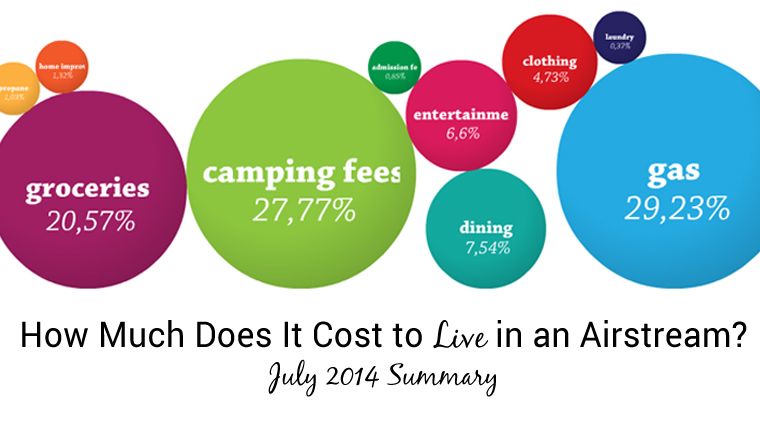
We are back to monthly summaries!! These are probably entirely for my benefit as I feel it provides some accounting for us month to month, but I figured we could share in the interest of anyone else that might be crazy enough to feel the information is useful.

We have officially had our first “full time” (no mortgage) on the road financial month. I feel like it was a good representation of what we expect this life to be like, and fairly similar to our last round of summaries that you can find here. We did eat at a few favorite restaurants and I was surprised at our dining out bill – but since I know we stayed within our overall budget we spent less on other things to balance it out.

I’ll detail a post later on about how I budget in general (because that’s not really Airstream life specific) but just know that these are not ALL of our expenses. Not even close. These are just the ones that are fairly Airstream specific. We still have health insurance, life insurance, entertainment expenses, loans on the Airstream and truck, HSA contributions, children’s savings… You get the idea.

But aside from all that, most people want to know what it’ll cost in the Airstream. The biggest differences for us are the camping fees, higher gas spending, higher groceries, laundry, and occasionally the higher eating out (only because we never really ate out before).

Here are the numbers. I thought the spreadsheet worked well so I’ll keep that but start over on our monthly average totals:

Spreadsheet for July 2014 copy

Categories
Airstream Accessories Daily Life Solar & Power

Wandering Wifi

During our first 6 month round of travel, I managed to keep connected with just a loose Verizon Hotspot, with service through Millinicom. When I say ‘loose’ I literally mean the hotspot was usually sitting on the table. I also had a Wilson SleekV 4G cradle booster, and a tiny magnetic antenna that I could mount in the window. I only pulled out and used the booster when I had a low signal.

After meeting Kyle and seeing his sweet setup, I decided it was time for an upgrade. Now that it is all installed, it’s time for a report.

Gear List

  • Pantech hotspot
  • Wilson Sleek-V booster cradle
  • PepWave SoHo (with DC power adapter)
  • 2 Roof mounted antennas
  • DC power distribution

Outside Antennas

IMG_20140610_113947
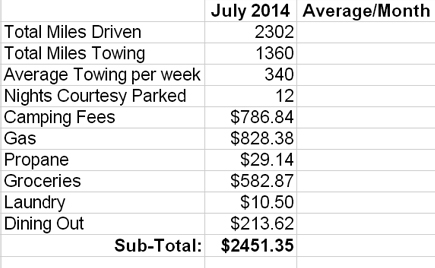
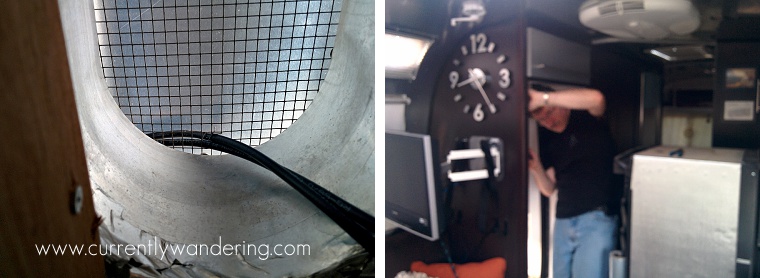
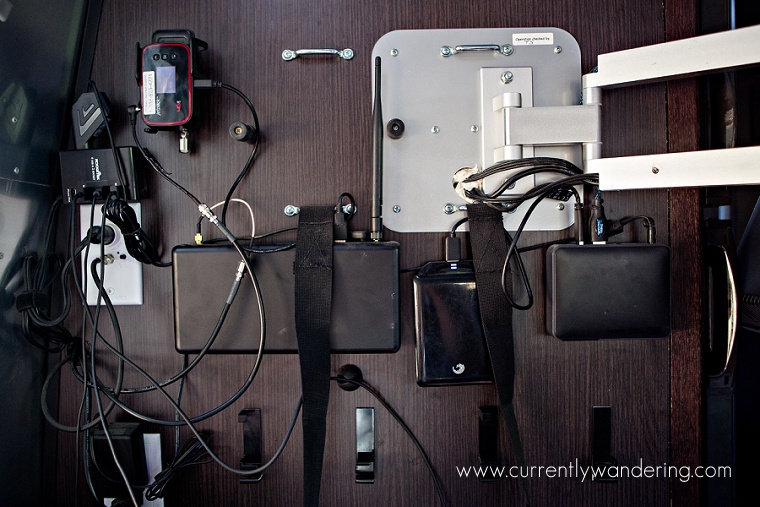
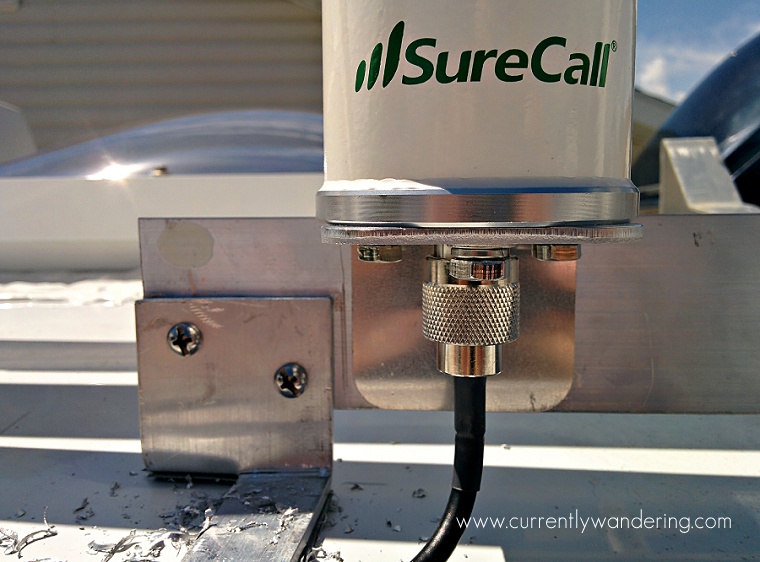
I wanted to mount the antennas on the roof, both to avoid the futz factor of an internal antenna, and to help the signal escape this faraday cage I call home. Kyle had his antennas mounted to his solar panels, but I didn’t have those yet, so I improvised. Using a piece of 1/4 by 2.5 in aluminum bar from the hardware store, I cut a horizontal piece and two ‘feet’ The feet were attached to the roof with outdoor adhesive tape, and the horizontal bar attached to the two feet and the vertical bar supporting the TV antenna. The new antennas were then screwed to this horizontal bar. Bolts with threadlocker were used on all connections. Using adhesive tape and the existing support for the TV antenna allowed a secure connection without drilling a mounting hole in the Airstream.

Cable Run

IMG_20140609_202953

Running the antenna cables took some thought. I ended up running them along the roof and down the vent above the fridge. To access the small area behind the fridge, I (with the help of my Father-in-law) removed the fridge. Removing the fridge mostly involves a hunt for the screws and bolts holding it in place. After those were removed, it slid right out. We set it on some cardboard on the Airstream floor while we worked inside it’s enclosure.

We were able to remove a thin wooden panel, cut a small hole in the mesh covering the fridge vent, and run the cable down the wall and out the existing hole behind the TV.  The antenna cables are 10 feet long, giving me just enough room to make it work.

Then, of course, we put the fridge back into place and reconnected it to the AC, DC, and propane. And it still worked! We ended up using some foil tape on hand to seal the back panel to the side walls, so you might want that handy if you attempt this stunt yourself.
Gimme The Power!

We now had some additional power requirements behind the TV. I found a DC splitter that also had USB ports in place, and this worked well. We have a 12V connector for the PepWave, and USB power connections for the booster cradle, and our two cellphones which sit in brackets to charge while we sleep.

The Pantech hotspot connects to the PepWave via USB, which provides both power and a network connection.

Industrial Strength Velcro

With everything hooked up and working, it was time to secure it to the wall. I used industrial strength velcro for this job, and it has worked very well. The velcro allows for things to be moved or adjusted, and has held securely while towing.

Amazingly, all this gear fits in the space behind the TV, making it nearly invisible unless you look for it.

Wandering Wifi - How We Get Internet While Traveling

And that, folks, is the wall of awesome.

Categories
Finances & Money

Baby Steps to Going Mobile: Start Working at Home

Baby Steps To Going Mobile - Start Working From Home

A friend asked me how I ended up with work flexible enough to allow for my travel. It was a good question, and one I’ve had before. Sounds like a great topic for a blog post!

I’m self-employed, working long term contracts paid hourly, and manage my own insurance and retirement, and I travel full time. The real tip here is to not make all those changes at exactly the same time. Prior to traveling full time, I was all those things minus the full time traveler. If you plan to travel (and are not made of money), then first find your way into flexible work. Many jobs allow working from home at least part of the time. Take the opportunity when you have it, and learn if remote work is for you.

A surprising number of full-time traveling (and full-time working) folks are technical in nature. I’ve not conducted a study, but among the circle of traveling folks we follow, most are in a technical field of some sort. If you can, find your way into such a field. You usually only need your phone, a laptop, and an internet connection to keep your work going (Technomadia recently wrote a great post about generating a mobile income HERE).

How do you land a job with so much flexibility? Be Awesome.

Now, I’m not AMAZING, but I do good work. I’ve been lucky to work with people that value contributions over warming a seat, and they have been willing to make me happy to keep me engaged there. One of my current clients would prefer that I was not traveling. My schedule randomness does cause some inconvenience for them. I’m not sure exactly how valuable I am, but since they haven’t fired me yet, I’m good enough to keep on despite my travel.

Being awesome shows up in two areas. The first area of awesome is good communication skills. You need to clearly understand others, and you need to communicate in ways that are effective to others. I find it valuable to learn to balance your communication methods. Email is great for things where clarity and a conversation history is useful. Text messages can help coordinate schedules and last minute changes. Phone calls and video chats are great when there are lots of things to discuss, or ideas need to be bantered about. Be sensitive to what type of communication is needed and when.

The second area of awesome is your work itself. You need to make it worth your client’s (employer’s) efforts to work with you. Your work needs to be excellent. There will be times when you will need to use your schedule flexibility to benefit your client. Putting in a few VERY LONG days at the right time can help a great deal. Changing your travel plans to be present for a meeting, or to make a customer visit can also be valuable.

The Short version: Prepare for a mobile life by finding a flexible job, working from home, communicating well, and doing great work.

Categories
Bedroom Remodel

Queen to Twins Remodel – The BIG REVEAL

In Part 1 of this post, we removed most of the queen, , and cut the bottoms and the tops of the beds to fit the space we needed.

Part 2 involved Sam working with his dad to build the bed frames, trimmed them with beautiful dark wenge, cut and hinged the top pieces for each bed, and relocated the heater vent.

In Part 3 we finished up some minor work – installing gas springs, fixing rivet holes, designing and building our corner end tables, finished up the trim and ordered a custom cushion to fit behind Cara’s bed.


Before we started the conversion, we had a standard RV walk-around queen bed. Rachel and Andrew slept on the bed, and little Cara slept in her ‘secret hideout’ along one side of the bed.

BEFORE Image I Queen to Twin Airstream Bedroom Remodel

After the conversion, we have three beds: 2 standard RV twins (75″ by 30″), and a standard size toddler bed. The middle isle has more usable space, and plenty of storage underneath!

AFTER Image I Queen to Twin Airstream Bedroom RemodelThough the beds are a standard size (and use standard size sheets – close enough!) they are custom shaped. The twins follow the curve of the Airstream at the back, and the beds have missing corners where they meet. We loved the company we used for the custom mattresses, www.mattressinsider.com, and highly recommend working with them!

One of our favorite features is the accessible storage under the beds. The queen bed lifted as well, but it was harder to use the space. With all three beds lifted, we can easily get to anything underneath. Note that we also have aisle access to the space under the twins, which makes our common stuff easy to access. The small raised piece of dark trim on the floor is not only pretty, but provides just enough support to keep the buckets from all sliding out when we move.

The storage space under the bed at the end used to only be accessible through the front outside access panel (behind the propane). Now, we can access that space from inside. Though the outside panel still works, we haven’t used it at all.

AFTER Image I Queen to Twin Airstream Bedroom Remodel

The custom quilts for each kids bed were the amazing work of Jess, detailed in a previous post.

We still use command hooks above their beds for hats, jackets, and towels, although Jess had to move them up a bit higher so Rachel didn’t have towels in her face at night. The photos were moved next to the storage cabinet up above on the other side. Andrew also decided he wanted to have his head opposite Rachel’s (for whatever reason) so its nice the beds can be made up either direction.

AFTER Image I Queen to Twin Airstream Bedroom Remodel 02

The Big Reveal_02

The Big Reveal_03

This bed configuration left some (almost) quarter round sections unused in the two corners. I built some removable bookshelves for the kids to store books and small items. The shelves lift out, allowing access to the small storage areas underneath. These are the least accessible storage in the new configuration, so we put things there that we rarely need. Although better than the nightstands we had previously, the kids still cram these things full of their “treasures”, books, and money banks. Maybe one day they’ll learn to keep things tidy, but at least we don’t have an cracks for papers and other small items to fall through!

AFTER Image I Queen to Twin Airstream Bedroom Remodel

And our bedroll? Well, it still just mainly gets in the way. The kids fight over who gets to NOT have the bedroll on their bed, and Jess and I try and keep it up off the floor so it doesn’t get stepped on.

AFTER Image I Queen to Twin Airstream Bedroom Remodel

There you have it! We absolutely LOVE our new space. The bright colors, more floor space for the kids to play on during the day (and they do!), and the beds double quite nicely as couches when we all want to gather in the back, the kids are doing school work, or Sam is working. We are completely happy with the way they turned out and make traveling in our Airstream even better!