Categories
This Week on Instagram

This Week on Instagram July 26 – Aug 1, 2014

This Week on Instagram July 26- Aug 1

Camp Noyo. I don’t even know how to explain the awesomeness, or how much our family loves it there. Peacefully established along the Noyo River in northern California, this place is paradise to my family. We had an amazingly relaxing week off grid. We played in the river, ate delicious food, binged on card and board games, and generally had a great time with friends and family!

Categories
California National Parks

John Muir National Historic Site in the Bay Area, California

Visit the John Muir National Historic Site to learn more about this amazing man who helped preserve our National Parks!
After visiting the Muir Woods last time we were in the Bay Area, I knew I wanted to visit the site that John Muir called home. About 30 minutes outside the downtown area, I was surprised at this oasis tucked in off a busy road.

When We Visited: July 2014
Ages of Kids: 8, 6, 4
How long: We spent about an hour and a half and my kids felt super rushed. Its quite a peaceful places and there are plenty of picnic tables!

Our deal was they had to earn a Jr. Ranger badge this week in order to skip school completely while we were out camping with the cousins. I thought I would have more complaining, but the kids actually seemed to really enjoy visiting this Historic Site.

It helps that John Muir had a pretty cool house.

John Muir NHS_05

We spent quite a bit of time exploring the house. The Jr. Ranger Book has a scavenger hunt to find objects in the house, plus Rachel and Andrew enjoyed climbing up to the bell tower (Cara had a panic attack at the top and almost refused to climb down the steep stairs!).

My favorite was John Muir’s “Scribble Room”. It seemed to be his private sanctuary and a room where he could pen his thoughts without reservation. Muir spent quite a bit of his early life wandering the wilderness of the Sierra Nevada mountains, and quite a bit of his later life writing about them to sway public opinion in favor of preserving these beautiful places.

John Muir NHS_03

The National Park Service was officially created two years after his death, but was influenced largely by Muir and his constant advocacy for preserving natural wilderness areas.

John Muir NHS_06

One voice really can make a difference. As we visit many of these National Parks during our travels, I’m grateful for those who saw beauty and strive to preserve it so that others may enjoy as well!

John Muir NHS_08


Categories
Airstream Accessories Daily Life Solar & Power

Wandering Wifi

During our first 6 month round of travel, I managed to keep connected with just a loose Verizon Hotspot, with service through Millinicom. When I say ‘loose’ I literally mean the hotspot was usually sitting on the table. I also had a Wilson SleekV 4G cradle booster, and a tiny magnetic antenna that I could mount in the window. I only pulled out and used the booster when I had a low signal.

After meeting Kyle and seeing his sweet setup, I decided it was time for an upgrade. Now that it is all installed, it’s time for a report.

Gear List

  • Pantech hotspot
  • Wilson Sleek-V booster cradle
  • PepWave SoHo (with DC power adapter)
  • 2 Roof mounted antennas
  • DC power distribution

Outside Antennas

IMG_20140610_113947
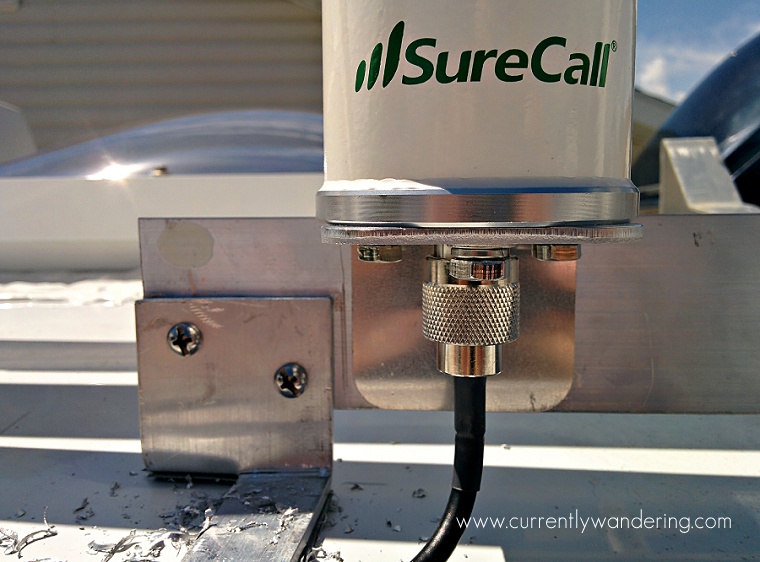
I wanted to mount the antennas on the roof, both to avoid the futz factor of an internal antenna, and to help the signal escape this faraday cage I call home. Kyle had his antennas mounted to his solar panels, but I didn’t have those yet, so I improvised. Using a piece of 1/4 by 2.5 in aluminum bar from the hardware store, I cut a horizontal piece and two ‘feet’ The feet were attached to the roof with outdoor adhesive tape, and the horizontal bar attached to the two feet and the vertical bar supporting the TV antenna. The new antennas were then screwed to this horizontal bar. Bolts with threadlocker were used on all connections. Using adhesive tape and the existing support for the TV antenna allowed a secure connection without drilling a mounting hole in the Airstream.

Cable Run

IMG_20140609_202953

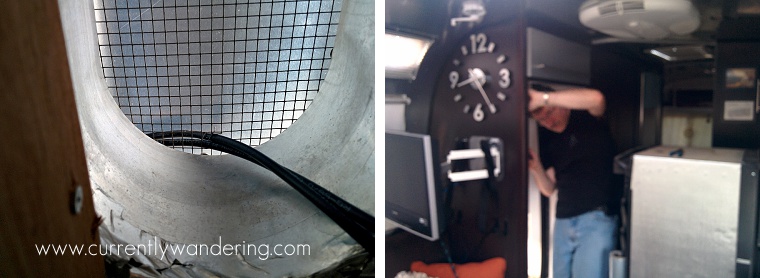
Running the antenna cables took some thought. I ended up running them along the roof and down the vent above the fridge. To access the small area behind the fridge, I (with the help of my Father-in-law) removed the fridge. Removing the fridge mostly involves a hunt for the screws and bolts holding it in place. After those were removed, it slid right out. We set it on some cardboard on the Airstream floor while we worked inside it’s enclosure.

We were able to remove a thin wooden panel, cut a small hole in the mesh covering the fridge vent, and run the cable down the wall and out the existing hole behind the TV.  The antenna cables are 10 feet long, giving me just enough room to make it work.

Then, of course, we put the fridge back into place and reconnected it to the AC, DC, and propane. And it still worked! We ended up using some foil tape on hand to seal the back panel to the side walls, so you might want that handy if you attempt this stunt yourself.
Gimme The Power!

We now had some additional power requirements behind the TV. I found a DC splitter that also had USB ports in place, and this worked well. We have a 12V connector for the PepWave, and USB power connections for the booster cradle, and our two cellphones which sit in brackets to charge while we sleep.

The Pantech hotspot connects to the PepWave via USB, which provides both power and a network connection.

Industrial Strength Velcro

With everything hooked up and working, it was time to secure it to the wall. I used industrial strength velcro for this job, and it has worked very well. The velcro allows for things to be moved or adjusted, and has held securely while towing.

Amazingly, all this gear fits in the space behind the TV, making it nearly invisible unless you look for it.

Wandering Wifi - How We Get Internet While Traveling

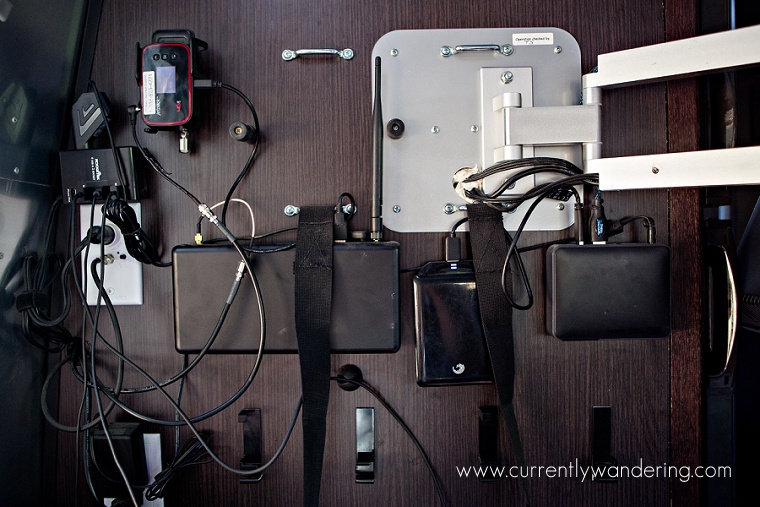
And that, folks, is the wall of awesome.

Categories
Most Popular Posts Night Photography

Night Photography Beginner Basics: The Gear

The Night Sky can be a beautiful thing, and long exposure nighttime photography can expose that beauty to anyone with the right (affordable) equipment. As complete beginners in this area, we thought we could share what we have learned as we enjoyed a week in Bryce Canyon recently and spent a few of our nights there capturing the beautiful Milky Way. What started as one post on the topic became very long, and so this is the first post in a series about celestial photography. We’ll include tips and information, mixed with the beautiful pictures that we captured during our visit.

To get the topic going, let’s talk about the gear that you’ll need to get started.

Camera

You’ll need a camera that allows you to set manual settings, and ideally has a connection for a cable release. Most Canon / Nikon SLRs work, and you may find plenty of others that do as well. Check out the Canon 5D Mark III or the Fuji X-T10.

16-35mm lens

Wide angle lens

You can use a longer lens for shooting stars, but you will be happier with a lens in the 16 to 32mm range. This is particularly true if you have a cropped sensor on your camera. In general the wider the better. This Canon 16-35 mm f/2.8L II USM on Amazon is a great one!


Cable ReleaseCable Release on Amazon

A cable release isn’t strictly required if your camera allows you to set a long exposure in the 12 to 30 seconds range. I’ve found that a cable release is still useful for a few reasons, and they are not very expensive. A cable release can minimize camera shake, can offer more settings options then the camera itself, and can often serve as an intervalometer for time-lapse photography work. The cable release that we use cost less than $20 and runs on two AAA batteries.

7155unjkrBL._SL1500_Tripod

You need a good tripod. It must be sturdy and allow you to point the camera in all sorts of odd angles. A ball-head on top of the tripod is common, and allows plenty of high angles. Some tripods allow setup very close to the ground. This can be very useful when composing an image with trees or rocks in the foreground of the image. As you might be hiking to your photography spot, a reasonably light tripod is nice as well. We use a Dolica tripod purchased from Costco, very similar to this one available on Amazon.

Something Heavy

Most tripods have a hook directly under the center column that allows you to hook a weight to add to the tripod stability. In most cases, your camera bag or a backpack can serve nicely in this function. A stable tripod will minimize any camera movement that will blur a long exposure.

Clothing, Food, and a Friend

Since you’ll be going out at night, I’ll also mention that you’ll need good temperature appropriate clothing, good shoes, a few flashlights, and some food and drink. Having a friend along is both fun and can help you get some amazing pictures with their help.

In our next post in this series, we’ll talk about camera settings so stay tuned!


The Milky Way really does look like this! Check out our basic beginner tips for capturing the night sky. 01

Categories
WanderLog

Hanging out in Petaluma, California

Travel Dates: July 20-16, 2014

From the shores of Lake Tahoe to the familiar town of Petaluma, CA we’ve done some driving this week! We spent the week divided between the local KOA and the beautiful farmlet of Ann & Dave.

Sam and his brothers helped with dad’s new roof, Jess relaxed in the hammock next to the chickens, and the kids were able to spend sometime playing with friends.

We also managed to squeeze in a Jr. Ranger Badge at the John Muir National Historic Site and visit a local “Glass Beach” where the kids hunted down treasured pieces of tumbled smooth glass.

This Week on Instagram July 20-26 2014