White Sands National Monument is one of those other-worldly places. Located in southern New Mexico this park is truly one of a kind. We visited three years ago on our initial trip from Virginia to Utah and the kids have been begging to go back. When we decided to stay west this winter they unanimously voted White Sands as the one place they wanted to visit for sure.
Travel Dates: February 17-18, 2017
Ages of Kids: 11, 9, 6
Where to Stay: There is no campground for trailers in White Sands National Monument. However, Lake Holloman is a free option about 5 minutes from the entrance, or Oliver Lee Memorial State Park is about 30 minutes away.
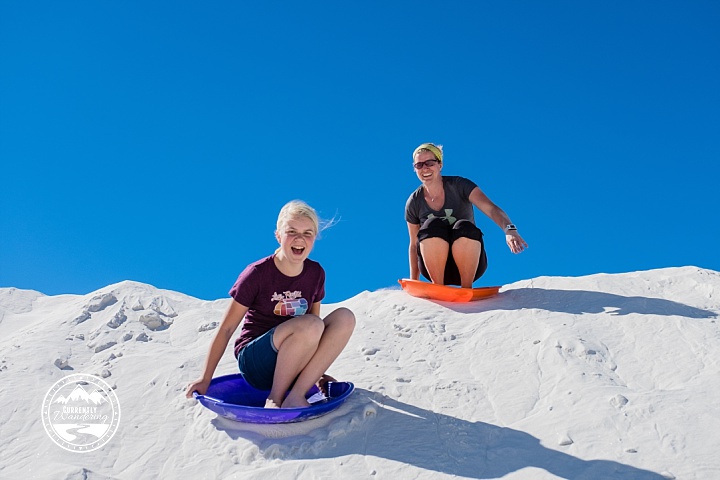
Where to Get Sleds: The Albertson’s in Alamagordo sells sleds (usually) but you can also get them from the Gift Shop through the courtyard and past the Visitor Center desk. At the time new disks were $16 and used were $10. They will also buy them back once you are done ($7 new and $3 used I believe).
We arrived Airstream in tow and parked in the Visitor Center lot where they have ample room for bigger vehicles. We went inside, grabbed our Junior Ranger books and headed to watch the video about the park. Unfortunately about this time a school group came through so we didn’t explore the exhibits further. After about 15 or 20 minutes of working distractedly on their books, the kids looked up at me and said, “Mom? Can we just go sledding?”
I realized we weren’t going to get anything else done before we hit the slopes as it were, so we bought used sleds from the Gift Shop for $10 each, some wax, and loaded up for the drive into the park.
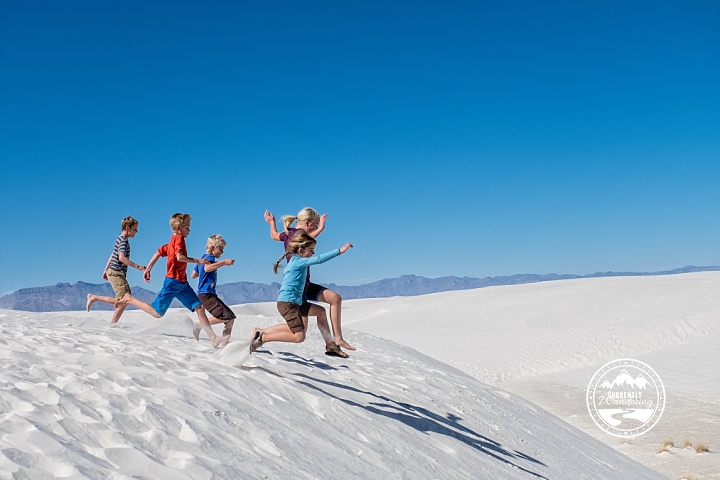
I love that the parking lots are HUGE and we can just drive our entire Airstream into the park. The best dunes are located near the end of the one way, teardrop shaped loop. We parked near the Alkali Flat Trailhead where there were multiple large dunes to choose from.
We also met up with both @liddleadventures and @thefamilycan so it was a full day of friends and sun! We couldn’t have asked for a more perfect day.
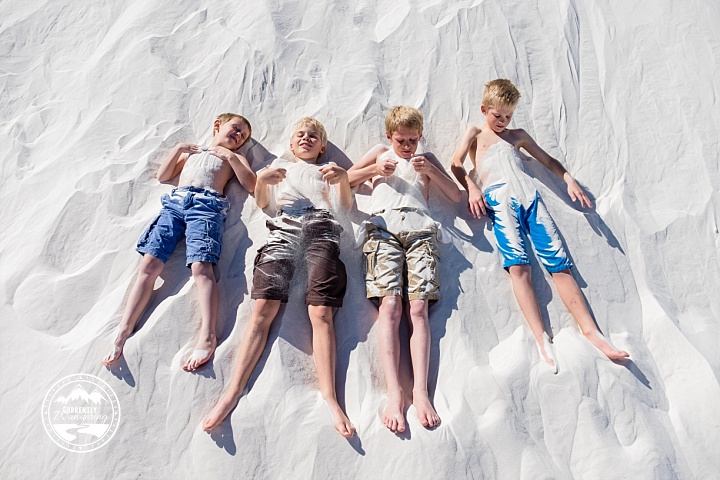
With cloudless blue skies, and warm temperatures, our visit this time was totally different. We basked in the sun wearing shorts and short sleeves, and even had to apply sunscreen in order to not be burnt. It felt like the perfect beach day and we were up and down the dunes for hours.
At one point in a conversation with another family, we were musing about the back country camping in the park. There is a loop for tenters and we joked about pulling out our tents and just staying the night.
And then we totally did.
Sam drove back to the Visitor Center to grab a permit (first come, first served) and I double checked to make sure we had enough food to pack in for dinner and then breakfast the next morning. Around 3pm our friends both took off for their next destinations and we set about packing up our overnight gear and prepping food.
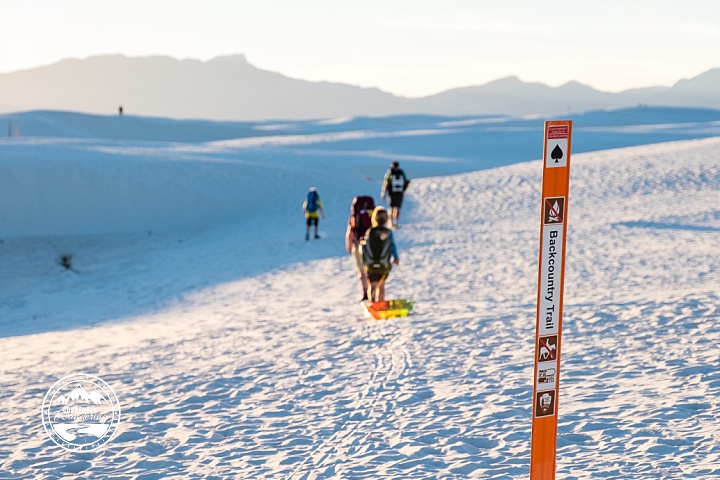
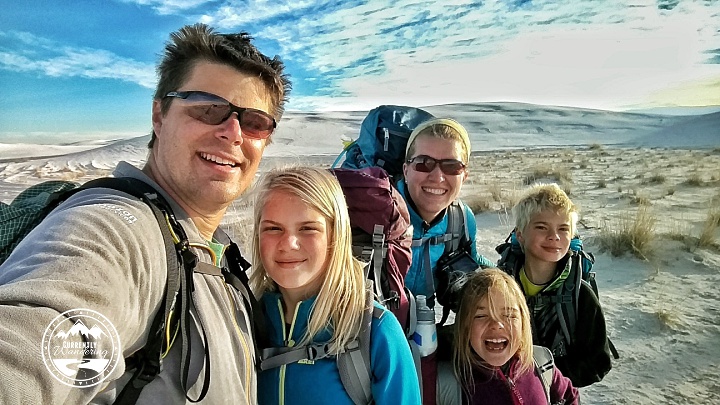
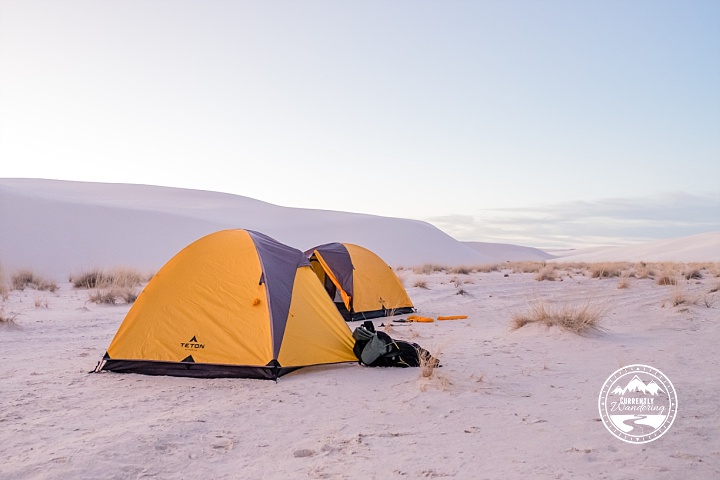
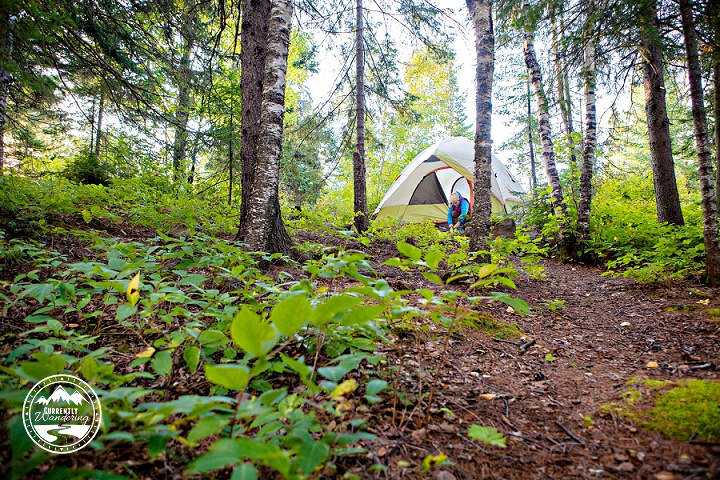
Once we were ready, we drove to the backpacker trail head, parked the trailer and set of into the sunset for our short one mile hike to campsite #2. Cara insisted on bringing a sled and pulled it behind her as we followed the orange markers out over the dunes.
We got to camp and hurriedly set up our tents before it got dark. In hindsight, we could have timed things to arrive just a little bit sooner, but honestly the kids were having so much fun sledding with their friends that I’m not sure we would change anything.
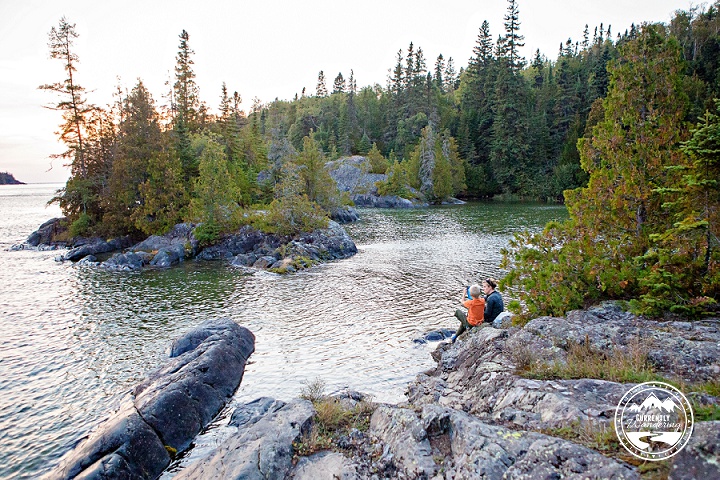
Have you ever had a random idea to turn a one day visit into a backcountry overnight trip? Me eithe…. Yeah. That happened. In our travels, we have learned to say Yes when adventure calls. That is how we ended up hiking into the otherworldly scene displayed here. We found our campsite amidst the dunes just before nightfall. Staying overnight allowed us to experience not only the late evening and early morning unavailable to daytime visitors, but also a brilliantly bright full moon. -@telegramsam
Hooray for a spontaneous backpacking trip! While sledding yesterday in White Sands National Park we decided to grab a back country permit and stay the night. With a full moon, plenty of stars, and a gorgeous sunrise we definitely made the right decision! -@currentlywandering
Camping on the dunes is prohibited so all of the camp sites are nestled in valleys between dunes. We settled into our little spot, made dinner, and the kids managed a final sled before bed.
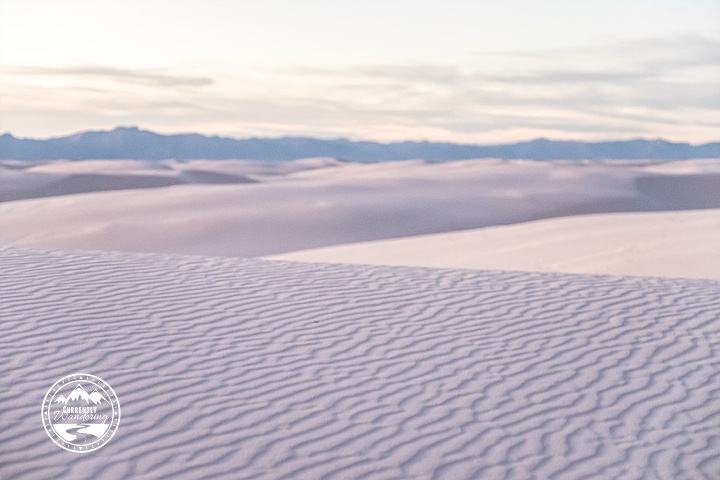
One of the perks of staying the night was the ability to see both sunset and sunrise in the park. Sunset over the gypsum sand was pure magic. Depending on the time of year, the park can close before sunset actually occurs which I think is totally sad. The rangers drive through the park at closing announcing over a loudspeaker that everyone needs to leave. I’m grateful we were able to just stand and enjoy it.
At first we were excited there was a full moon and then we realized that its really hard to sleep when its so bright outside! Sam, Rachel, and I went for a walk at 10pm with no headlamp (and no shoes honestly) to try and bring on some sleep. I didn’t even try to capture any star photos as the moon would have just washed them out.
“The moon was full last night, and as it shone upon the brilliant white sand around us, it lit up the night in a way I have never seen before. It was bright enough to allow a late night wander without any light at all. It was so bright that we had moon shadows. It was so bright that we had trouble falling asleep. It was indeed otherworldly.” -@telegramsam
We had plans to be 5 hours south of White Sands by Saturday night, so were were up and out of camp early the following morning. We had a quick breakfast of Cliff Bars, fruit strips, and hot chocolate before making our way back to the trailer. Halfway there we realized the Visitor Center didn’t open until 9am (we needed to turn in our Jr. Ranger books) so we slowed down a bit and got some more sledding in.
Backpacking trips that involve sand dunes and sledding are much more fun. -@currentlywandering
I love that we could revisit one of our favorite places and the experience was so different than last time. White Sands is definitely a unique visit and camping in the back country made the visit even more special.
My husband, Sam, and I completed our first backpacking trip together in New Zealand’s rugged mountains four months after we were married. Actually, it was my first backpacking trip ever. While he grew up with parents who frequently went into the back country, we were more front country, car camping kind of people. Despite the flies, the rain, and the incredibly steep trails, I was hooked after that one experience.
Knowing how incredible it feels to wake up in a tent on top of a mountain, we agreed that we would love to share that experience someday with our kids. This last year we finally reached our goal, completing four separate excursions in various states across the U.S. We watched our kids struggle up steep trails and bundle up against cold, windy weather but then also lift their faces in awe as they soaked up an early morning sunrise.
So, how did we do it? How did we go from tent for two, to trailside with five? Here are eight tips for taking your kids into the backcountry for the first time:
Plan Carefully.
There are many questions to consider when planning your child’s first backpacking trip. What are your goals? How many nights do you want to do? How far can your kids hike? What is there to do once you get there? Are you going to start after dinner? Early in the morning? How steep is the trail? Is it a long drive to the trailhead? Knowing your kids and their limits (generally speaking) can give you a good idea of where to start.
Many of our overnight hikes leave around 2pm, hike five miles to the campsite, eat dinner, have a lazy morning and hike back out around lunchtime. Simple, easy, yet a great way to unplug and be together as a family. Other families I know grab Subway after work on the way to the trailhead and hike a mere mile or two in before setting up camp for the night. Know your goals and then research the best way to accomplish them.
Start Simple.
Long before we loaded our kids up with a pack we hit the trails. We hiked short trails, long trails, hikes in the mountains, and hikes in the desert. Our kids could hike up to ten miles, which we did repeatedly over the course of a year. Our first backpacking trip, however, was a short 3.5 miles. We’ve gradually increased the distance over time, but we’ve found that hiking with a pack is a different experience for a kid. My husband has memories growing up of even shorter, one mile hikes to backcountry sites shouldering his small backpack and water bottle. The idea is to get your kids used to hiking in to their campsite wearing a pack whether it’s one or ten miles in.
Take Your Time.
On multi-day trips, my husband and I often remind ourselves we have ALL DAY to hike with the kids. The beautiful part of backpacking is that often there’s not much to do besides hike, so taking all day to hike that 3.5 miles not going to crimp anyone’s schedule. Smell the flowers, throw rocks in the stream, take a longer snack break and don’t push too hard.
Pack Plenty of Treats.
Well-thought out and distributed candy, snacks, and gummies can help motivate even the most reluctant hiker. Quick carbohydrates and sugar are often the perfect pick-me-up. We often have a mile limit or a goal to reach before we sit down to pull out the treats, which keeps the kids from asking every five minutes if they can have skittles. A special treat for reaching the “top” is also a welcome bonus. Our kids love Australian licorice, skittles mixed with toffee covered peanuts, mini M&M’s, and Pull-and-Peel Twizzlers.
Simple Meals.
While you may enjoy a gourmet backcountry dinner, chances are your kids are just hungry. In addition to plenty of snacks and treats, we do Freezer Bag Cooking for dinner and breakfast. All dry ingredients are prepared beforehand at home and then sealed in a freezer bag before getting tossed in our packs. Once mealtime rolls around, we boil water, add to our freezer bag, stir, let it sit in a cozy for 10 minutes, and voila! Dinner is served. Our three kids typically share a meal, while Sam and I eat a second. Our favorites so far are Cheesy Bacon Onion Mashers, Chocolate Protein Oatmeal, and Chicken Thanksgiving Dinner.
Be Prepared for Boredom.
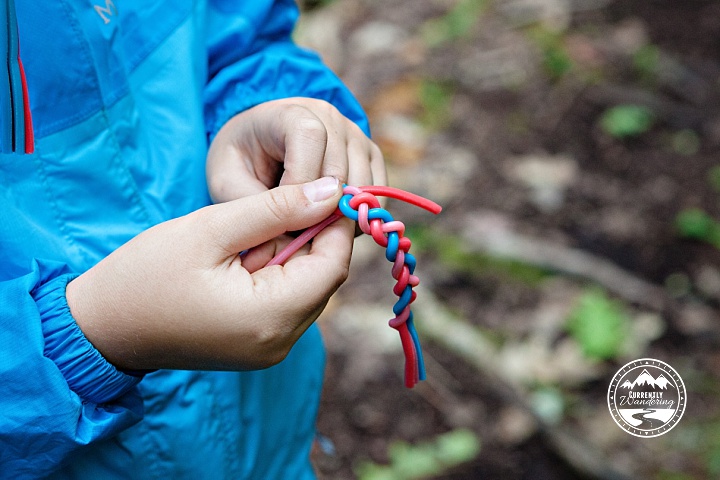
Let’s face it. Most kids are addicted to screen time and even when they are conditioned to get outside often there’s still going to be whining about being bored. At camp, my older two kids will happily read on a Kindle for an hour or two, but after ten minutes my five year old is complaining because no one will play with her. We’ve learned to be strategic about how much time we will have at camp, whether or not there is anything nearby to explore, and to bring card games and even toys to play with once we get there. Packing a compass for scavenger hunts, a GPS unit for Geocaching, or a pocket knife for whittling sticks are all fun ways to spend time together once camp is set up.
Ultralight is Best, but Don’t Stress About Gear.
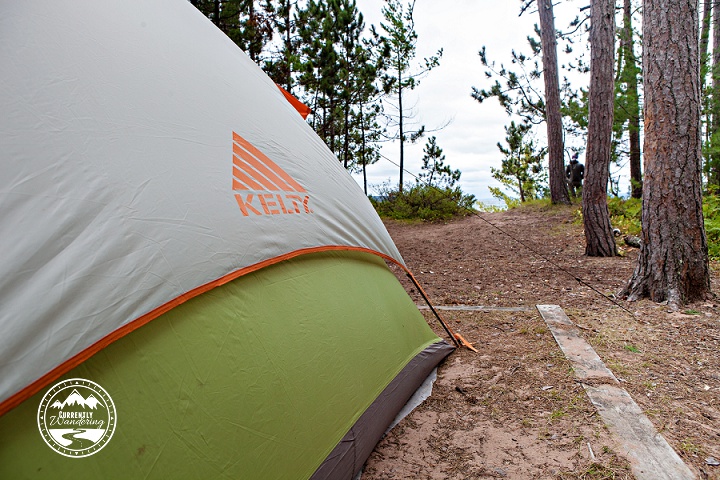
Between the two of us, we carry most of the gear. From the tent to the sleeping bags, cooking gear, and the food, most of it is packed into our two larger bags. Over time we’ve been able to make adjustments and swap not-so-light gear out for less weight as we gradually increase our distance, but start with what you have. At short distances, ultra-light gear is not as important. Let your four year old wear her Winnie-the-Pooh backpack and bring her stuffed animal. You can see our gear list here.
Have a Good Attitude.
The best thing you can do to help your kids have a good attitude and appreciation of the experience is to have a good attitude yourself. If your kids hear you talk about how much you enjoy the view, how much you appreciate the challenge of that ridge in front of you, and the good memories you have of other backpacking trips, your kids are likely to adopt a similar attitude. If they hear you complain about how dirty you are, how much you miss your bed at home, and the pains you feel, they will likely adopt those feelings too. Having a good attitude can be a challenge, but the payoff is worth it!
While we introduced our kids to backcountry camping fairly spectacularly manner, camping for two nights on an island in Lake Superior is not feasible for everyone. Our main goal, however was to have the experience end solidly with a “backpacking is really awesome” mindset for the kids no matter where we went. We feel it was a success since the kids happily followed that up with three more trips over the next few months.
Backpacking, or doing anything outdoors, with kids involves a different mindset. Suddenly we weren’t doing this for us, we were doing it for them. The miles are shorter, the terrain a little easier, the views maybe not quite as majestic, but the time spent together hiking, setting up camp, and snuggling in our sleeping bags while the stars wink overhead is irreplaceable.
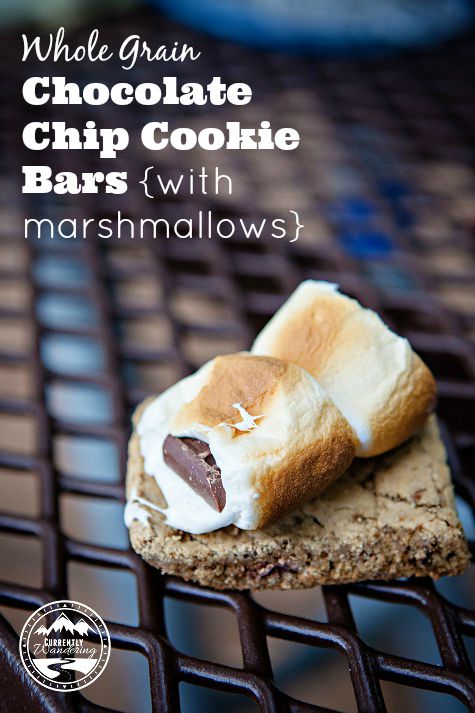
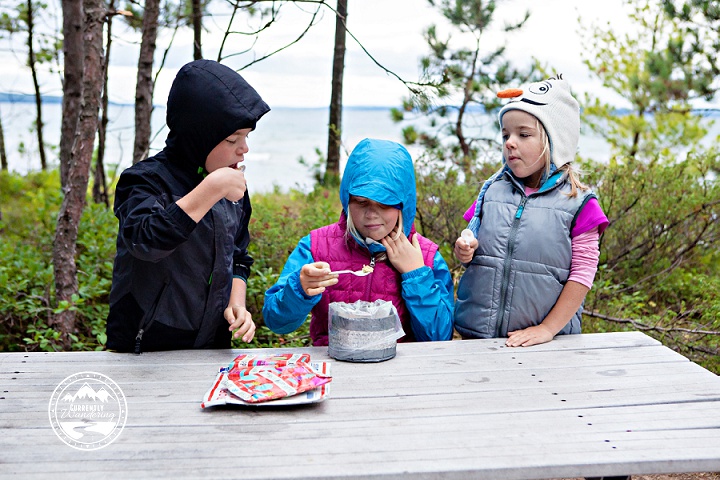
We discovered these delectable treats as I was looking for a way to pack a dessert in to the Apostle Islands for Andrew’s birthday. Made with whole wheat flour & ground flaxseed, I can at least pretend they are more healthy than regular chocolate chip cookies, right? At least until we add the marshmallow.
Whole Grain Chocolate Chip Cookie Bars
1 cup whole wheat flour
1 1/4 cups white flour
1 1/2 Tbsp ground flaxseed
1 tsp baking soda
1 tsp sea salt
1 cup unsalted butter, softened
3/4 cup packed brown sugar
2 eggs
1 tbsp vanilla
1 cups semi-sweet or dark chocolate chips
Large, toasted marshmallows (optional)
Hershey’s chocolate bars
Preheat oven to 375 degrees, and spray or grease a 9×13 pan.
In a medium bowl, cream butter, then add sugars and mix until creamy. Mix in eggs and vanilla. Gradually stir in flours, baking soda, and salt until completely mixed. Really you should mix these all separately first, but I always just mix the soda and salt in the measuring cup with the flour after dumping a little in the bowl to make room. Call me lazy. Or just efficient.
Add chocolate chips until just mixed in.
Spread mixture evenly in prepared pan. Bake for 20-25 minutes or until golden brown. Cool in pan, cut into bars.
These are easy to wrap individually and take hiking or backpacking, or cover and store in a cool, dry place.
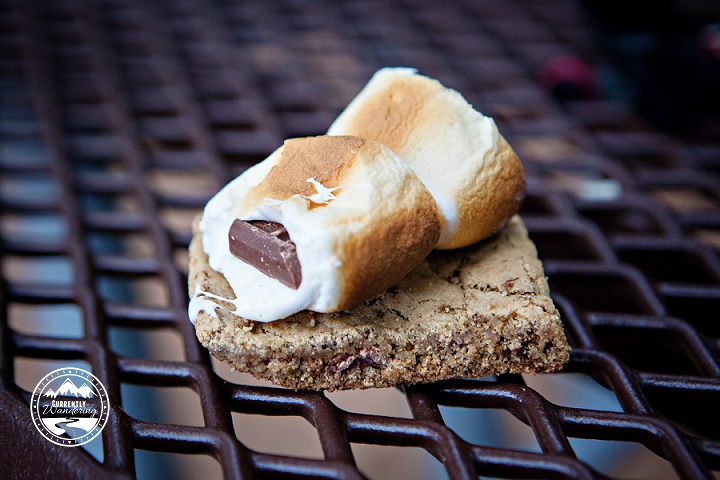
We roasted marshmallows over the fire, stuck a piece of Hershey chocolate inside, and then smashed them on top of the cookie bars.
I don’t think we’ll ever eat a regular S’more again.
While we would have loved to receive this item for free to review, we actually spent money to purchase it. This post contains Amazon affiliate links which help to fund the blog in a small, small way. Thanks for helping us out!
Most backpacking requires a way to filter water. Despite looking clean and clear, most water contains bacteria that will make you pretty sick. The problem is easily remedied by a few methods. Water treatment drops will kill bacteria, but they don’t remove them and can leave a bad taste in the water. My favorite method is the use of a water filter.
Most of the water filters I’ve used in the past have been great, but fairly bulky and expensive. On our recent trip backpacking in the Apostle Islands, we tried a new water filter that is both cheaper and lighter than any I’ve tried before.
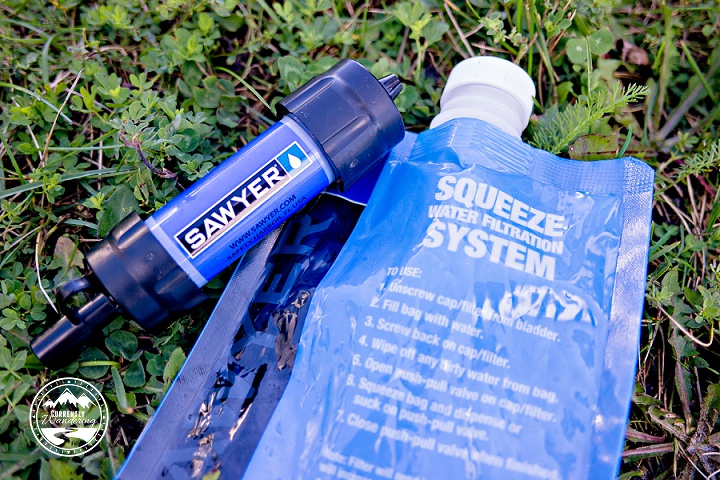
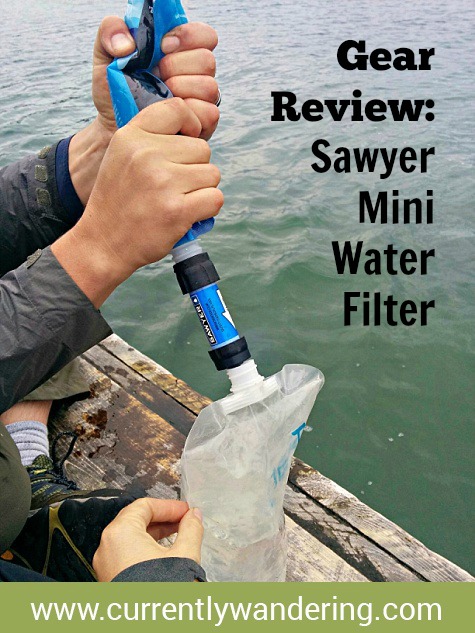
We used the Sawyer Mini water filter, which can be bought for $20 to $25 either online or in many outdoor stores. The filter is small and lightweight. It does sacrifice some ease of use, but for the weight and cost savings, the tradeoffs are worth it for most purposes.
The filter unit itself is easy to understand. Dirty water goes in one end, and clean water comes out the other. With the filter comes a small, lightweight bag to use as a ‘dirty’ bag. The connector is a standard bottle thread though, so you can replace the included bag with anything from a cheap water bottle to a full sized two liter bottle.
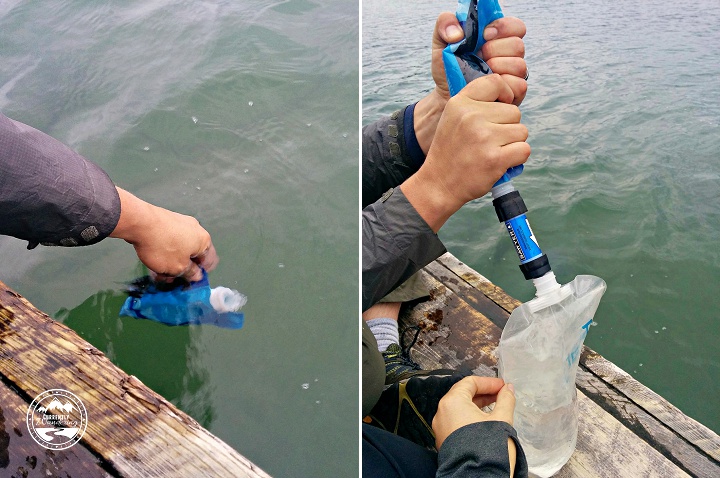
You filter water by filling the included bag (or replacement bottle) from a lake or a river and screwing it on to the filter. you then squeeze water through the filter and into your clean water bottle. The process is quick and easy. You do need to make sure you don’t get dirty water on the clean end of the filter, but that really is the only thing to pay attention to.
In addition to using a different bottle, there are other upgrades you can make as well, including quick attachment connectors to common water bladder systems. In a genius way, this filter system is perfect. It provides just the bare necessities, and allows expansion and customization as desired.
This filter performed wonderfully during our backpacking trip. It will also make an excellent addition to our emergency supplies, allowing us to filter water in circumstances where we cannot find clean water.
There are instructions right on the dirty bag for how to backwash the filter (when it starts slowing down or gets clogged) as well as how to clean for long term storage. Spoiler- you just use a little bit of bleach water and squeeze through the filter, drain it, and let it air dry.
Pros: lightweight, small, easy to use, screws onto any top of regular bottle.
Cons: Included bag is a little small for a family of 5. It just takes a little longer to filter enough water.
We are definitely glad we have this, and plan to upgrade to a larger dirty water bag in the future. We’ll buy one of Sawyer’s, or most likely just get another Platypus Platy Bottle and write “Dirty” on it with a sharpie.
Sam and I have never considered traveling in an Airstream “camping”. Camping is what you do in a tent either with a car or in the back country. We had the goal this summer of introducing our kids to backpacking, and at first we planned to go at least once a month all summer.
It was a bit of a lofty goal.
June & July ended up being super busy with family and other projects and we really didn’t have time to sit down and really hash out details until the end of July. Looking ahead at our schedule we picked a place we knew we wanted to backpack and started making reservations.
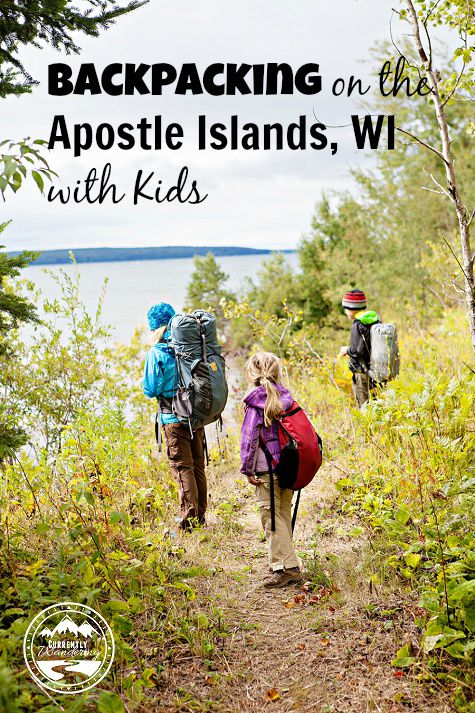
The Apostle Islands have been on my list to visit for over a year. I had heard they were beautiful, and what a great spot to overnight camp! We had never camped on an island before and it just sounded like fun. The Apostles fit into our itinerary well, so we focused on getting our plans solidified.
Doing Research
First we had to figure out which island we wanted to camp on. Not all of the Apostles are easily reachable, nor do all of them have campgrounds. I called the Apostle Islands visitor Center in Bayfield to ask about possibly canoeing out to the islands, but the ranger on duty said they don’t recommend it. The water is unpredictable enough that they recommend sea kayaks, spray skirts, and wet suits. He did say there was a shuttle to both Stockton and Oak Islands and great camping there.I did some research online to figure out which island sounded the best for our situation. The National Park Service website has great information about the sites, whether there is water nearby, the hiking trails, maps and all sorts of useful information.
Next, we looked at the ferry schedule to both Oak and Stockton Islands. They don’t run everyday, and we had to time our visit so we wouldn’t be out there for a week since a) we didn’t have enough time off work for that, and b) it would be completely overdoing it. We wanted something simple, yet long enough to have a good experience. The shuttle ran on Tuesday, Friday, Saturday, and Sunday. We figured Friday & Saturday would be busiest and hardest to get a campsite, so we opted for heading out on Sunday morning and back on Tuesday, even though that would mean missing church. That schedule would give us 2 nights which seemed about perfect.
After we looked at our calendar and figured out our time frame, we called the Visitor Center in Bayfield and she helped us come up with campsites that were available in our time frame. We figured we had 2 or 3 different dates that would work with the shuttle schedule. We originally wanted to camp on Oak Island since there were a few campsites we could hike to on our second night. After talking with the ranger, however, she helped me plan a route for Stockton Island which was more appealing because there was little to no hiking the first day, a ranger program that night, and then our own, personal, beach campsite the second night where the shuttle could pick us up without having to hike back. It sounded perfect!
Finally, we had to figure out where to leave the Airstream. During my phone call with the park ranger, I asked about overnight parking. The Park Service charges a minimal fee to park in their lot (with a trailer it was $8), but after picking up our camping permit and actually seeing the small parking lot I was worried we wouldn’t fit. Instead I called the Apostle Islands Ferry service and asked them. They directed us to a public parking field about a block south of the ferry building. Its roped off, but had plenty of room for us to park our truck and trailer and best of all it was free!
Preparation of Gear
I’ll have more on which gear we took, food we ate, and clothes we packed in future posts. Each one of those is a topic in and of itself! We do carry our tents, sleeping bags, and pads with us in the truck at all times. Last time we went near the storage unit we also picked up Sam’s backpacking bag (its pretty large) and some other miscellaneous gear. This was not the first time we’d ever been backpacking so we felt we had a pretty good handle on what we’d need.
The night before we packed up all our bags, cleaned up the campsite and made sure everything would be ready to go right after we got the kids out of bed.
The Backpacking Trip Day 1
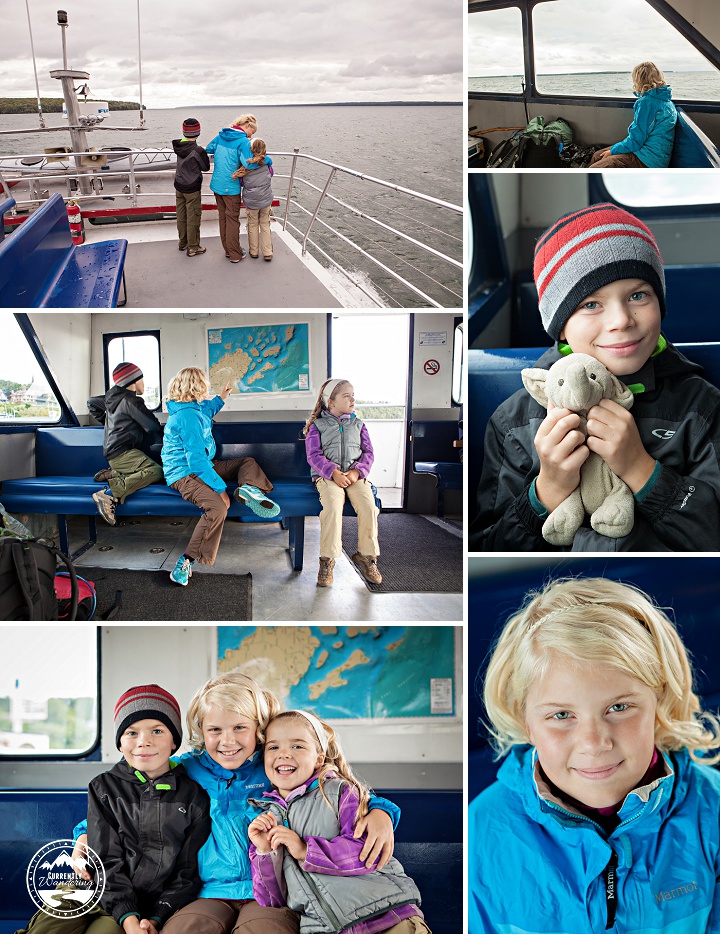
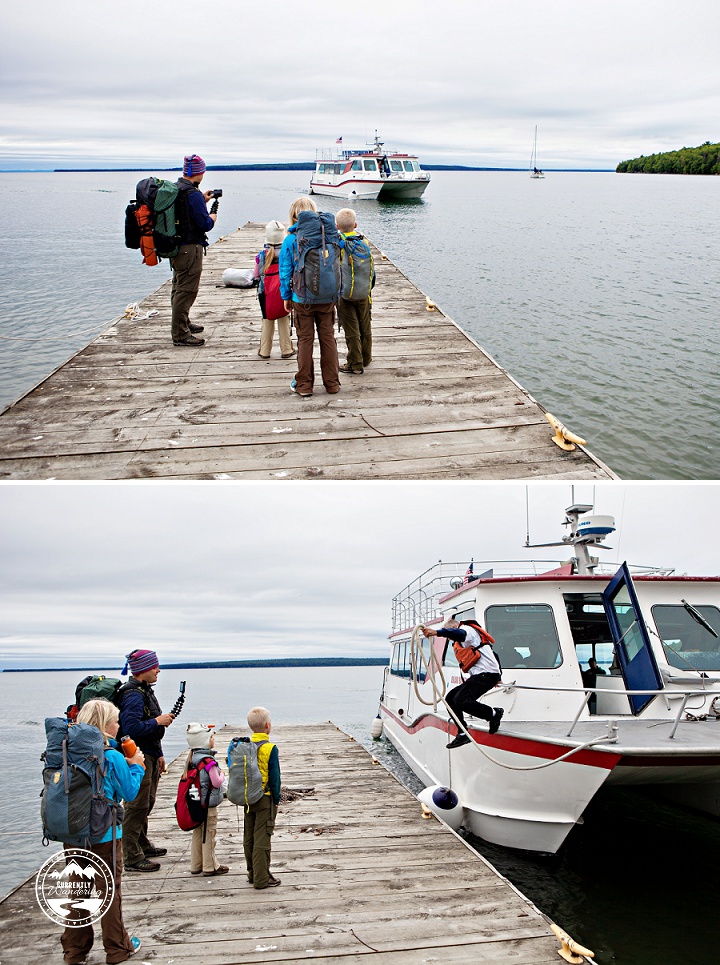
We had a bright and early 8:30 am ferry to catch in Bayfield, WI. We were driving from Ashland, WI which was about 30 minutes away.
Sam and I woke up around 6:00am and we got the kids up around 6:30am. It wasn’t hard to wake them up as they were super excited! Everyone got dressed and while Rachel supervised putting cream cheese on the bagels, I helped Sam get hitched up and we were off around 7:15 with Go-Gurts, grapes, and cream cheese bagels to eat in the car for breakfast.
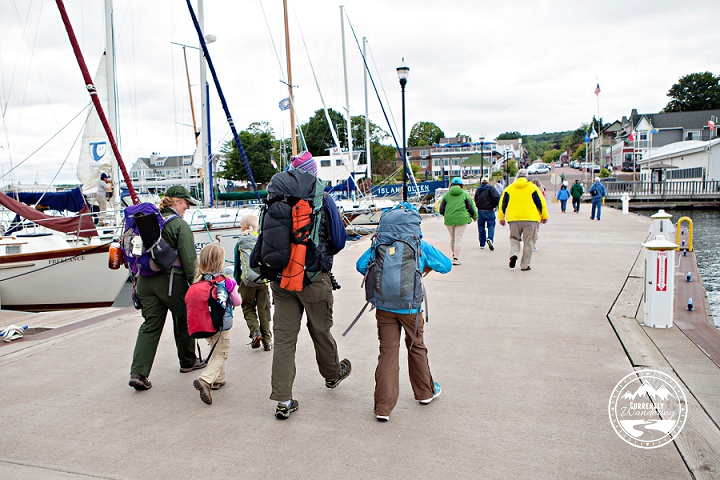
Parking was pretty simple and straightforward and then we had time for a photo before making our way to check in for the ferry. I feel like we arrived just in time around 8:15, checked in at the front desk and made our way down the dock to the boat.
Group selfie before we head for the ferry.
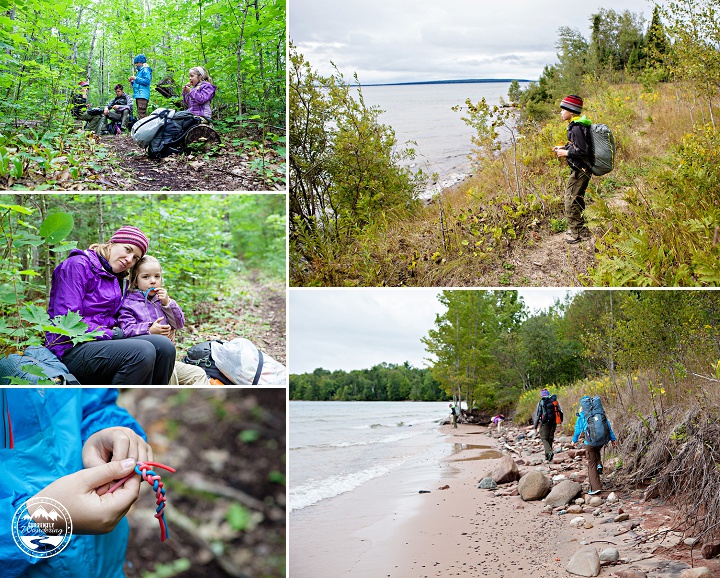
The ferry ride to Presque Isle on Stockton Island took about an hour. It was crazy windy, but we went up on deck anyway to check out the view. The kids had all packed their stuffed animals, and Andrew had to pull out his elephant to make sure the pachyderm was doing okay.
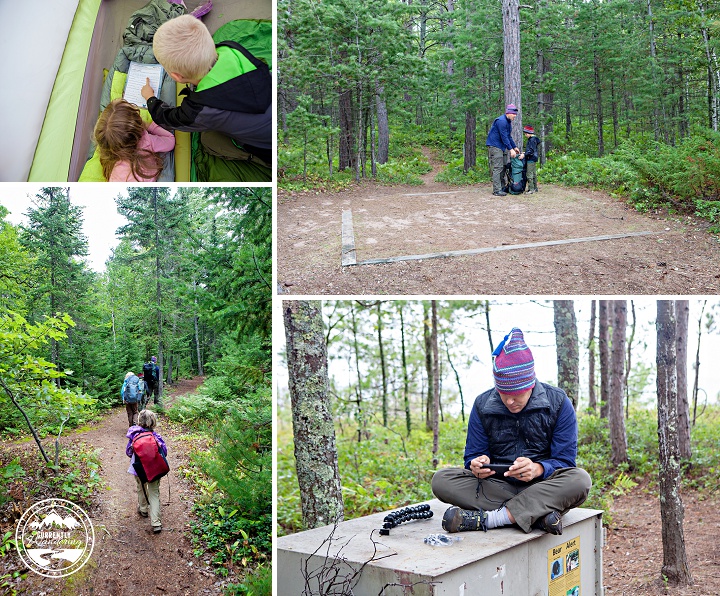
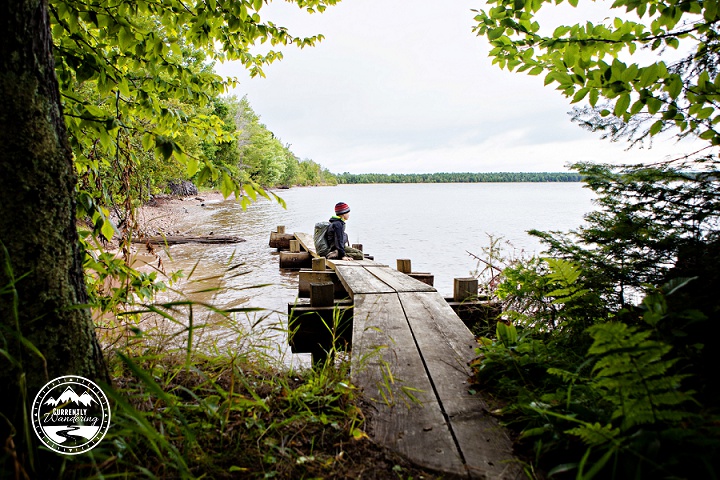
Once we got to the island, we unloaded our stuff and hiked to our campsite. The 19 sites at Presque Isle are spread out from the Visitor Center to about a half a mile up the trail. The ranger on the boat recommended site #15, so we hiked almost the whole half mile to check out it. She wasn’t joking when she said it was a good one.
There were quite a few trees to shelter us from the wind, and a nice grassy spot on the bluff overlooking the bay. It was perfect!
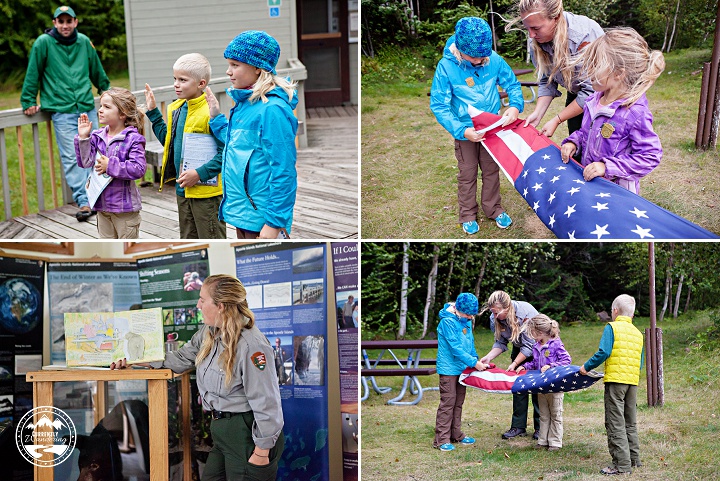
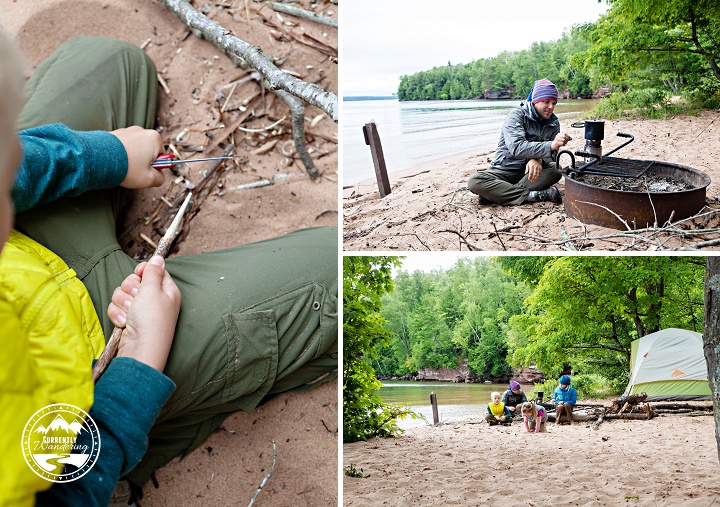
After getting our tent set up, all the kids wanted to do was hang out in it! We had a quick lunch and then pulled out our Jr. Ranger Books and worked on those for about an hour while Sam enjoyed his work-free time getting caught up on editing video.
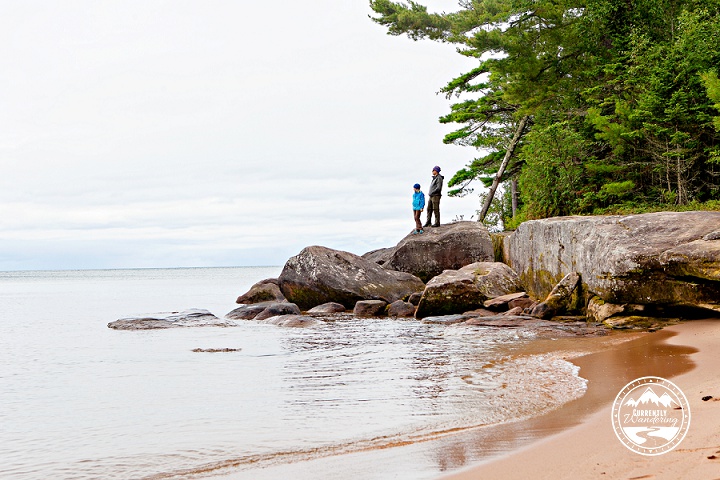
After we had rested for a bit, we grabbed our day packs and hiked back to the Visitor Center where there was well water to fill up our bottles. We signed in for our campsite and then decided to hike the Anderson Point Trail over to Julian Bay (about 1.4 miles) hoping it would be less windy on that side of the island.
It totally was! The kids played in the sand, Sam and I stretched out on the sand and closed our eyes for a bit to relax. Because the bay was so much sheltered than the surrounding area, there were about a dozen sailboats moored out on the water. Our relaxation officially ended with Andrew’s announcement he needed to use the bathroom (the island encourages the use of the port a potties since it is a higher traffic area) so we cut across inland and hiked the .4 miles back.
After a delicious yet slightly late dinner, and a completely ruined dessert (my fault) we raced to the Visitor Center for the ranger program at 6:30pm. Since it was too windy for a campfire, Ranger Gail held the program inside the small Visitor Center. She talked about Scar, the black bear they had to put down because he had grown too accustomed to human food. We talked about bear safety, bears on the island, and what the rangers did if they had an aggressive bear. Instead of relocating the bear (which never works here) they close that part of the island to visitors instead. It gives the bear time to relax with no human food or presence around.
After the program (there was the 5 of us, and another couple) the kids passed off their Jr. Ranger Books and Ranger Gail invited them to help her take down and fold up the flag. We found both Ranger Gail and Luke (a volunteer) to be extremely helpful, nice, and pleasant to chat with. Gail was so patient with Cara who absolutely adored her and followed her around. We stayed around and talked with the rangers until about 8pm when we figured it was time to get ready for bed. Both rangers said to come get them if we had problems with our tent and the wind and they’d leave the Visitor Center building open in case of an emergency.
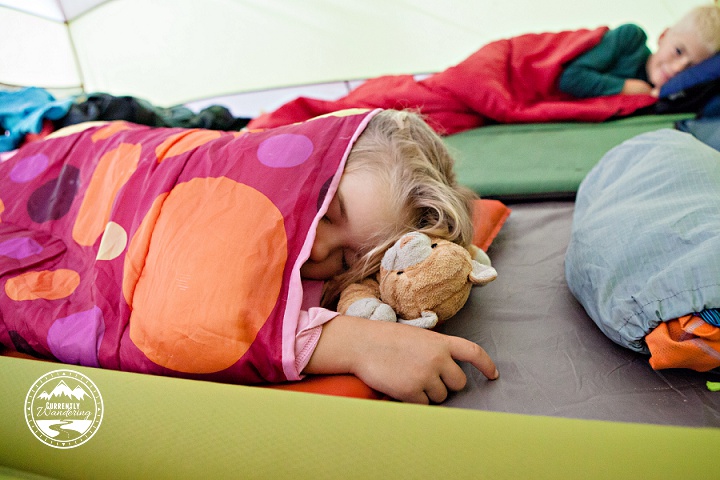
We visited the bathroom on the way back to our tent, quickly ate our mini Oreos for dessert (I brought a backup plan), and then brushed teeth and climbed into bed. We listened to our family audio book for half an hour and by that time Sam and Cara were already snoozing.
The Backpacking Trip Day 2
Monday was Andrew’s Birthday. He was so excited to be out backpacking, and we managed to completely surprise him with presents (read more about Andrew’s birthday here).
We got everything taking down and packed up after breakfast and presents. It was fun trying to figure out how we had packed all the bags the first time, and generally just fit everything however it worked. The rangers came over to say goodbye before we headed to our next campsite which was about 3.5 miles down the trail. Ranger Gail brought us a handwritten weather report (awesome thinking on her part!), and they presented Andrew with an Apostle Islands sticker as a present (so awesome!).
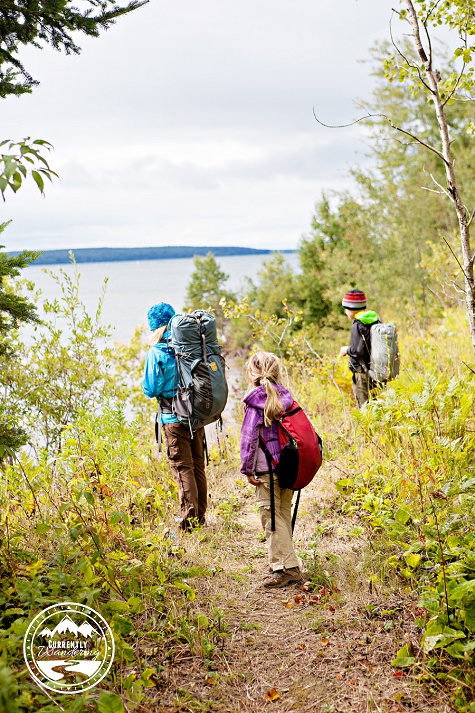
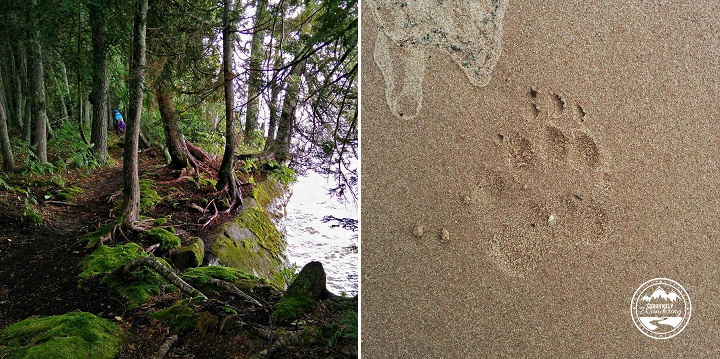
Our hike to Quarry Bay was pretty uneventful. We kept the kids’ packs super light – Rachel is carrying two long(ish) sleeping pads so her pack looks huge but was pretty lightweight. The trail alternated between forest and views of Lake Superior.
At one point the trail is along the beach, and with the water as high as it was we would have gotten our feet pretty wet. Instead we opted to bushwack a section through the trees and returned to the beach when we would stay dry.
We took a pretty good snack break about halfway through and had the kids take their packs off. I feel like it totally lifted their spirits and they did great the rest of the way. I loved that the trail had no serious elevation, so the kids could get used to carrying packs on a pretty gentle trail. They are good hikers, but carrying a pack can sap your energy pretty quick!
We reached our campsite just before lunch. The Quarry Bay area has a dock, 2 group sites, and 1 single campsite. A group of kayakers had been blown in with the storm the night before and had spread out….everywhere. They were pretty good about moving their boats out from our site and we watched them paddle out a little later to rescue one of their kayaks.
We spent the afternoon pretty lazily, which was perfect! I got a pretty good nap in (taking kids backpacking is fairly exhausting), we read, played cards, and the kids had fun whittling sticks with their knives. Cara loved playing in the sand, and we just generally enjoyed ourselves. Since this bay was more protected from the wind (which had also started to die down) we managed a campfire and marshmallows for Andrew’s birthday in the evening and then listened to more of our book before falling asleep.
The Backpacking Trip Day 3
Cara was our latest sleeper every morning and I loved watching her snuggled up with her kitty. Rachel and Andrew would read in the mornings (they do that in the Airstream as well) and it was generally the need to go to the bathroom that finally got us up and going.
While Sam managed the stove for breakfast, the kids and I packed up our gear so we would have time to hike to the Quarry before the ferry came to get us. It was about a 3.5 mile round trip and it was probably the fastest we have ever hiked. The Quarry was…okay. It basically was a site where “they” (whoever they were) mined sandstone. It was very moss covered, but we could still see many of the cut marks. Pretty dark though so we don’t really have any photos. The trail was beautiful, and on the way back we found some fresh bear tracks in the sand pretty close to our campsite.
The ferry arrived at the dock to get us right around 10am.
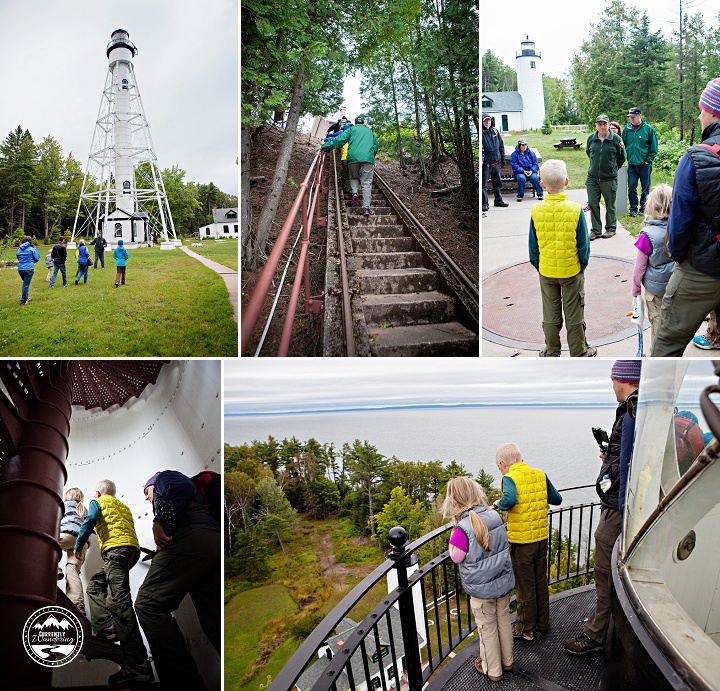
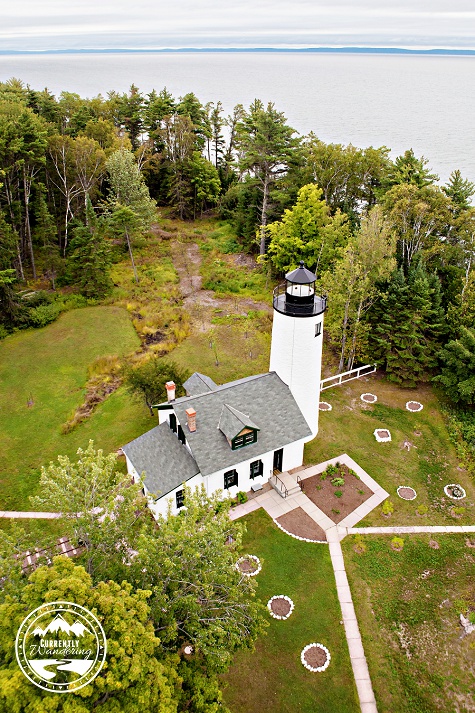
Once we were on board, the ranger approached us and mentioned they were headed to Michigan Island for a lighthouse tour. If we wanted, we could pay the $8 for our whole family and join them, or wait 45 minutes on the boat. Total no-brainer. I’m just glad we packed an extra lunch!
There are two lighthouses on Michigan Island – one that was supposed to built somewhere else, and one that actually was built somewhere else and then brought over! We were able to hike to the top of the newer lighthouse (also taller) and we had an amazing view from up top!
After Michigan Island, we actually went back to Presque Isle to pick up some day hikers, and our friend Ranger Gail! Cara was delighted to see her again, and Gail kept her entertained almost the entire way back to Bayfield. We arrived back in Bayfield around 1:30pm and unceremoniously disembarked from the boat and started the walk back to the Airstream. Gail walked down the dock with us, but then Cara had to tell her goodbye. We are so grateful for amazing rangers at National Parks and for all their hard work. Sometimes rangers make the difference between a good experience and a great one.
We were tired, a little smelly, but overall very pleased with our experience. The kids did so awesome. Despite some less than ideal weather (cold and windy!) there was no complaining and they all just rolled with it. We’ve already started thinking about our next trip, although it definitely won’t involve an island and a ferry ride!
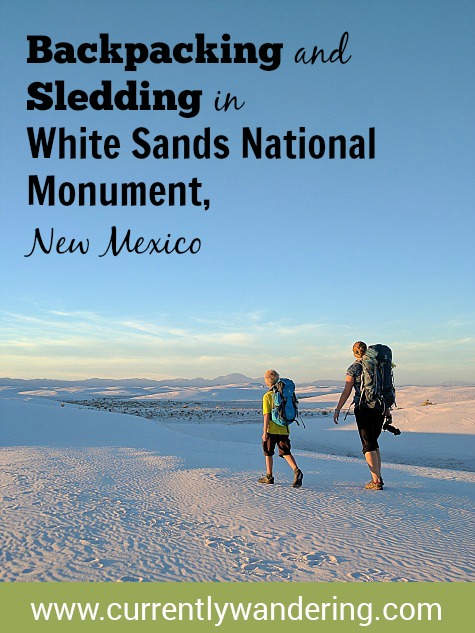 White Sands National Monument is one of those other-worldly places. Located in southern New Mexico this park is truly one of a kind. We visited three years ago on our initial trip from Virginia to Utah and the kids have been begging to go back. When we decided to stay west this winter they unanimously voted White Sands as the one place they wanted to visit for sure.