While we would have loved to receive this item for free to review, we actually spent money to purchase it. This post contains Amazon affiliate links which help to fund the blog in a small, small way. Thanks for helping us out!
Most backpacking requires a way to filter water. Despite looking clean and clear, most water contains bacteria that will make you pretty sick. The problem is easily remedied by a few methods. Water treatment drops will kill bacteria, but they don’t remove them and can leave a bad taste in the water. My favorite method is the use of a water filter.
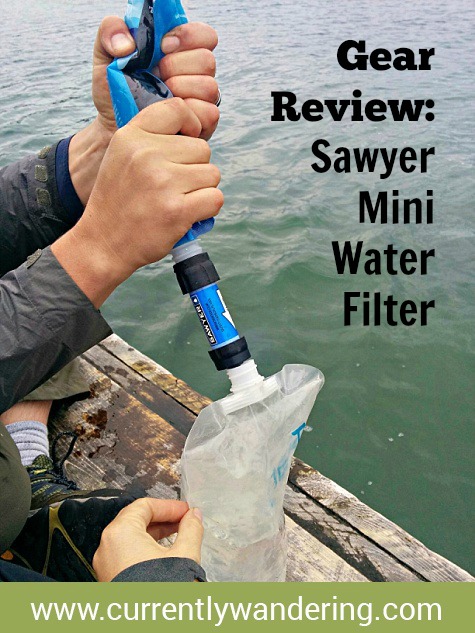
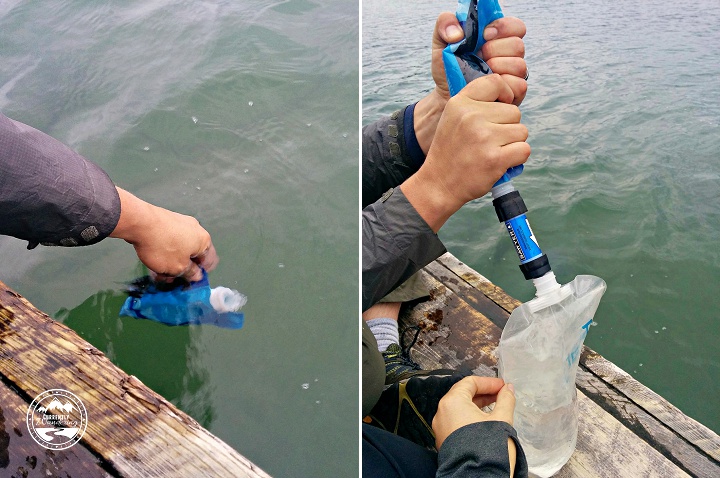
Most of the water filters I’ve used in the past have been great, but fairly bulky and expensive. On our recent trip backpacking in the Apostle Islands, we tried a new water filter that is both cheaper and lighter than any I’ve tried before.
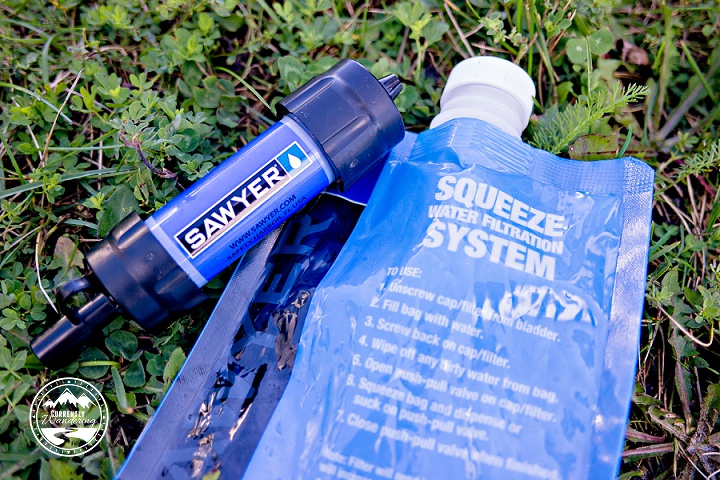
We used the Sawyer Mini water filter, which can be bought for $20 to $25 either online or in many outdoor stores. The filter is small and lightweight. It does sacrifice some ease of use, but for the weight and cost savings, the tradeoffs are worth it for most purposes.
The filter unit itself is easy to understand. Dirty water goes in one end, and clean water comes out the other. With the filter comes a small, lightweight bag to use as a ‘dirty’ bag. The connector is a standard bottle thread though, so you can replace the included bag with anything from a cheap water bottle to a full sized two liter bottle.
You filter water by filling the included bag (or replacement bottle) from a lake or a river and screwing it on to the filter. you then squeeze water through the filter and into your clean water bottle. The process is quick and easy. You do need to make sure you don’t get dirty water on the clean end of the filter, but that really is the only thing to pay attention to.
In addition to using a different bottle, there are other upgrades you can make as well, including quick attachment connectors to common water bladder systems. In a genius way, this filter system is perfect. It provides just the bare necessities, and allows expansion and customization as desired.
This filter performed wonderfully during our backpacking trip. It will also make an excellent addition to our emergency supplies, allowing us to filter water in circumstances where we cannot find clean water.
There are instructions right on the dirty bag for how to backwash the filter (when it starts slowing down or gets clogged) as well as how to clean for long term storage. Spoiler- you just use a little bit of bleach water and squeeze through the filter, drain it, and let it air dry.
Pros: lightweight, small, easy to use, screws onto any top of regular bottle.
Cons: Included bag is a little small for a family of 5. It just takes a little longer to filter enough water.
We are definitely glad we have this, and plan to upgrade to a larger dirty water bag in the future. We’ll buy one of Sawyer’s, or most likely just get another Platypus Platy Bottle and write “Dirty” on it with a sharpie.
In one of my church meetings this past Sunday (Elders Quorum, for Mormon readers), everyone in the room introduced themselves by name and answered a question to help us get to know everybody. Last Sunday in the same group, they asked everybody what their favorite meal was. This time, we all shared our favorite alternative sport. The answers were entertainingly varied, including ping-pong, lacrosse, and curling. The mention of curling prompted many heads nodding in approval, because Minnesota. One guy claimed Settlers of Catan as his favorite sport. Game night in his family must be quite an event. I wonder if it is considered full-contact?
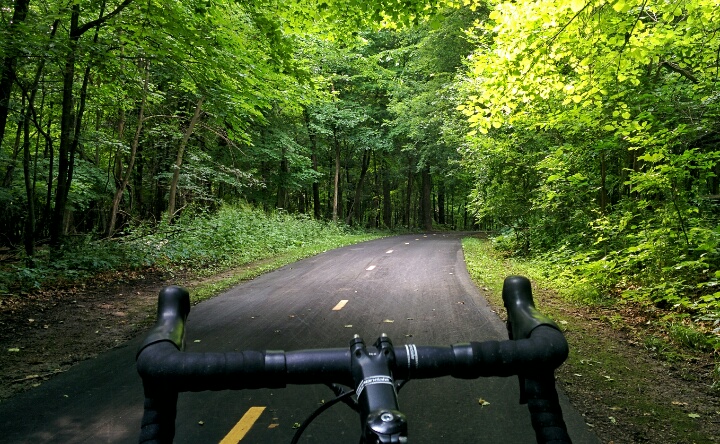
When my turn came, I claiming cycling as my favorite. I’ve ridden several centuries prior to full-time travel, so this was a reasonable answer. We do travel with bikes, and try to ride when we can. One of those opportunities came up today, and I rode a nice paved loop right off the state park we are staying in. I enjoyed my ride, but I began to rethink my answer given on Sunday.
I’ve decided that full-time travel is my favorite sport.
We regularly practice planning a route, finding places to stay, dodging ‘weekend warriors’, managing tanks, battery power and propane, and finding good signal, just to name a few. Sometimes luck and practice come together to place us in an amazing place. And sometimes we end up in a dumpy rv park. Really, I’m surprised at how many times things just work out, even when we are not on our A game.
Next time somebody asks me that question, I’m going to have a much better answer.
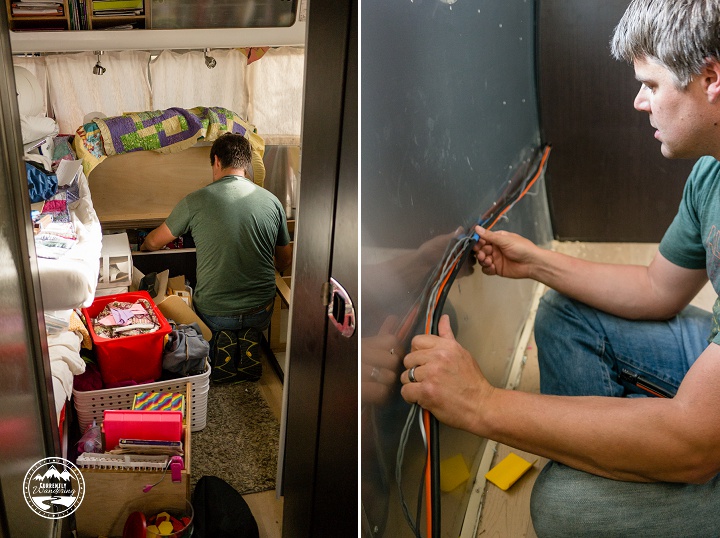
With the solar mounted on top (part 1, part 2) and the wires run to the forward compartment (part 3), there was only one thing left to do. The next step in my project was to connect it all up!
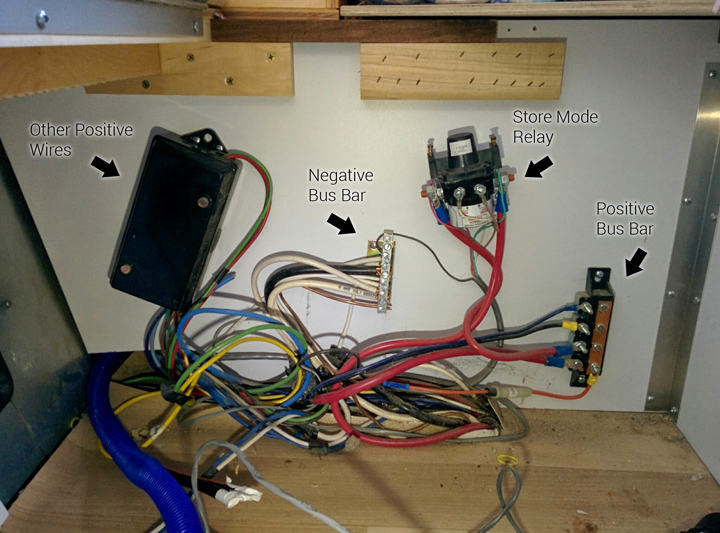
Underneath Cara’s bed is the wiring panel where the battery is connected to the rest of the DC wiring. This is a prime location for the solar charge controller because of it’s proximity to the batteries. Later, I’ll install the inverter nearby for the same proximal reason. The existing wiring in this location was a positive bus bar, a negative bus bar, the ‘store’ mode disconnect relay, and a positive DC breakout box.
Also found in this location was the ends of the solar pre-wire placed by Airstream. I knew they were there, but the wire gauge was so small that I had to replace it anyway.
As I was adding plenty of components, I had to do a little rearranging of the existing components. They were just screwed into the plywood panel, and I was able to re-arrange them without too much difficulty.
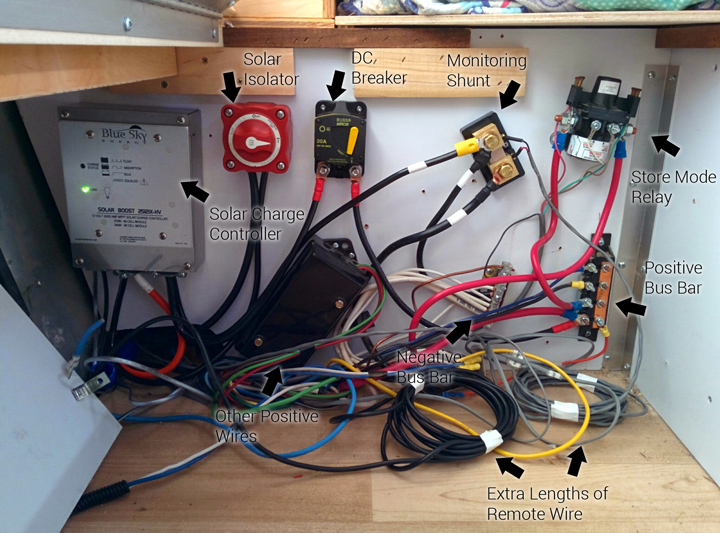
In principle, the solar panels are wired to the solar charge controller, and the solar charge controller is wired to the positive and negative bus bars. In practice, there are a few additional details.
The first component I installed was the isolator switch on the positive wire leading from the solar panels. By switching this off, I was able to protect myself (and the equipment) from an accidental short during the rest of my wiring project. (A ‘short’ is when you accidentally connect two wires that are not meant to be connected. Ever accidentally touch the clamps of a jump start cable together? That is a short.) After installing the isolator switch, I left it off for the rest of my install.
I next wired up the solar charge controller. A short run from the just installed isolator switch on the positive side, and the negative side of the cable from the rooftop panels. The next step involved connecting the ‘out’ side of the controller to the existing DC system. The positive side of this connection is run through a switchable 30 amp DC breaker. This switch automatically flips off if the solar charge controller attempts to output more than 30 amps. With a maximum output of approximately 24 amps, I suspect this will never trip. It DOES serve as additional protection, and also as an extra isolator switch should I manually switch it off. The positive side is then wired to the positive bus bar.
The negative side of the charge controller ‘out’ connection can be wired directly to the DC bus bar, but I cheated slightly and attached it to our last new component: The battery monitoring shunt. This magical component can measure the flow of electricity from one side to the other. This enables both a real-time view of charge/drain activity on the battery, as well as keeping track of how many ‘amps’ or amp-hours are left in your battery. This measure is unaffected by load (like voltage) and gives a great indicator of battery charge state at a glance.
The monitoring shunt is installed between the negative terminal of the battery and the rest of the negative half of the DC system. I moved the negative battery cable from the DC bus bar and connected it to one side of the shunt, and added a new cable between the other side and the DC bus bar. Now, every use of DC power can be monitored. More on that later.
I connected the negative side of the charge controller DC ‘out’ to the shunt as well, on the non-battery side. (ONLY the battery should be connected on that side of the shunt. EVERYTHING else is connected on the other side.)
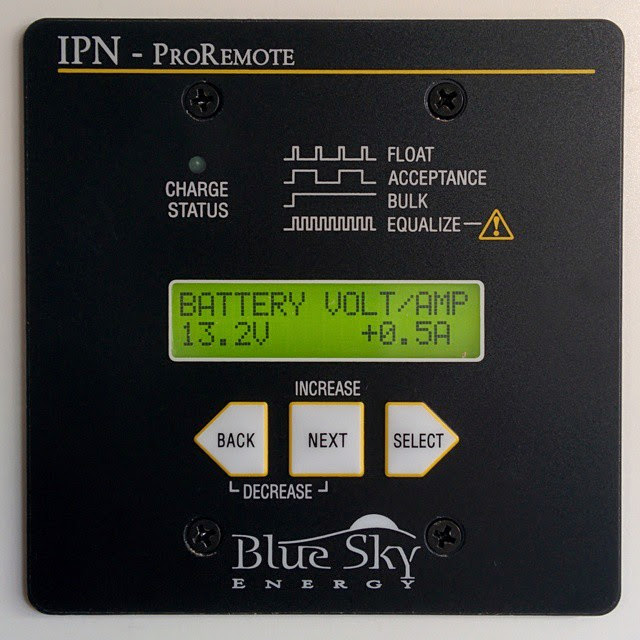
At this point, everything ‘major’ is in place. In part 3 of this series, I mentioned running remote cables from the kitchen cabinet down to the electrical panel and along the same run as the solar wire. At this point, I attached these remote wires to their various components. The IPN Pro Remote cable attached to the solar charge controller. The shunt monitoring cable attached to the shunt with little screw mounts.
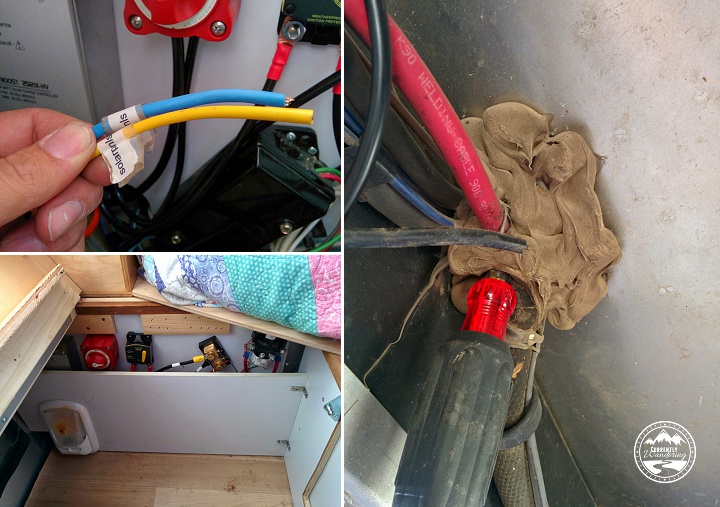
The last step I’ll describe was really the hardest step of this last phase. The solar charge controller has a remote temperature sensor that allows it to adjust it’s charging based on the temperature of the battery. This cable attaches to a battery terminal in the battery box, and to the solar charge controller inside the Airstream. The existing battery cables are run through a heavily caulked hole in the floor. By poking carefully with a phillips screwdriver, I was able to poke a hole through the middle of the bundle without damaging any existing wire. After attaching it to the battery and threading it out of the battery box, I ran it alongside the battery wires, and protected it with some plastic wire wrap. I shoved it through the hole I poked, and then squooze a bunch of silicon sealant around the wire from the top and the bottom. The sensor attached easily to the charge controller, and then I attached the cover.
The weak-sauce wires prewired for solar, my screwdriver hole making method for the temperature sensor, and how it all looked with the protective panel reinstalled.
At this point, everything was installed. I only needed a short length of wire and a few wire terminals from the store, and everything else was provided in the installation kit from AM Solar. Between their instructions and the inspection of Dave Zimmerman’s wiring, I was able to work out all the details and complete the self install.
The only thing left to do was to flip the system on. I started with the solar isolator switch, but nothing lit up upon flipping that on. Next was the 30 Amp breaker, and that did the trick. Things started blinking, the power in the Airstream worked again, and I immediately started my addictive ‘check the solar monitor’ habit.
Really, I’m surprised that everything worked out as well as it did. I re-attached the plywood panel that covers the wiring, and the project was complete. Really, I had a few random things to do, like zip-tie wires in various places, but it all feels better when the darn thing works!
At the conclusion of Part 2, we had panels mounted on the roof and wired up to the combiner box. We connected the 6 gauge wire to the combiner box and dropped it behind the fridge. The next phase of this project involved running the wire from behind the fridge to the forward compartment. In the forward compartment, I’ll wire it up to the solar charge controller. But first, we must get there.
I drilled a hole in the lower segment of fridge compartment side wall. The side wall there is plywood with a metal covering. I drilled through both the metal and the wood, enlarging the holes so it fit the 6 gauge wire. That hole places the wire in the utility space underneath the wardrobe. In the utility space there is one side of a wire chase that runs side to side under the hallway down the middle of the Airstream. The other end of the wire chase comes up behind the electrical panel and underneath the pantry. I pulled the electrical panel out, which is pretty easy to do. I had done it several times before, most recently to upgrade the single stage converter to a multi-stage converter. Threading the wire through that wire chase was actually easier than I had imagined. After pushing the wire into one side, I was able to pull it out of the far end using my fingers. After I had a handle on both sides, I was able to thread the remaining wire pretty quickly.
Me, looking both tired and surprised at how easy the wire chase was.
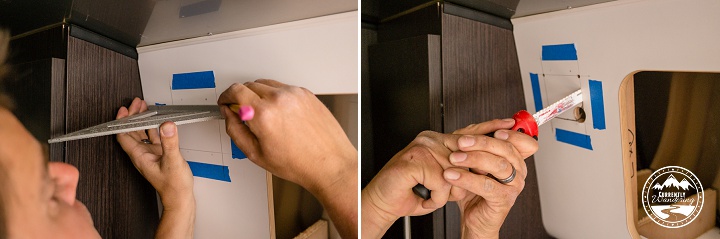
I paused my wire-running activities here to install the remote control panel for my Blue Sky solar charge controller. I measured and taped, and then drilled holes and used a small hand saw to cut the right hole for the controller in the upper kitchen cabinet. We fed the wires through a new hole in the pantry panel, and down the back of the pantry to meet up with the 6 gauge wire from the roof. There were two wires connected to the remote control: the remote control wire for the charge controller, and the shunt wire that connects to the battery monitoring shunt that I would install. After joining the main 6 gauge solar wire, these wires followed the same route for the remainder of the trip.
I then ran the wire through the side wall and above the hot water heater under the bathroom sink, later securing them with zip ties to to the underside of the shelves. I then ran the wire behind the back of the bathroom cabinets, and through a hole I drilled in the bathroom wall and into the bedroom.
My wiring route at this point is very specific to my bedroom configuration. During the remodel last year, I removed the walk-around queen and installed two rv-twin sized beds along the side walls, and a toddler sized bed in the very end. This configuration means that the remainder of my wire run is hidden underneath one of the side beds.
If you have a walk around queen, the wire run would not be hidden. In this case, the best solution I have seen is to run the wires along the floor, have a metal wire cover made, and screw it down to cover the wires. This solution is very nice looking, and barely noticeable at all.
I should mention here that an alternative wire run is possible. I’ve seen several installations where they ran the wire out through the bottom of the Airstream, through some conduit, and back up into the forward compartment. I didn’t like this solution for several reasons, including durability and aesthetics, but it might be a viable option if none of the other wire route paths work.
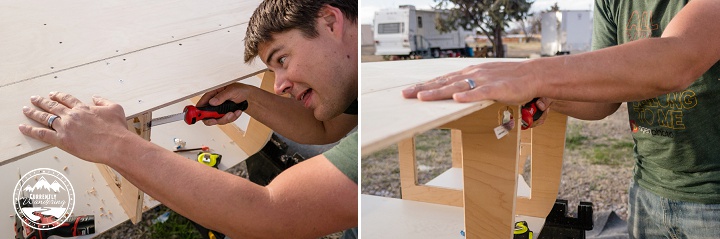
To run the wire underneath the bed, I needed to cut a notch in the vertical supports of the bed. When my Father and I designed the beds, we designed them to be removable without full disassembly. I emptied the storage compartments, removed some trim, and pulled the bed outside to make the cuts.
In the corner underneath the kids’ bookcases between the side bed and the back bed is a bundle of wire. During the bed remodel, I had made a cover for that wire bundle, and the added 6 gauge wire fit in just fine. I ran the wire along the same path, which led it right into the wiring panel underneath the front bed compartment.
I put the side bed back into place, replaced the electrical panel, and sealed the wire path in the fridge compartment with some silicon.
A few weeks ago, we found ourselves hiking the Sound of Silence Trail in Dinosaur National Monument. It had been a rainy few days, but we found ourselves with a few hours of sunshine and set out on the trail. We were blessed with visitors from Jess’s family, and had a wonderful time chatting as we hiked up the trail.
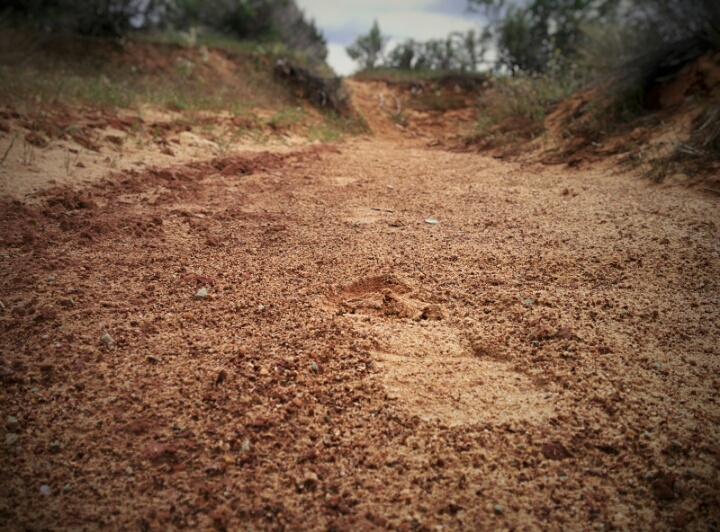
Fairly soon on the hike, the trail dipped into a wash, and we followed the winding course of the wash for a mile or so. The rain the previous few days had washed the trail clean, safe for some wild-animal hoofprints and the footprints of one lone hiker. The trail was beautiful, and were were enjoying the solitude. An occasional trail sign assured us that we were on the right path. About a mile up the wash, the trail (marked with a sign) led up and to the right. The trail led up and out of the wash, and then wound through some clay hills that reminded me remarkably of the Painted Hills in Oregon.
The tight turns in the trail through the clay hills soon revealed the name of the trail: despite being only a few hundred yards in front of the rest of our hiking party, we could not hear any sound of their talking. It occurred to me that this point that I was glad to have signs along the trail to guide our way. Without signs, the limited visibility and inability to hear could create a dangerous situation should we become lost.
The trail had signs at every significant turn, but at points I began to wonder if we were still on the trail. The rain had wiped out all previous footprints, and sections of the trail were not that distinct from the surrounding landscape.
I found myself watching for the footprints of that lone hiker who had hiked the trail before us that morning. Seeing the path of somebody who had gone before us was comforting. The trail signs were sufficient to guide us at forks in the trail, but it was the footprints that gave me confidence.
God’s prophets (ancient and modern) serve as signposts along our trail of life. At significant junctures we can learn from their teachings and choose the path that aligns with principles of The Gospel of Christ.
At times on our journey through life, we might wonder if we are still on the right path. Recent controversy, disasters, or personal relationships at times wash out our trail. During these times, it is often the examples of others that give us confidence in our direction. Their example, living the Gospel day by day, little by little, are the footprints that stretch before us.
As we neared the end of our hike, the footprints before us gave us confidence. The gap in the rain was closing. With a rainstorm moving toward us and raindrops starting to fall, we started to hurry. We followed those footprints rapidly down the trail, and made it back to the truck only slightly wet.
I’m grateful to those whose footsteps I follow, both in life, and on the trail. Their step by step examples give me courage and confidence as I push onward.
 In the utility space there is one side of a wire chase that runs side to side under the hallway down the middle of the Airstream. The other end of the wire chase comes up behind the electrical panel and underneath the pantry. I pulled the electrical panel out, which is pretty easy to do. I had done it several times before, most recently to upgrade the single stage converter to a multi-stage converter. Threading the wire through that wire chase was actually easier than I had imagined. After pushing the wire into one side, I was able to pull it out of the far end using my fingers. After I had a handle on both sides, I was able to thread the remaining wire pretty quickly.
 We fed the wires through a new hole in the pantry panel, and down the back of the pantry to meet up with the 6 gauge wire from the roof. There were two wires connected to the remote control: the remote control wire for the charge controller, and the shunt wire that connects to the battery monitoring shunt that I would install. After joining the main 6 gauge solar wire, these wires followed the same route for the remainder of the trip.