Categories
Fitness & Recipes

Peanut Butter Oatmeal Power Cookies

SAM_3708-Edit

These breakfast “cookies” are ridiculously delicious. They’ve turned into one of our go-to hiking snacks as they are easy to stash in a small tupperwear and toss into our pack. They are loaded with Peanut Butter energy goodness, apples, oats, and bananas!

I’ve made them both with chocolate chips and without and lately the kids have preferred them without (I think they are crazy – chocolate chips make everything better).

We also freeze these and I’ll pull them out for snacks, let them sit on the counter for an hour and then we eat!

SAM_3705-Edit

Peanut Butter Oatmeal Power Cookies
adapted from thebakermama.com

1 1/2 cups flour (I do 3/4 white, 3/4 wheat)
2 1/2 cups oats (any kind)
2 tsp baking soda
1/2 tsp salt
1/2 tsp cinnamon
1 cup creamy peanut butter (PB2 works great – 1 cup powder, 1/2 cup water)
1/4 cup dark brown sugar
1 large egg
1 tsp vanilla
1 cup mashed banana (about 2 medium)
1 cup shredded apple (peeled if you are feeling like an over-achiever)
1/2 cup chocolate chips (optional)

Preheat oven to 350 degrees.
Blend peanut butter, sugar, egg, and vanilla.
Mix in mashed banana.
Add dry ingredients: flour, oats, soda, salt, and cinnamon.
Stir in apple & chocolate chips.
Form 2-4 Tbsps of dough into balls and flatten slightly with the bottom of a measuring cup.
Bake for 10-15 minutes or until golden brown and no longer mushy.

Peanut Butter and Oatmeal Power Cookies

Categories
Fitness & Recipes

Airstream Kitchen: Corndog Muffins with Vegan Cornbread

Corndog muffins are super yummy and a great hit with the kids!Okay, so I know adding a hot dog to a Vegan Cornbread recipe kind of defeats the purpose of the whole vegan thing. Trust me, though, the cornbread recipe is so good I couldn’t imagine using any other one.

We’ve made this cornbread recipe plenty of times and even taken it to a full time traveler pot luck or two (although we did always serve with butter and honey!). Everyone agreed it was delicious. Then I saw a recipe where they added hot dogs in the middle of cornbread muffins to make a corndog, and thought “That looks WAY healthier than the breaded, fried, and frozen versions”. So I tried it and my kids gobbled them up! Total win-win.

It is super easy to make, is filling, and best of all, healthy! Unlike most traditional cornbread recipes, this leaves out all the fattening butter and replaces it with the flaxseed mixture. Don’t let it scare you! Ground flaxseed can be found in most grocery stores (trust me, I’ve found it all over the country), and is usually in the baking aisle.

Corndog Muffins/Vegan Cornbread

adapted from livinlightly.com
serves: 22 muffins or a 9×13 pan of cornbread
21 Day Fix: 1 1/2 Yellow

Ingredients for Cornbread
1/4 cup ground flaxseed
3/4 cup water
2 cups non dairy milk (we use Soy)
1/2 cup canola oil
2 cups flour (we usually just use white)
8 tsp baking powder
2 cups whole grain cornmeal
1/2 cup white sugar
1 1/2 tsp salt
For Muffins:  1 package turkey hot dogs

Directions:
1. Preheat oven to 425 degrees. Line muffin tin or grease a 9×13 pan.
2. Heat water in a small sauce pan on stove. Once it is boiling, add the flaxseed. Reduce heat and whisk until you get a gel-like consistency.
3. Combine milk & oil in a large bowl. Add sugar and mix well.
4. Add dry ingredients to the wet mixture (Sift flour if you want – I’m always too lazy!) and mix well.
5. Stir in flaxseed mixture.
6. Fill muffin cups 3/4 full, or spread cornbread mixture into a 9×13 pan. It’s pretty thick, but don’t worry.
7. If you are doing muffins, slice each turkey hot dog into thirds and then stick one in the middle of each muffin.
8. Bake – 9×13 pan for 20-30 minutes, muffins for 12-15 minutes.
9. Eat & enjoy!

Corndog Muffins are a great way to spice up lunch for your kids.

Categories
Fitness & Recipes General Information

Airstream Kitchen: Grilled Peanut Chicken

SAM_3836-Edit

I can’t take credit for this recipe even though it has become one of our absolute favorites. Earlier this year we were in Las Vegas for a few weeks, and our friends Heather & Jeff from AudreyAirstream graciously babysat our kids so we could go on a date. Not only did they babysat, but they also offered to feed us dinner! She made these amazingly delicious peanuty chicken skewer things and we all about died with how good they are! Naturally, I requested the recipe and we make them at least twice a month.

SAM_3835-Edit-2

If you aren’t a fan of peanut butter, this recipe is not for you, but being the avid Thai food fans that we are, sometimes I could just drink the sauce. Enjoy!

Grilled Peanut Chicken
1/3 cup hot water
1/4 cup Teriyaki BBQ sauce or marinade
1/4 cup creamy peanut butter (PB2 doesn’t cut it – we tried!)
1/4 cup soy sauce
1/4 cup chopped cilantro
2 Tbsp Dijon Mustard
1 lb chicken breast halves cut into 12 thin strips
Skewers (optional)

Mix water, BBQ sauce, peanut butter, soy sauce, cilantro and mustard in a medium bowl with a whisk.

Pour half the mixture into a large, resealable bag. Add chicken and marinate for 1-2 hours.

Refrigerate remaining sauce for dipping

Thread chicken onto skewers (or just cook it if you are lazy like us!) and grill for 5-7 minutes or until cooked through.

Our favorite is to serve with brown rice & some kind of vegetable. Drizzle leftover sauce over both the chicken & rice. Yum!

SAM_3839-Edit

Grilled Peanut Chicken - this recipe is SO ridiculously delicious!

Categories
Daily Life

Using Campendium to Find Awesome Campsites & $50 Weekly Giveaway

campendium_ad

We get a lot of questions about how to find our awesome campsites – whether they are boondocking, dry camping, National Forest or even just plain old RV Parks. Last year, our answer would have been varied as we had a lot of different tools we use. Since our official launch from the house last June, however, there’s really only one place we turn to to figure out where to stay: Campendium.

Campendium 1

Campendium is the brain child of Brian & Leigh of Aluminarium whom we met for the first time in 2014 near Tucson, and then again in the Indian Bread Rocks in 2015 near Fort Bowie. Super awesome, welcoming, and helpful with just about any questions you might have, Brian & Leah are an amazing couple.

IMG_2988-Edit

Why do we love Campendium so much? Let me give you a list:

1. Comprehensive collection of ALL types of campsites. From RV Parks, National Parks, National Forest, BLM land, Casinos, and WalMart parking lots, Campendium lists them ALL. No more going back and forth from freecampsites.net to reserveamerica to instagram to figure out what’s available in a certain area. We just type in a city, national park, or even a specific campground name and we get results.

Although we LOVE to boondock, we also don’t love it 100% of the time. We like to vary where we stay, so having all the options in one place is really great.
Campendium 2

2. User Campground Reviews. Find out what real people think of  a campground. The user base (so far) is awesome. Great, honest reviews for campgrounds all over the country. Most reviews I’ve found to be a mix of the actual campground itself (location, site quality, noise level, ease of access) and things to do in the area.

3. Cell Phone Signal Reviews. This is HUGE for full timers like us. We can’t stay in places that don’t get Verizon signal because Sam has to work. Going off grid on “vacation” is something we do sparingly so knowing beforehand if we will have signal is a big deal for us. Often we won’t go to a particular campground if we can’t get signal but will find another site nearby  instead. There’s a super easy graph that indicates how good the signal is and what type.

4. Blog Posts. There are many full time travel bloggers that post comprehensive campground reviews on their blogs (I am not one of those- obviously). This is great as there is also a tab where user can submit their own blog posts and they’ll show up in a nice little list. When I want to find out more info on a campground, I’ll often turn to these.

5. Photos. Leigh and Brian (in particular) spend HOURS in an area taking photos of campgrounds. I love it when they visit an area because suddenly Campedium is flooded with campground photos. Anyone can submit pictures, however, and its always great to see what a campsite will look like before showing up!

Campedium2

Campendium is definitely in its infant stages, but more users are joining by the day and I love seeing all the reviews and great places to camp! They have a list a mile long of improvements, ideas, and places to take this resource and I can’t wait to see how much better it gets over the next year or two!

$50 Weekly Giveaway-

For the next 9 weeks, Campendium is doing a weekly $50 giveaway! All you have to do to enter is submit one campsite review. Easy peasy! One review = one entry so get going! Check out their blog post on it here, and then head to Campendium.com to sign up for a FREE account and get going!


Categories
Fitness & Recipes

Grilled Barbeque Chicken Pizza

IMG_20150323_183024

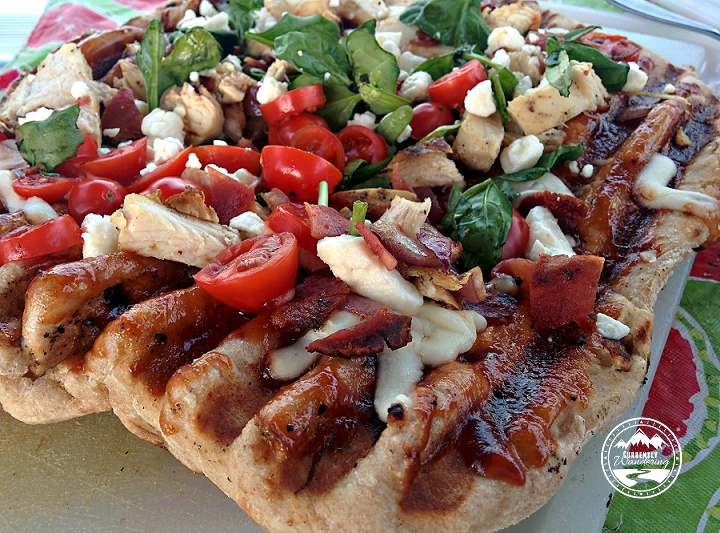
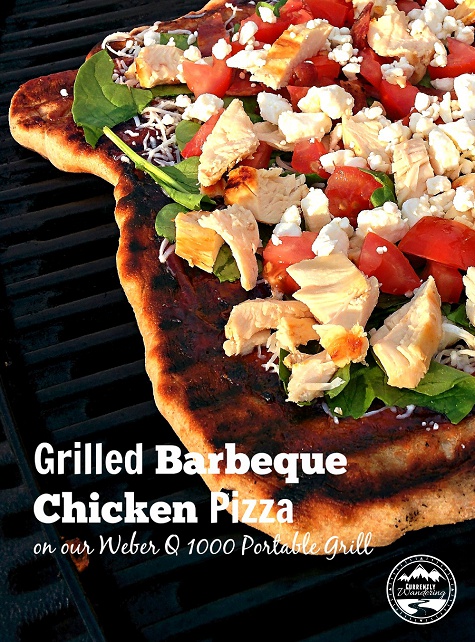
I love pizza, and even better is GRILLED pizza. So delicious. There are a million different variations on toppings, but this Spinach, Chicken, Tomato, Bacon, BBQ sauce, Feta one just happens to be a favorite.

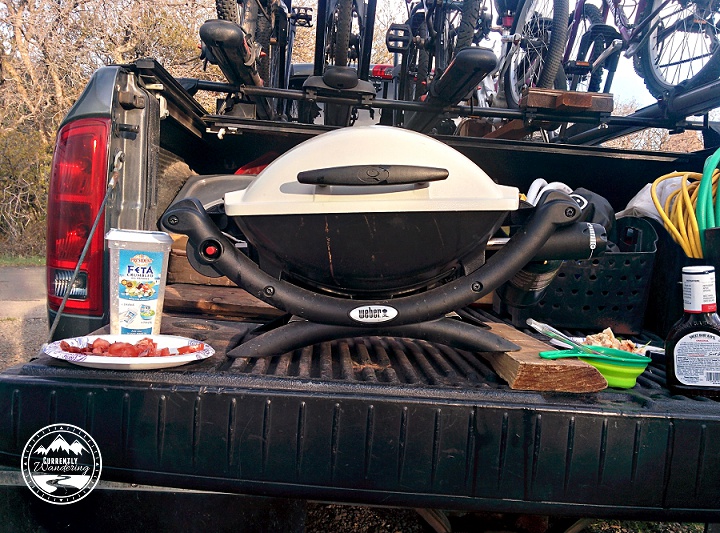
We have a Weber Q 1000 bought from Amazon (affiliate link) and we love it. The only thing we’d love MORE is to have bought the model with the thermometer. Unfortunately, that particular model also came with the side wing tables which we did NOT want so we figured that $30 was not worth the thermometer. Oh, it totally would have been. We have yet to buy a stand alone one, so mostly its just guess work as to how hot the grill is.

IMG_20150412_183656

The only trick with this recipe is working fast so your cheese has time to melt before the bottom of your pizza crust burns. Sam and I usually work together once he flips the crust and we have everything set out ready to go by the grill (notice how our truck is very NOT level):

IMG_20150412_184029

Our kids gobble this up, although Cara prefers the pieces with less tomato and spinach. You can use as much or as little BBQ sauce and cheese as you’d like – we tend to go less as its healthier and we have a bit of a dairy intolerance around here.

Enjoy and let me know how it goes!

Yummy Pizza Dough

Makes 2 14″ pizzas (enough to feed our family of 5)
 
1 1/4 cups warm water
2 teaspoons active dry yeast
2 tablespoons granulated sugar
1 tablespoon honey
1 tablespoon olive oil
2 teaspoons salt
2 cups all-purpose flour *more if needed*
2 cups white wheat flour (if you’re doing regular wheat flour, do 1 1/2 cups instead and increase the all-purpose flour to 2 1/2 cups).

In a small bowl, mix together the sugar and warm water. Sprinkle the yeast on top and let sit for 10 minutes to activate. Add the remaining ingredients (flour 1/2 cup at a time just in case) and mix well. I always have to add in more flour (not less) so its not crazy sticky, but do whatever works for you.

Spray a bowl with cooking spray, scrape your dough into the bowl and cover.  Cover and let rise on the counter about 3-5 hours or until it has at least doubled in size (or you are impatient and just hungry and want to eat!). You can also refrigerate this for up to 3 days if you want to make it ahead of time, but I’m never that prepared.

To Make the Pizza You’ll Need:

Pizza dough
olive oil
BBQ Sauce (our favorite is Sweet Baby Rays)
1-2 Grilled & thinly sliced chicken breasts
3-4 slices of turkey bacon, cooked and crumbled
1 cup fresh baby spinach, roughly chopped
Cherry Tomatoes- halved
Feta Cheese

Get out all of your toppings and prep them beforehand, because once you start grilling its a mad dash to get it all on there. About 45 minutes before we want to eat, I’ll cook and crumble the bacon, chop the spinach, halve the tomatoes, and have Sam grill the chicken.

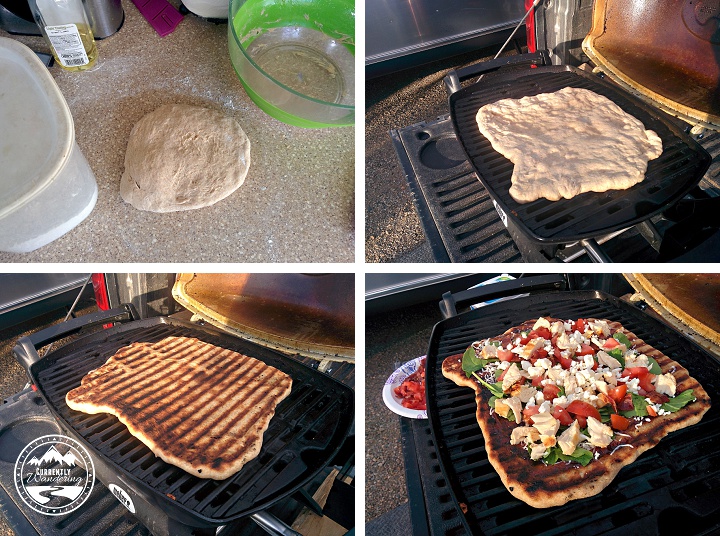
When all your ingredients are ready, get your BBQ turned up hot (it might already be warm from grilling the chicken) while you divide the dough in half and roll out on the counter. Try to get it as thin as you can, but ours usually ends up being on the thicker side and I kind of like it that. Plus, our counter just really isn’t that big. I usually transfer to a plate and send it outside with one of the kids to give to Sam who is stationed at the grill.

When the grill is hot, spread oil over one side with a basting brush and put the crust on the grill. Spread oil over the top side now and let it cook for about five minutes, or until it starts to look nice and toasty. Carefully flip it over.

Working quickly (so you don’t burn the pizza!), spread the barbecue sauce over the crust, then sprinkle the mozzarella cheese evenly over that. Add spinach, sliced chicken, bacon & tomatoes, and then top with the Feta cheese.

Close the lid of the grill and let it cook for about 4-6 minutes, until the bottom of the crust is crispy and the cheese is starting to bubble.

With grilling tongs, carefully slide the pizza onto a cutting board or cookie sheet (this usually takes two of us!). Let cool for about 5 minutes, then slice and serve.

Eat & enjoy!

Grilled Chicken BBQ Pizza is super easy and one of our favorites!