Categories
Featured Destination National Parks Oregon

Visiting John Day Fossil Beds in Eastern Oregon

John Day Fossil Beds_09

Eastern Oregon definitely gets less press than its beautiful counterpart – the coastline. The geography is very different, and luckily for us, so was the weather. After Halloween in Lincoln City (2014) we knew we needed to get out of the rain or we’d go crazy. A rather intense couple of driving days took us through Salem to Bend, to Prineville, and on to the Painted Hills Unit inside of John Day Fossil Beds National Monument.

When We Visited: November 3-4, 2014

Ages of Kids: 9, 7, 4

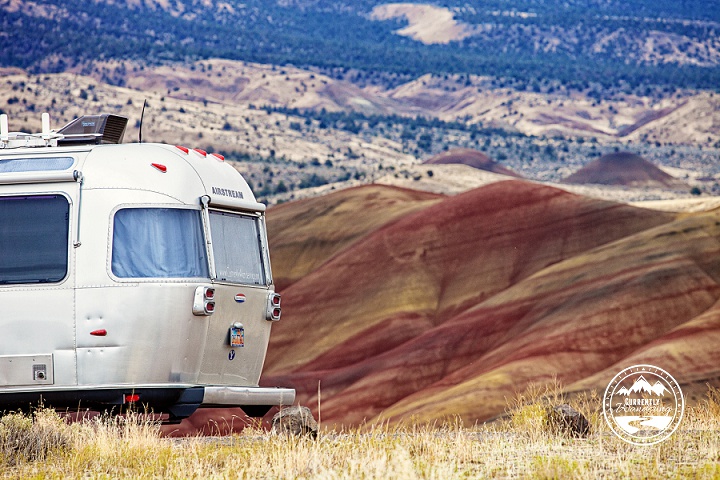
Where We Stayed: There is no place to camp IN the park. This one of the only parks we’ve done a drive through with the Airstream. We mostly just planned to have Sam take the day off work (except for a lunch meeting) and we left early from Prineville to the Painted Hills Unit, then the Visitor Center in the Sheep Rock Unit. Once we were done, we then drove to Clyde Holliday State Recreation Site, arriving after dark. The park was peaceful and we would definitely recommend staying there!

John Day Fossil Beds_06

Inside of the John Day Fossil Beds National Monument there are three different units: The Painted Hills Unit, the Sheep Rock Unit, and the Clarno Unit. Which you visit is largely determined by your vehicle type, and how much time you have as they are pretty spread apart. We had seen photos of the Painted Hills, so for sure that was on our list and then we needed to hit up the Thomas Condon Paleontology Center in the Sheep Rock Unit to get our Junior Ranger Books.  We decided to save the Clarno Unit for a later visit since it was farther out of the way.

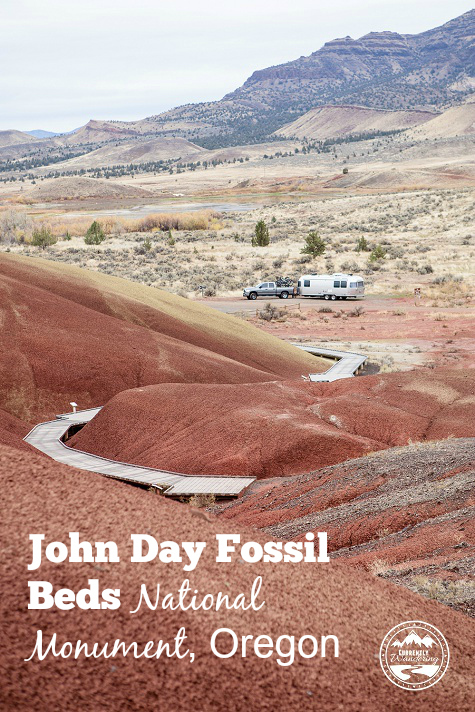
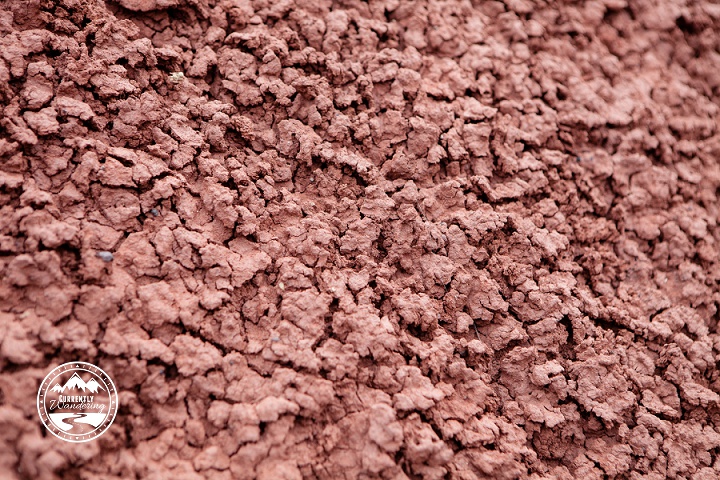
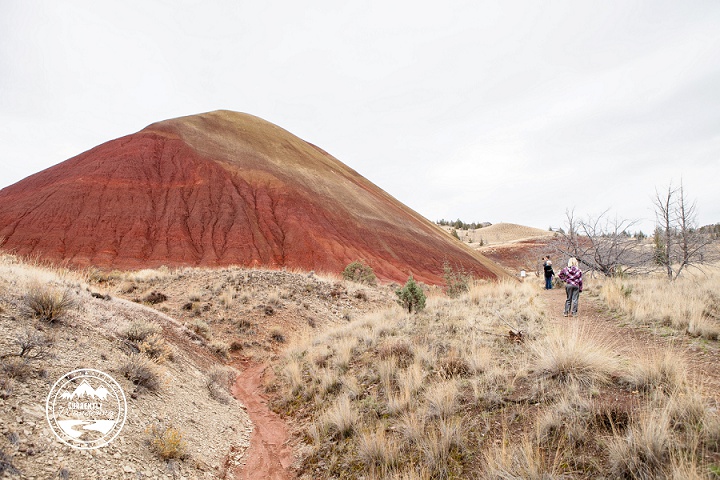
The Painted Hills are an impressive geological collection of varying layers of rock and clay. The reddish color had a pretty sticky, mud like consistency which was unsurprising since it had been raining. However, it IS clay so I imagine it is always a little sticky.
John Day Fossil Beds_07

In addition to the short Painted Cove boardwalk hike that takes you up close and personal to the clay, there’s also a few overlooks with views like this one:

John Day Fossil Beds_20

We also drove into the unit a little farther and hiked the short Red Scar Knoll Trail, which ended at this huge pile of yellow and red clay.

John Day Fossil Beds_11

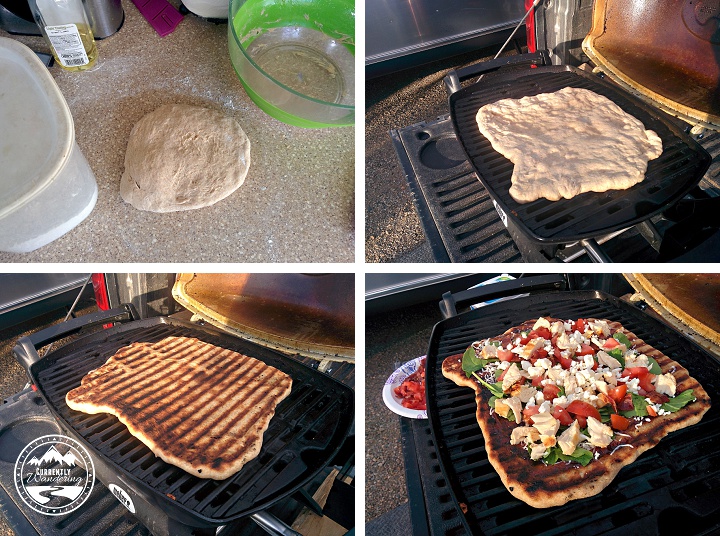
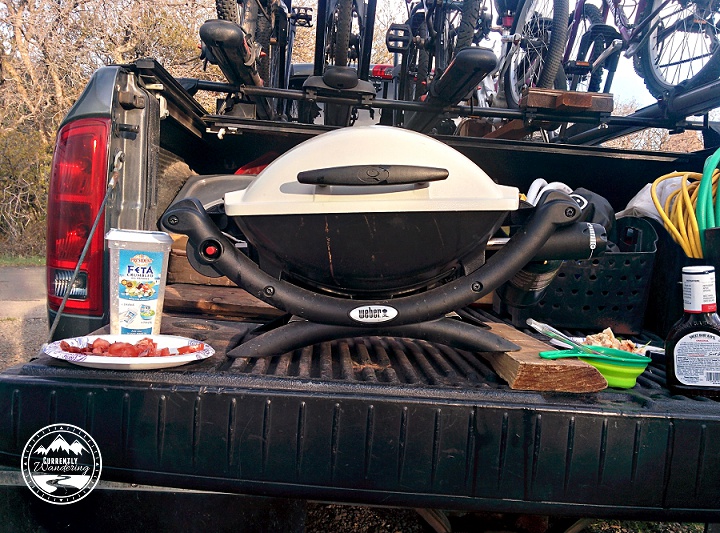
After leaving the Painted Hills Unit, we stopped a few miles down the road where we actually had cell coverage so Sam could make his work meeting. While he worked to the pay the bills, the kids and I whipped up a quick lunch. I love traveling with our refrigerator.

After that it was about an hour drive to the Thomas Condon Paleontology Center in the Sheep Rock Unit. We picked up our Jr. Ranger Books and then hung out in the children’s room for a bit while they worked on their school for the day

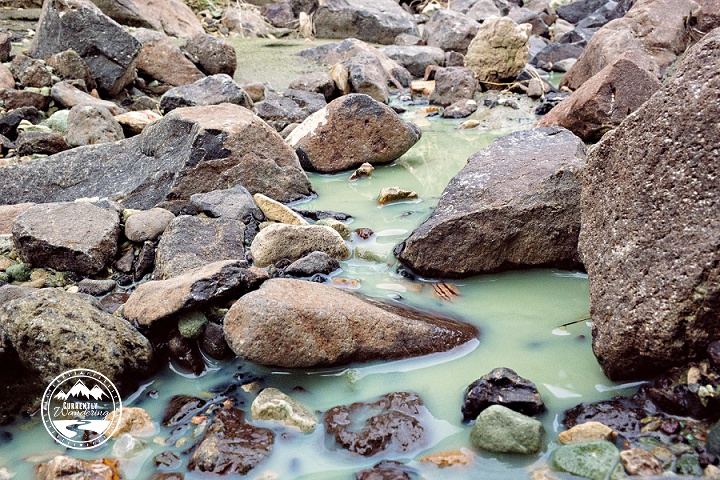
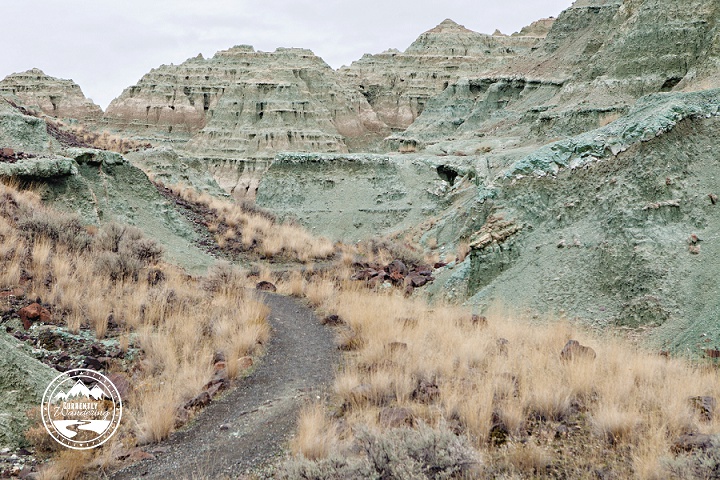
Since it was already afternoon and we didn’t have a ton of time, the ranger recommended hiking through Blue Basin on the Trail of Time. It was spectacular! I have never seen anything like these blue hills. It kind of reminded of us Bryce Canyon – only a different color. The kids were particular fascinated by the small GREEN creek running out through the canyon. The minerals from the rock seep into the water, and it had an almost paint-like consistency. Andrew had fun throwing rocks in and watching them spash!

John Day Fossil Beds_24

John Day Fossil Beds_30

John Day Fossil Beds_36

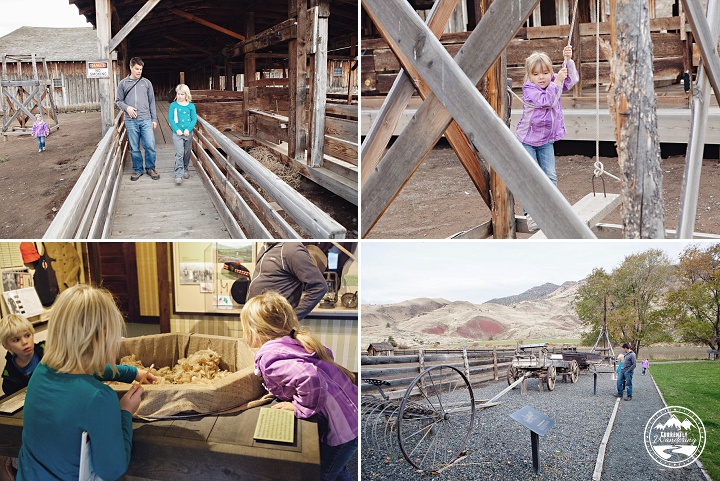
On our way back to the Paleontology Center, we stopped by the Historic Cant Ranch to see how a family used to make their living in this canyon raising sheep. The Ranch is well done and super informative. There were signs everywhere about the type of equipment they used for farming, how they sheared the sheep, and generally what life was like on a ranch in the early 1900’s.

John Day Fossil Beds_44

Lastly, we stopped back by the Visitor Center to finish up our books using the displays, and to pass them off with the ranger. Our kids got to wear ranger hats while they were getting sworn in. This was a first for us, and I don’t think any of the kids found them very comfortable!

John Day Fossil Beds_49

Although we didn’t see everything, I felt like we developed a good appreciation for this park and what makes it special! We would definitely go back and would love to see the the sections of the park we missed. John Day Fossil Beds National Monument in Oregon is definitely a must see!

Categories
Fitness & Recipes General Information

Airstream Kitchen: Grilled Peanut Chicken

SAM_3836-Edit

I can’t take credit for this recipe even though it has become one of our absolute favorites. Earlier this year we were in Las Vegas for a few weeks, and our friends Heather & Jeff from AudreyAirstream graciously babysat our kids so we could go on a date. Not only did they babysat, but they also offered to feed us dinner! She made these amazingly delicious peanuty chicken skewer things and we all about died with how good they are! Naturally, I requested the recipe and we make them at least twice a month.

SAM_3835-Edit-2

If you aren’t a fan of peanut butter, this recipe is not for you, but being the avid Thai food fans that we are, sometimes I could just drink the sauce. Enjoy!

Grilled Peanut Chicken
1/3 cup hot water
1/4 cup Teriyaki BBQ sauce or marinade
1/4 cup creamy peanut butter (PB2 doesn’t cut it – we tried!)
1/4 cup soy sauce
1/4 cup chopped cilantro
2 Tbsp Dijon Mustard
1 lb chicken breast halves cut into 12 thin strips
Skewers (optional)

Mix water, BBQ sauce, peanut butter, soy sauce, cilantro and mustard in a medium bowl with a whisk.

Pour half the mixture into a large, resealable bag. Add chicken and marinate for 1-2 hours.

Refrigerate remaining sauce for dipping

Thread chicken onto skewers (or just cook it if you are lazy like us!) and grill for 5-7 minutes or until cooked through.

Our favorite is to serve with brown rice & some kind of vegetable. Drizzle leftover sauce over both the chicken & rice. Yum!

SAM_3839-Edit

Grilled Peanut Chicken - this recipe is SO ridiculously delicious!

Categories
Daily Life

Using Campendium to Find Awesome Campsites & $50 Weekly Giveaway

campendium_ad

We get a lot of questions about how to find our awesome campsites – whether they are boondocking, dry camping, National Forest or even just plain old RV Parks. Last year, our answer would have been varied as we had a lot of different tools we use. Since our official launch from the house last June, however, there’s really only one place we turn to to figure out where to stay: Campendium.

Campendium 1

Campendium is the brain child of Brian & Leigh of Aluminarium whom we met for the first time in 2014 near Tucson, and then again in the Indian Bread Rocks in 2015 near Fort Bowie. Super awesome, welcoming, and helpful with just about any questions you might have, Brian & Leah are an amazing couple.

IMG_2988-Edit

Why do we love Campendium so much? Let me give you a list:

1. Comprehensive collection of ALL types of campsites. From RV Parks, National Parks, National Forest, BLM land, Casinos, and WalMart parking lots, Campendium lists them ALL. No more going back and forth from freecampsites.net to reserveamerica to instagram to figure out what’s available in a certain area. We just type in a city, national park, or even a specific campground name and we get results.

Although we LOVE to boondock, we also don’t love it 100% of the time. We like to vary where we stay, so having all the options in one place is really great.
Campendium 2

2. User Campground Reviews. Find out what real people think of  a campground. The user base (so far) is awesome. Great, honest reviews for campgrounds all over the country. Most reviews I’ve found to be a mix of the actual campground itself (location, site quality, noise level, ease of access) and things to do in the area.

3. Cell Phone Signal Reviews. This is HUGE for full timers like us. We can’t stay in places that don’t get Verizon signal because Sam has to work. Going off grid on “vacation” is something we do sparingly so knowing beforehand if we will have signal is a big deal for us. Often we won’t go to a particular campground if we can’t get signal but will find another site nearby  instead. There’s a super easy graph that indicates how good the signal is and what type.

4. Blog Posts. There are many full time travel bloggers that post comprehensive campground reviews on their blogs (I am not one of those- obviously). This is great as there is also a tab where user can submit their own blog posts and they’ll show up in a nice little list. When I want to find out more info on a campground, I’ll often turn to these.

5. Photos. Leigh and Brian (in particular) spend HOURS in an area taking photos of campgrounds. I love it when they visit an area because suddenly Campedium is flooded with campground photos. Anyone can submit pictures, however, and its always great to see what a campsite will look like before showing up!

Campedium2

Campendium is definitely in its infant stages, but more users are joining by the day and I love seeing all the reviews and great places to camp! They have a list a mile long of improvements, ideas, and places to take this resource and I can’t wait to see how much better it gets over the next year or two!

$50 Weekly Giveaway-

For the next 9 weeks, Campendium is doing a weekly $50 giveaway! All you have to do to enter is submit one campsite review. Easy peasy! One review = one entry so get going! Check out their blog post on it here, and then head to Campendium.com to sign up for a FREE account and get going!


Categories
Faith Musings of Sam

Gospel applications on the Slickrock Trail

wpid-14306899302140.jpg

During our stay in Moab, Utah, we were camped only 1,500 feet from the start of the Slickrock Trail. This particular trail is unique, with nearly the entire trail travels across the sandstone rock that makes up the landscape. The trail itself is grueling and difficult, but also includes a practice loop of much more approachable difficulty. I had the pleasure of riding this loop several times during our stay, and on my second ride, I had a realization.

Riding most mountain bike trails is fairly easy. Trail activity produces a path through the dirt and rocks that is generally easy to follow. The sandstone of the Slickrock has nearly no dirt, and therefore no tracks. You can faintly see a worn section of path, but it is difficult to follow at riding speed. To help riders follow the route, a white dashed line has been painted onto the surface of the rock.

Between my first and second ride of this loop it had rained. Water pools in depressions in the sandstone and remains until dried by the sun. As I followed the white dashed line across the rock, I encountered such a water pool. Dry during my previous passing, the white line of the trail traveled right through the center of the water pool. To follow the line, I would have to travel directly through the pool of water.

Right there on my bike, my mind immediately flashed to the ancient prophet Lehi’s Vision of the Tree of Life. In his vision, The Tree of Life represented the Love of God, and the blessings of living the Gospel. Leading to the tree was a straight and narrow path. Along the path was a rod of iron, representing the Word of God.

The imagery is clear. To receive the benefits of the Gospel of Christ, we must travel on the straight and narrow path and cling to the Word of God. The path and the rod will guide us there.

In Lehi’s Vision, both the path and the iron rod traveled through a mist of darkness on the way to the tree of life. This mist of darkness represents all the difficulties we encounter in life. These difficulties are distracting, disorienting, and discouraging. Only by clinging tightly to the rod can we hope to remain on the path through the mist of darkness. It can be tempting during difficult times to think that we have a better path. If we let go of the rod, we can navigate around an obstacle and rejoin the path later on. Doing so carries the danger that we will not be able to rejoin the path, or will encounter incredible difficulties in making it back.

When following the Gospel of Christ, the best plan is clearly to never let go. If we never stray from the truth he taught, we will never have to find our way back. We cannot expect our journey to be easy. There will be portions that travel through the mist of darkness, and perhaps even pools of water.

Now, let’s not stretch this analogy too far. The white line on the Slickrock Trail is not intended to be followed to the inch. It is necessary along the trail to find your own route around and over obstacles, staying within a reasonable distance of the line itself. Wanting to avoid getting mud on my bike and wet myself, I just rode around the pool of water.

The Gospel of Christ IS intended to be followed as exactly as we can manage. Christ is The Way, The Truth, and The Life. Following Christ has added a richness to my life and led me to to true joy and help through my struggles. May we commit ourselves anew to studying the Word of God and never letting go.

Categories
Fitness & Recipes

Grilled Barbeque Chicken Pizza

IMG_20150323_183024

I love pizza, and even better is GRILLED pizza. So delicious. There are a million different variations on toppings, but this Spinach, Chicken, Tomato, Bacon, BBQ sauce, Feta one just happens to be a favorite.

We have a Weber Q 1000 bought from Amazon (affiliate link) and we love it. The only thing we’d love MORE is to have bought the model with the thermometer. Unfortunately, that particular model also came with the side wing tables which we did NOT want so we figured that $30 was not worth the thermometer. Oh, it totally would have been. We have yet to buy a stand alone one, so mostly its just guess work as to how hot the grill is.

IMG_20150412_183656

The only trick with this recipe is working fast so your cheese has time to melt before the bottom of your pizza crust burns. Sam and I usually work together once he flips the crust and we have everything set out ready to go by the grill (notice how our truck is very NOT level):

IMG_20150412_184029

Our kids gobble this up, although Cara prefers the pieces with less tomato and spinach. You can use as much or as little BBQ sauce and cheese as you’d like – we tend to go less as its healthier and we have a bit of a dairy intolerance around here.

Enjoy and let me know how it goes!

Yummy Pizza Dough

Makes 2 14″ pizzas (enough to feed our family of 5)
 
1 1/4 cups warm water
2 teaspoons active dry yeast
2 tablespoons granulated sugar
1 tablespoon honey
1 tablespoon olive oil
2 teaspoons salt
2 cups all-purpose flour *more if needed*
2 cups white wheat flour (if you’re doing regular wheat flour, do 1 1/2 cups instead and increase the all-purpose flour to 2 1/2 cups).

In a small bowl, mix together the sugar and warm water. Sprinkle the yeast on top and let sit for 10 minutes to activate. Add the remaining ingredients (flour 1/2 cup at a time just in case) and mix well. I always have to add in more flour (not less) so its not crazy sticky, but do whatever works for you.

Spray a bowl with cooking spray, scrape your dough into the bowl and cover.  Cover and let rise on the counter about 3-5 hours or until it has at least doubled in size (or you are impatient and just hungry and want to eat!). You can also refrigerate this for up to 3 days if you want to make it ahead of time, but I’m never that prepared.

To Make the Pizza You’ll Need:

Pizza dough
olive oil
BBQ Sauce (our favorite is Sweet Baby Rays)
1-2 Grilled & thinly sliced chicken breasts
3-4 slices of turkey bacon, cooked and crumbled
1 cup fresh baby spinach, roughly chopped
Cherry Tomatoes- halved
Feta Cheese

Get out all of your toppings and prep them beforehand, because once you start grilling its a mad dash to get it all on there. About 45 minutes before we want to eat, I’ll cook and crumble the bacon, chop the spinach, halve the tomatoes, and have Sam grill the chicken.

When all your ingredients are ready, get your BBQ turned up hot (it might already be warm from grilling the chicken) while you divide the dough in half and roll out on the counter. Try to get it as thin as you can, but ours usually ends up being on the thicker side and I kind of like it that. Plus, our counter just really isn’t that big. I usually transfer to a plate and send it outside with one of the kids to give to Sam who is stationed at the grill.

When the grill is hot, spread oil over one side with a basting brush and put the crust on the grill. Spread oil over the top side now and let it cook for about five minutes, or until it starts to look nice and toasty. Carefully flip it over.

Working quickly (so you don’t burn the pizza!), spread the barbecue sauce over the crust, then sprinkle the mozzarella cheese evenly over that. Add spinach, sliced chicken, bacon & tomatoes, and then top with the Feta cheese.

Close the lid of the grill and let it cook for about 4-6 minutes, until the bottom of the crust is crispy and the cheese is starting to bubble.

With grilling tongs, carefully slide the pizza onto a cutting board or cookie sheet (this usually takes two of us!). Let cool for about 5 minutes, then slice and serve.

Eat & enjoy!

Grilled Chicken BBQ Pizza is super easy and one of our favorites!