Categories
Montana National Parks

5 Family Activites on the West Side of Glacier National Park

Thinking of visiting Glacier National park with your family? The park is so huge we broke our visit into two - check out our top 5 activities for the west side!

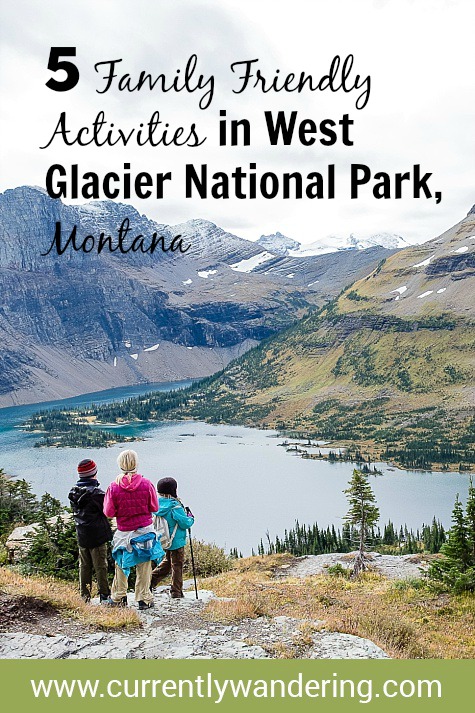
Glacier National Park is a favorite for quite a few people.  Its always been high on my list, but we just hadn’t quite had the time to visit. This fall I was feeling spontaneous and ready for adventure so we drove a few extra hours in late September to spend six days on the west side.

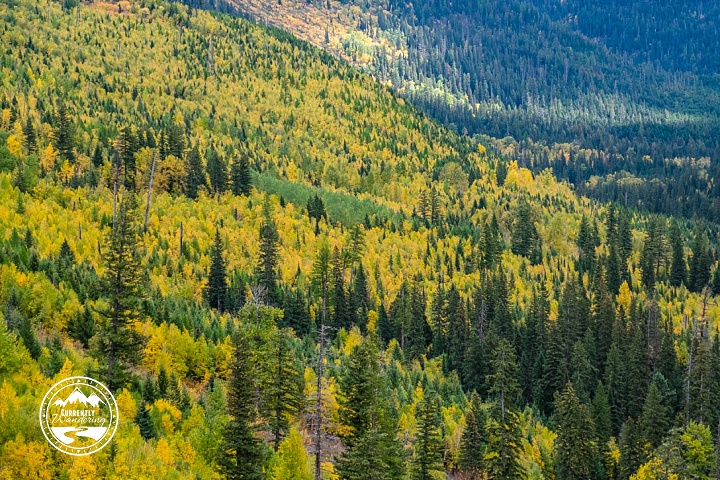
It was magical. Every National Park should be visited in every season, but since that is unrealistic, let’s just say that Glacier is spectacular in the fall. Crisp air, changing leaves, and fewer crowds are just three of the perks for visiting in the off season.

dscf7543

Amid school, work, and church we managed to keep ourselves busy for almost a week and definitely left plenty to do the next time we visit! While this isn’t an exhaustive list of activities on the west side of this park, here are some of our favorites:

1. Go on a Hike

The park newspaper is fabulous for planning hikes! There are detailed maps, one-way mileage, elevation and locations for the trail heads. All valuable information when you are planning activities with kids. Three hikes we did on this side were Avalanche Lake, Hidden Lake, and Rocky Point. There were a few other hike recommendations, but we really just didn’t have time to do everything (as much as I wanted to!).

I noticed that many of the hikes in the park require some serious effort. When I asked a ranger for an 8-10 mile loop hike, she gave me a blank stare. “We have more like 3-4 day loops hikes here,” was her comment. She went on to suggest some easier 3-4 mile hikes, but that’s about as difficult as we got.

While we didn’t venture out in to the back country due to cold night time temperatures, we did keep ourselves busy by strolling along the shore of Lake McDonald and driving to the summit via Going to the Sun Road.

Avalanche Lake Hike: 2.3 miles one way, 500 ft elevation gain

This is a well used trail. Luckily for us Avalanche Creek campground was already closed for the season, otherwise I think the trail would have been packed. The trail begins in conjunction with the Trail of the Cedars boardwalk and is a nice meander through some beautiful cedar trees.

dscf7601

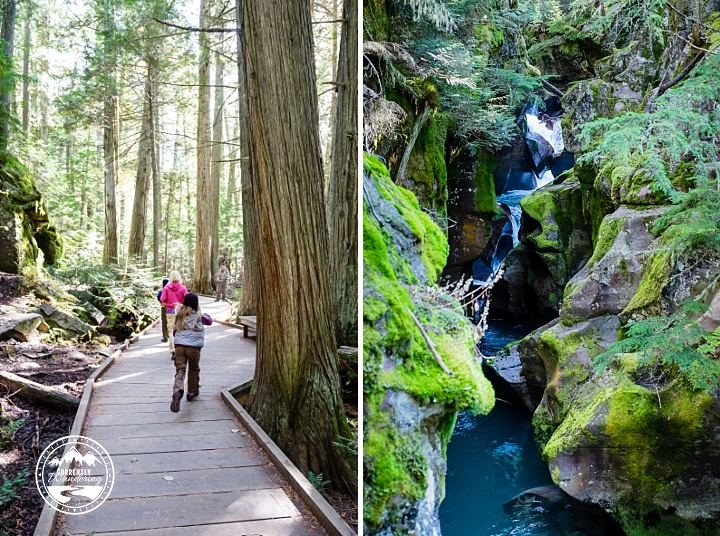
Just past the most amazing glacier waterfall (the water is SO blue) you take a turn to head up to the lake. The trail is not necessarily steep, but it is a pretty constant uphill. We did see a black bear WAY across the lake from us once we got there, but not close enough to even worry about the bear spray we had forgotten to bring.

Bonus: There is an outhouse just before you get to the lake. Hallelujah.

img_20160926_154306

Hidden Lake: 2.6 miles one way, 460 ft elevation + dropping 780 ft down to the lake

The temperature steadily dropped as we drove Going to the Sun Road up to the top of the pass. Once we got the top it was actually really cold and we quickly put on ALL our layers.  The trail to Hidden Lake starts behind the Logan Pass visitor center. It is mostly paved or a boardwalk until you get to the overlook about 1.4 miles down the trail.

While the overlook was nice, continuing on the trail down to the lake was GORGEOUS. Even if you don’t hike all the way down, go out on the trail a bit. I promise its totally worth going past the overlook. While the goats were not out in abundance (perhaps they don’t like cold wind?) we did see a fat marmot. Much more exciting than goats anyway.

We had a nice lunch down by the shore of the lake, and I was amazed that not just one, but TWO guys jumped in the water to swim. They were out quickly, but apparently its a thing? Wow. I was not tempted to get in.

Bonus: There is an outhouse down by this lake as well. Hooray for an easy place for kids to go to the bathroom!

Rocky Point Hike: 1.1 mile, gains 85 ft elevation

This is an easy 2 mile lollipop loop with a great overlook of Lake McDonald. We drove from the campground over to Fish Creek Campground and the trail head was pretty obvious from there. While the trail itself wasn’t anything spectacular, this was a great “we just need to get out in the evening” type trail.

2. Drive Going to the Sun Road

This road is famous for a reason. It twists and turns and gains some serious elevation on the way up to Logan Pass. We were so excited to be on it that you would have thought we won the lottery. There are a few pull outs to get out of the way and take photos and we used more than a few. We also had some great clouds moving across the valley below us which helped shape the already dynamic landscape. Even if you aren’t going hiking up at the top, its definitely worth the drive!

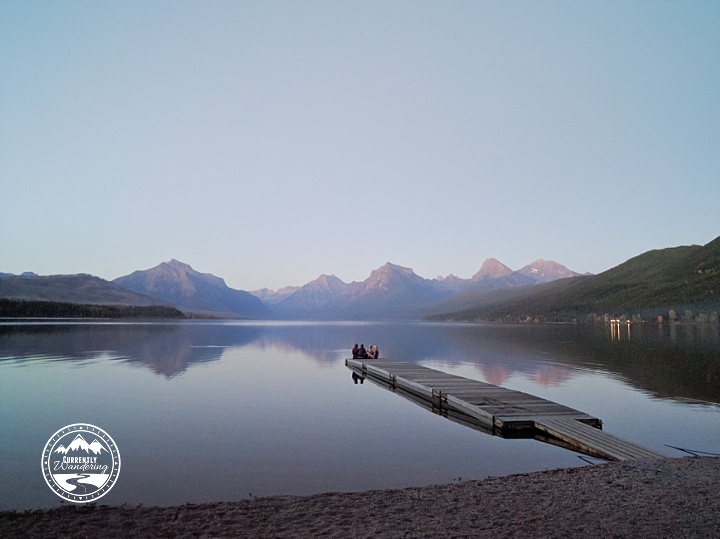
3. Eat ice cream and watch the sunset on Lake McDonald

In Apgar village there’s a little ice cream shop that was open until 8pm. We each grabbed some ice cream (my flavor was huckleberry! yum!) and took them out to sit on the dock and watch night settle over Lake McDonald.

img_20160926_195253

You can also rent boats on the lake, but we opted out of that for the time being as we’d rather have canoes not kayaks. The outfitter only had the latter this late in the season. Bummer. It would’ve been a good time.

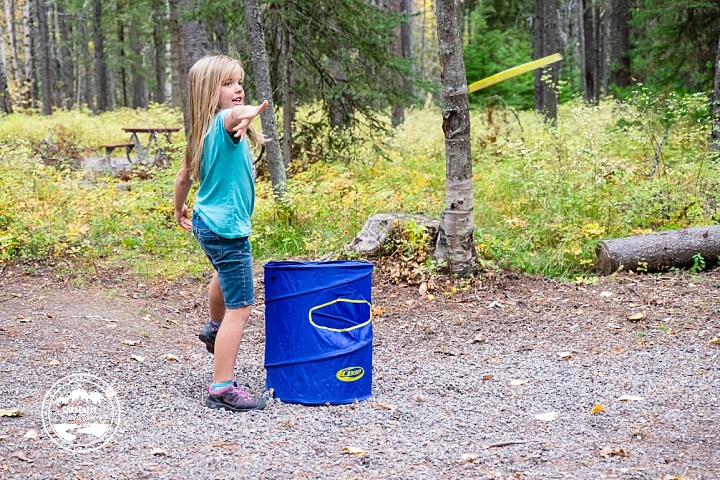
4. Camp in Apgar Campground

There’s a lot of turn over in the campground, so even though many of the sites were first come, first served we didn’t have trouble snagging one on a Wednesday night.We did notice that things filled up over the weekend, and then magically emptied again on Sunday night. Typical campground behavior.

dscf7578

For trailers many of the sites put the door on the wrong side, so maybe just be a little picky. There’s a trail that you can walk/bike to the Apgar Ranger Station, or even just walk to Apgar village or down to the lake.

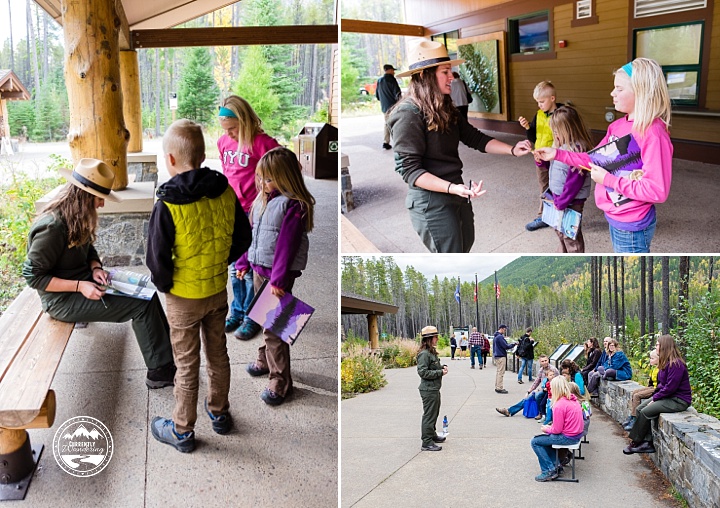
5. Attend a Ranger Program & Earn Jr. Ranger Badge

Naturally, we earned our Jr. Ranger Badges while we were there. I felt the book was well put together and easy enough for the kids to figure out on their own. There are A LOT of ranger programs in all areas of the park but we chose an easy one about animals getting ready for the winter at the Apgar Visitor Center. We learned about mountain goats, pikas, bears, and the marmots. Score one for road school.

dscf7551

I would have loved to visit Bowman Lake but it was a long drive out there on a dirt road, and we were unsure of boat rentals and/or the status of the road that late in the year.  We’ll make sure we make it up there next time as I’ve heard its gorgeous.

We’ll be visiting the east side – Two Medicine, Grinnell Glacier, Many Glacier next summer. We plan to hit some of the back country sites (possibly even from the Canada side!) so stay tuned!

Categories
Daily Life Outdoor Gear

Small Wardrobe Made Easy With Aventura Clothing

Looking for ways to simplify your outfits? I love using Aventura Clothing for my minimalist wardrobe. Their clothes are super cute, eco-friendly, and easy to mix and match. Check out this post for our favorite ideas! #sponsored

Having a small space for clothes has both its positive and negative sides. On the one hand, our closet for 5 has less space than most people have just for their dress shirts. On the other, I actually wear my clothes more often and even wear them out before I grow tired of them. We typically have at least a week’s worth of clothing for each of us, plus jackets, puffy vests, and rain shells.

Prior to becomming Aventura ambassador (free clothes!) my wardrobe consisted solely of outdoorsy clothes from places like REI. They are super comfortable, but occasionally I do like to feel more like a “real” person and less like I just came out of the back country. There is still a certain appeal to dress up on occasion.

Aventura does a great job of styling their clothes to blend well with each other. They use the same color schemes throughout their entire line (you’ll see a lot of “smoked pearl” and “blue indigo” in my clothing picks!) which makes it crazy easy to mix and match a few pieces to create a pretty extensive wardrobe. In addition to color, the fabric is generally soft and forgiving while still being flattering.

I did struggle with sizing on their fall collection, however. I felt like I was a solid medium (normally a large in other clothing lines) in their spring line, but a lot of the long sleeved shirts felt tight across the chest and short on the waistline. I found that if I went up a size the fit was better. I also ordered a size up on the Daria Vest to fit across my chest.

I’d like to think that its them not me, but there is also a good chance I’ve gained an inch or two in the last 6 months. Totally lame, but that’s real life.

I also have a puffy vest obsession, so that led to the absolute NEED to have something to wear underneath them. I may or may not have purchased  a few extra long sleeve shirts. Don’t worry. We’ll just stash the kids’ clothes under the beds instead of in the closet.

Favorite clothing picks from Aventura’s Fall Line:

Outfit #1: Sunday Style

Athena Top, Bryce Skirt, Daria Vest, & Bienne Leggings

This combo has been great for wearing to church on Sundays. I’m generally not a weekday skirt kind of girl, but this outfit makes Sundays kind of fun. The Bryce Skirt doe not have a thick waistband (despite looking like it does) but its just a smaller 1″ elastic in the top. Still looks cute, and we’ll see if it holds up over time.

The Athena top has some great crochet in stripes (I bought one in blue you can see better below) but it does wash a little funny. Wash cold and then stretch it out before hang drying or tumble dry low. That way it won’t pucker between the stripes.

The Bienne Leggings are crazy comfortable! I couldn’t find them on Aventura’s website anymore (hopefully they’ll come back) but I did find them at Zappos.com instead.

Looking for ways to simplify your outfits? I love using Aventura Clothing for my minimalist wardrobe. Their clothes are super cute, eco-friendly, and easy to mix and match. Check out this post for our favorite ideas! #sponsored

Outfit #2: Warm & Cozy

Tara Pant, Erin Top, Aldean Scarf, Adeline Hat, Granada Vest OR Jayla Jacket

I think I literally tried every pair of pants that Aventura offers, and the Tara was the only one I liked. I’ve heard other ambassadors having good luck with other styles, but they just didn’t fit me right. That said, they are still SHORT. I am a tall 5’11” and these are not the length I usually enjoy. I like my pants to hit the floor and I tend to wear them out with my heels.

However, I have learned its all about what shoes you wear them with (hello! Not very fashion savvy around here). Once paired with my KEEN Mary Jane style shoes and rolled up they look great. Sam compliments me every time I wear them, so naturally I wear them all the time.

All the pants have stylized stitching that really does look better in person than on their website. Trust me.

I adore the Adeline hat, and the Erin Top is exactly like the short sleeved version from their spring line. Super comfortable and looks great. The Jayla Jacket I kept in a medium as a large was rather baggy, and its my new favorite outerwear piece of clothing. I don’t have a “coat” as we just layer up so having a longer, warmer, jacket this winter will be nice. Assuming we go someplace cold enough to wear it!

Looking for ways to simplify your outfits? I love using Aventura Clothing for my minimalist wardrobe. Their clothes are super cute, eco-friendly, and easy to mix and match. Check out this post for our favorite ideas! #sponsored

jackson
Hanging out in Jackson, WY. Photo credit: http://talesofamountainmama.com/

Outfit #3: Chic & Comfy

Tara Pant, Leonie Tunic, Kennedy Sweater

I got another pair of Tara pants in Walnut, but the Leonie Tunic is a bit of a stretch in style for me. I really wanted something with longer sleeves and length so I went for it. The fabric is crazy soft, and I love that you can ruche the sides up with little string toggle things. It adds some fun styling to the piece. I do wear it with my Tara Pants rather than leggings, but maybe I’ll break my leggings out at some point. I have a lot of friends that like tunics to wear over the gym clothes after a workout, but since my gym is outside my house… well, I don’t have that issue. Looking for ways to simplify your outfits? I love using Aventura Clothing for my minimalist wardrobe. Their clothes are super cute, eco-friendly, and easy to mix and match. Check out this post for our favorite ideas! #sponsored

Extras

Samara Top, Mia Top

I did say I ordered some extra long sleeved shirt, right? I wanted clothes that would go under the Kennedy Sweater, the Daria Vest, and the Grenada Vest. I feel like all these pieces work well for that. The Samara Top has beautiful detail on the back, so I’ll probably just wear that on its own, but the other three look great layered.

I did go a size up on both the Mia and Samara Tops, and probably could have on the other two as well, but I’m going to hold out though and lose that pesky 5 lbs again. Its a close fit.

Looking for ways to simplify your outfits? I love using Aventura Clothing for my minimalist wardrobe. Their clothes are super cute, eco-friendly, and easy to mix and match. Check out this post for our favorite ideas! #sponsored

Apparently I also really like blue. I figured when you have a color scheme (raspberry, blue, gray) mixing and matching your clothes is a lot more simple.

There you have it! Small wardrobes can be fun if you find the right clothes to go in them. If you’d like to give Aventura a try leave a comment and I’ll email over a 60% off coupon! Its good for a single order up to $250 so you can easily ramp up your wardrobe for cooler temperatures!

Also check out these posts from other Aventura ambassadors to see what their favorite fall pieces are:

Colorado Mountain Mom
365 Atlanta Family – a Capsule Wardrobe
Kid Project
Real Girl’s Realm
The Simple Moms

Categories
Holidays & Bdays

Spending our Nomadic Halloween with Friends in California

Every year we’ve managed to spend Halloween with friends or family. We don’t always choose to spend holidays with other people. In fact, for many we’d rather be off in the desert (or at the beach) by ourselves. Apparently Halloween is the exception.

Travel Dates: October 24 – Nov 1

Last year we spent Halloween with my family in Utah, coinciding with both Andrew’s baptism and my cousin’s wedding. The year before that we were in Lincoln City with some Instagram traveling friends sporting some frosty costumes.

halloween-2014_36

This year Sam had a geek conference in Mountain View, California so we stayed a few extra days in town to spend Halloween with the Siminoff family. We met them last winter in the Florida Keys and they fast became some of our favorite people. They spent a year in their truck camper touring the US (with a side trip to New Zealand and Australia!) and are now back in their sticks and bricks.

Happily for us they have a very long driveway, full hookups, neighbors with chickens, and take payments for their “campsite” in chocolate chip cookies, staying up until 2am talking, and fresh pineapple.

It’s been a fabulous week.

The Costumes

In the last 6 months Rachel and Andrew both earned their Hogwart’s robes through our Family Store. I was impressed they thought that far ahead and made sure they would get their costumes with plenty of time to spare.

Sure, dressing up as Hogwarts students isn’t particularly original, but how many kids have you seen that actually wanted to be in Slytherin?

dscf7951

Andrew chose Gryffindor (since they obviously couldn’t be in the same house), which means Cara was left with Ravenclaw or Hufflepuff.

dscf7960

Cara didn’t earn her robe, however, so we swiped a knight costume destined for Goodwill, added  a cheap sword and cardboard shield and she galloped off into the sunset to save the day!dscf7967dscf7968

Pretty cute kids. We don’t have tons of room for costumes to hang out in the trailer with us, but the kids actually dress up in their robes quite frequently and play so we’ll find room for them somewhere.

dscf7980

The Events

We kept things pretty low key. We made some really easy Pumpkin Rice Krispie Treats, attended the local LDS Trunk – or – Treat, and carved pumpkins. Rachel and Sam had been cooking up a microcontroller lit pumpkin for the last month or so and are happy that it worked out!

Halloween Night was spent out combing the streets for MORE candy (not that they needed it!) with the neighborhood gang and then staying up way past bedtime.

halloween-2016_22halloween-2016_09

We are all sugared out! I love being able to spend holidays celebrating with friends all over the country. It really does make each year unique and memorable – we get to not only remember WHAT we did, but WHERE we did it.

How about you? What was your favorite part of Halloween this year?

Categories
Rock Climbing Utah

First Lead Climb in Years – Rock Climbing in Maple Canyon, UT

dscf5763
Back in high school I worked on the rock climbing wall at our community recreation center in Sandy, UT. I loved climbing, so when I landed a job in college at BYU Outdoors Unlimited I was pretty excited to have a steep discount on climbing gear. Not only that, I associated with others who shared the same love. By the time Sam and I married I had completed a few lead climbs and felt pretty comfortable out on the rock.

Then came the small kids and the “dry years”. There are ambitious climbers that take their kids out on the crag (I follow a few on Instagram), but we just weren’t the type. While traveling we haven’t done much climbing either despite our kids getting older. Andrew & I had a date in Canada to a climbing gym, and last year we went out with fellow Airstream friends in Prescott, AZ for an afternoon on the rocks. For the most part though, our climbing gear just gathered dust and took up much needed space in our Airstream.

Just before we went to Manti for the month of June, we stopped in Sandy, UT to take care of some logistics. We put all the rock climbing gear in our storage unit as we weren’t ready to part with our harnesses, rope, and shoes permanently. Once in Manti though, I realized we were only 30 minutes from Maple Canyon! Whoops. Its a premier and unique rock climbing location in Sanpete County with some of the coolest conglomerate rock. I had climbed there once or twice in college and knew there were some easy routes the kids could handle. When Sam went back up to Sandy for a conference a few days after we arrived, he dropped by the storage unit and reclaimed our gear. We were good to go!

With our pageant schedule, we had Sunday and Mondays off so our first Monday we took the evening and drove up to Maple Canyon to check out some climbs. I had looked around on the internet and the best route I could find were Bob’s Bolts, a 5.4 in the Schoolroom area. I figured I could handle lead climbing a 5.4 and the kids would be able to climb once I did.

Unfortunately when we got there it was difficult to find the route exactly. We looked around for a bit, but I wasn’t super comfortable with any of our options.

A little farther up the trail is Road Kill Wall. There was a couple climbing there and after talking with them a bit, we decided to do an easy climb basically up a large gully. There weren’t any bolts but it was no problem for me to get up there, anchor and create an easy climb for the kids.

dscf5708

Turns out my kids aren’t really into climbing.

Rachel lacked interest before we arrived at the wall, and came prepared. She practice on the jamstik+ while lounging in the hammock  while the rest of us climbed.

cw-jamstik_07

Cara made it barely up the wall and decided to come back down. Andrew did a little better, but he was still pretty nervous.

Since the kids were happy to hang out and eat snacks I decided to tackle Tomato Man, an easy rated 5.5 with “great clipping stances” and only 6 or 7 draws.

I was terrified. Despite having done some lead climbing, I’ve never taken a real fall and I hear the first one is always the worst. I took a deep breath and started up the wall. Right hand, left hand. Feet placement. Stand up. Reach for the rope. Clip in. Despite my nerves I managed to make it up to the top without any serious problems.

dscf5733

We managed to coax Andrew about half way up the wall, Sam climbed, and we had brought a friend who did awesome for her first time ever climbing! Overall we had a great evening and finished the night with dinner at a local Mexican restaurant.

dscf5754

We will never be an avid rock climbing family. Sometimes I’ll look at kids or families on social media that are easily climbing 5.10 routes and simply be amazed. We are social climbers – its great to go with friends or when its really convenient but I doubt we’ll go out of our way to make it happen.

That said, I was super stoked to know I could still pull off a lead climb. An easy one, turns out, but I still felt pumped when I reached the top. Sometimes a sense of accomplishment is important for us adults too!

Categories
Solar & Power

Power Upgrade: So you Want to Install Solar?

Installing solar panels on your RV or Airstream can be a huge benefit for getting off grid, boondocking and camping. Check out our blog series for DIY instructions and part recommendations. Spoiler: Solar may not be the first step!

I’ve written about the hows, whys, and costs of installing solar panels on your RV or other travel trailer. I’ve had people ask my opinion about getting started with solar given my own experience, and I thought I’d share that basic opinion publicly. So, here it is:

If you think you want to install solar, you should buy a generator.

dscf7803

Now, don’t misunderstand me here. Solar is great, but the use of a generator can help you plan an appropriate solar install and evaluate your true needs. If you already have a generator, you’ve probably already figured this out, but a read through may be useful anyway.

Learning about Boondocking

I’ve heard from folks that think they might like boondocking and are thus considering installing solar. Boondocking is usually dispersed camping without sites or hookups, and is something we really quite enjoy. There’s no power there, so you’ll need to rely on your own batteries and your own power generation while you are there. Solar is nice for boondocking, but a generator is WAY simpler. Buy (or borrow!) a generator and go boondocking with it. You’ll likely need to run the generator for an hour or two, both morning and evening. This is easy to do, and most boondocking locations have no set generator hours.

Please do be courteous when you are camping within earshot of other campers. A small Honda generator is quieter than most other generators (like this Honda 1000 on Amazon), but you still want to avoid early or late generator use. Nobody likes waking up super-early to the sound of a loud generator. Don’t be that neighbor.

If you love boondocking, then having solar can be a real convenience. Keep reading.

Understanding Power Requirements

A generator can help you understand how heavy your power needs are. If you are only using lights, your use will be low and your batteries will last longer between recharges. If you power two laptops during the day, extended use of fans, and recharging other devices, you’ll need to generate far more power. Your first easy look at power consumption is how often you need to be charging your batteries.

Many advanced solar controllers have shunt based monitoring that can give you very accurate power use information, but using a generator will give you a great gut-level understanding.

Recharging vs Inverting

There are two benefits of running a generator. It’s primary job will be to charge the batteries through the running DC Converter. An added benefit is that it will power the AC outlets as well. Watch how often you use the AC power to understand if and what size inverter you might need. Prior to having an inverter, I pulled out the generator for two main AC power purposes. I pulled it out when my wife wanted to use the Blender, and when she wanted to do her hair with a flat iron or a hair dryer.

When it came time to size our inverter, it became an easy choice. The Blender takes 1800 watts, the flat iron 200, and the hair dryer 2100 watts. Reaching somewhat of a compromise, we chose a 2000 watt inverter and Jess bought this 1200 watt, folding hair dryer (Amazon again – you can really buy anything on Amazon!) to replace the power hungry larger one.

Battery Capacity

Generator use will help you understand your battery capacity. Most RV batteries (with the exception of Lithium) charge slower as they get full. This means that batteries charge from 50% to 80% full pretty fast, but take forever to charge from 80% to 100% full. It isn’t worth running your generator till your batteries are absolutely full, as it will take forever and you’ll waste a bunch of gas.

Larger batteries will allow you to run the generator less often. If you find yourself with a low battery every morning despite charging some in the evening, you will likely want a larger battery setup, even with solar.

It is also worth understanding that batteries degrade over time, and have a reduced capacity for power storage. Most batteries need to be replaced every few years, and often sooner if they haven’t been cared for. Replacing most standard batteries is easy, and I’ve done it several times in the parking lot of Costco, where I bought the matching replacements. If your battery is REALLY terrible, start with replacing it with new batteries of the same type.

Taking the Solar Leap

After all this, there is one simple reason to make the Solar Jump: Convenience. Or Laziness. Here is what you get when you spend the money and/or time to install solar:

Freedom From Generator Hours. This one was painful for us in National Parks. We found a few parks with fairly restrictive generator hours, and we had trouble getting sufficient charge.  Solar is nice and quiet, and you never have to remember to turn it off.

Hands Off Operation. Everybody loves to watch their solar monitor right after it is installed, but if you’ve planned sufficiently well you can often go days without caring how much your batteries are charged. You don’t have to turn it off when you are charged, it charges under way, and it takes care of itself.

Instant AC Power. An inverter can give you super quick AC power for when you want it. Press the on button, and you have AC power. No more trips outside to start the generator when your wife wants to run the blender or do her hair.

Worry Free Basecamp. We love to adventure away from the Airstream for overnight camping trips or day hikes. I love the ability to leave the Airstream in a parking lot and come back to full batteries and a cold fridge. This was a pain point for us before we installed solar, and it’s been great for us to have less worry when using the Airstream as a base camp.

Easy Full Charge. As long as you have sufficient solar for your use, you’ll generally reach full charge every day. Often, you’ll be at full charge before noon, and can use all the power you want during the rest of the day. Your batteries will be happier as a result, and you’ll have every available amp-hour for use.

After some considerable generator use, use what you’ve learned about your power use, batteries, and inverter needs to price a solar system. Now compare this price to the benefits mentioned above. You may decide that it isn’t worth the cost, and decide to stick with the generator. You may make the decision to make the leap, and now you’ll have a properly sized system and will enjoy your carefree power.

Generator After Solar

Even after you have your amazing new solar system installed, you might want that generator around. Consider cloudy days, which will rarely yield a full charge every day. Cloudy days usually offset our daily power use, but don’t generate enough power to replace our nighttime use. With bad weather, we can usually make it 2-3 days before we need  to charge.

Solar systems also need plenty of sun, and not all the amazing places you will want to go have perfect views of the sky. Camping in the redwoods along the Avenue of the Giants is amazing, but you will not get an inkling of solar beneath those giant trees.

Generators are comparably cheap, reliable, and often useful things to have with you when you travel. I have not regretted keeping ours on hand after our solar install.

But I do love the convenience of solar!

Check out our other posts on our power upgrade:

My Plan for Self Installing Solar Panels
Drop-in Multi-State Converter Upgrade
Solar Power Install Part I – Panel Mounting
Solar Install Part II – Self-Install Combiner Box
Solar Power Install Part III – Self Install Running Wire
Solar Install Part IV – The Wire Panel
Adding Bigger Batteries
Installing a 2000 Watt Pure-sine Inverter
Automatic Transfer Switches
Cost Breakdown


dscf7789