Categories
Fitness & Recipes

Airstream Kitchen: Cast Iron Skillet Vegan Cornbread

We recently acquired a 10″ cast iron skillet, and are convinced that everything tastes better in it. I had been making this recipe in our 9×13 glass pan, but the first time we tried it in the skillet we were blown away by the deliciousness. Super soft, moist, and full of flavor, this cornbread recipe is sure to be a hit at parties and get-togethers. Plus, it doesn’t have a lot of butter (something many recipes do) so I like to think its a little bit healthy.

Cast Iron Vegan Cornbread

adapted from livinlightly.com
serves: 10″ skillet – how many people depends on how big you cut it up!
Ingredients for Cornbread
1/4 cup ground flaxseed
3/4 cup water
2 cups non dairy milk (we use Lactaid)
1/2 cup canola oil (melted coconut oil works too)
2 cups flour (we usually just use white)
8 tsp baking powder
2 cups whole grain cornmeal
1/2 cup white sugar
1 1/2 tsp salt

Directions:
1. Preheat oven to 425 degrees. Spray skillet with non-stick cooking spray (probably not needed, I do usually do it anyway just in case).
2. Heat water in a small sauce pan on stove. Once it is boiling, add the flaxseed. Reduce heat and whisk until you get a gel-like consistency.
3. Combine milk & oil in a large bowl. Add sugar and mix well.
4. Add dry ingredients to the wet mixture (Sift flour if you want – I’m always too lazy!) and mix well.
5. Stir in flaxseed mixture.
6. Spread cornbread mixture into a cast iron skillet. It’s pretty thick, but don’t worry.
8. Bake for 20-30 minutes or until a toothpick comes out clean.
9. Drizzle with honey  & enjoy!
Airstream Kitchen -Cast Iron Vegan Cornbread Recipe

Categories
Florida

The Kennedy Space Center in Cape Canaveral, Florida

Most of our activities are chosen and planned by Jess as we travel. I spend much of my time working and don’t always adventure with the family. Every once in awhile, I choose a place that I’m particularly interested in, and Jess and the kids are awesomely accommodating. My chosen adventure this time was a week of Space Stuff at Cape Canaveral. In addition to witnessing a rocket launch, we spent a day exploring the Kennedy Space Center.

Headed to the Kennedy Space Center with Kids? Check out these tips!

We had camped at the crowded but conveniently located Manatee Hammock Campground, a county campground just south of Titusville, Florida. We watched the launch from the edge of the campground, and it was only a short drive as we headed over to the Space Center.

Date We Visited: February 6, 2016

Ages of Kids: 10, 8, 5

Kennedy Space Center_17

We don’t often pose as a complete family, so here is one of us, looking completely normal. The NASA ball is cool, but also notice the shuttle booster in the background.

Kennedy Space Center_27

I’ve been a minor space nut all my life. One morning a few years ago the kids wandered into my home office to say hello. I was streaming one of the Space X ISS Resupply rocket launches, and they asked what it was. I paused for a moment, and then explained that there were astronauts living in a spaceship in orbit around Earth, and this was a mission to send more food and science experiments. It was such a cool experience to share with my kids. We watched video tours of the International Space Station, and have since spotted the space station as it streaked across the night sky.

Kennedy Space Center_01

Visiting a veritable mecca of space travel was a continuation of that experience. Learning alongside my kids about various space travel accomplishments was a wonderful experience. Just inside the gates is the Rocket Garden, where they have a variety of rockets on display. The early days of space travel were a strange and wonderful thing. The kids piled into one of the spacecraft used to first circle the earth.

Kennedy Space Center_03

There are many things to see at the Space Center, but after the Rocket Garden we headed quickly to the Bus Tour. The tour is included in the admission tickets, and includes a drive by visit to a few launch pads. It was amazing to drive by the huge crawling platforms that were used to move rockets between assembly buildings and the launch sites. We also drove past one of the Space X launch sites and saw (at a distance) the ULA rocket that we watched take off a few days later.
Kennedy Space Center_07

Cape Canaveral is a huge area dotted with launch pads, but most of the space is just empty wilderness to maintain a buffer around launches. Explosions on the pad or in the air are hugely problematic, but having ‘nothing’ around the pad helps to slightly simplify things in the event of a disaster. All that area is free range for the wildlife, including alligators and an incredible variety of birds. The bus drove right by two bald eagles, just sitting right by the road. View blocking heads present for… uh… scale.

Kennedy Space Center_06

The main stop of the bus tour is the Saturn V center, dedicated to the Saturn V rocket and our exploration of the moon. The main feature of the center is of course a Saturn V in all of it’s glory. The sections were slightly separated for easier viewing, but were otherwise present, laid down through the building. Rockets are really stacks of rockets. Each stage has a fuel tank and an engine that burns the fuel to provide thrust. You generally need a stage for each phase of a mission. As each phase burns out it separates and drops off, making the load lighter and easier to accelerate for the next burn. Rockets delivering satellites to Earth orbit commonly have 2 stages. The Apollo missions to the moon had a much more difficult job which required many more stages and engines in different configurations to make the trip there, AND the trip back. The massive size of the rocket is impressive, and exploring and learning about them was a serious highlight of the tour.

Kennedy Space Center_14

Cara took to my suggestion and wore her Buzz Wings. The wings were originally part of a costume Cara had, and as she grew the wings were the only part of the custume that still fit. They have traveled with us, and though she doesn’t always wear them they come out her and there. Seeing her wear them as she wandered around looking at space stuff was especially cute.Kennedy Space Center_12

After exploring the rockets and exhibits at the Saturn V Center, we jumped back on the bus for a ride back to the Johnson Space Center. Our next goal was to see one of the spacecraft of my youth: The Atlantis.

Kennedy Space Center_22

Pictured above (with children for scale) is the main fuel tank and solid rocket boosters that boosted the Space Shuttle fleet into space. After entering the main doors we entered a presentation room with projection screens all over the walls and roof. Our introduction video was quite impressive, but the coolest part was when the wall behind the front screen opened to reveal the Atlantis on display. The Atlantis was amazing to see in person. It served for many years as part of the three shuttle fleet, running an amazing number of missions to space. The shuttle fleet was the main method of transporting and building the International Space Station and other space tools like the Hubble Telescope.

The moment the screen opened and I walked up to see Atlantis was my personal highlight of the entire day.

Around the ship itself was quite a number of displays, including mockups of the interior and exhibits to learn about flying the shuttle. The kids loved the slide, which we managed to not get a picture of.
Kennedy Space Center_18

Another area we visited twice was the play structure by the Rocket Garden. It was a wonderful display, and provided the kids plenty of unstructured relax time. We have learned that our kids to better on structured activities (tours, museums, etc.) if they can mix in some wiggle time. We also ate lunch here after I retrieved our lunch cooler from the truck.
Kennedy Space Center_23

We also viewed the 3D IMAX movie about an Atlantis mission to repair the Hubble Telescope. The movie itself was breathtaking, and I felt like it gave us a good view of what life in space was really like. The wonderful views of Earth, and of Atlantis in action made the time spent there worthwhile.

We loved our visit. The kids had fun, and Dad got his space fix in. We completed our space experience a few days later when we watched a rocket launch up into space.

And just for posterity, here is another of those whole family poses.

Kennedy Space Center_26

Categories
Airstream Accessories General Information Solar & Power The Airstream

Power Upgrade – The Bliss of Automatic Transfer Switches

Our Airstream didn’t come with an inverter installed. There is one AC panel inside the Parallax power distribution center which distributes the 30 Amps from the street connection to all internal plugs, the refrigerator, the DC power converter, and the air conditioner. Adding an inverter complicates this setup considerably, for reasons I will now attempt to explain.

We wanted the inverter to run the aforementioned blender and provide power to the AC outlets throughout the Airstream. There were a few things that we NEVER wanted the inverter to power. The air conditioner was off-limits as it draws more than the 2,000 watts our inverter can produce. The refrigerator also has a heavy draw, and I’d rather just burn propane while boondocking. But the MOST IMPORTANT THING to NEVER RUN OFF THE INVERTER is the DC Converter.

See, the DC converter uses AC power to charge the batteries and provide power to the DC systems in the Airstream such as lights and fans. The inverter uses DC power to produce AC power. Powering the DC converter (AC->DC) with the inverter (DC->AC) works these two components against each other, causing them to both lose excess power in the process and drain your battery down quickly with no benefit.

It is common to make sure the DC converter has a switch that can turn it off when the inverter is running to prevent this problem. If your AC panel has the converter isolated on a breaker, you can just switch the breaker off and no harm is done.

At this point, I’ll remind you of the primary reason for our Solar Install and Power Upgrade: Laziness.

I didn’t want to have to remember to switch the converter off. Luckily, somebody smart invented something called an Automatic Transfer Switch. This wonderful device can switch between two power sources. It is often used to wire in a backup generator, but in my case I’m going to use it to automatically switch between the inverter and shore power.

With the Automatic Transfer Switch and some reworking of the AC wiring, I’ll explain how I created a system that automagically does the right thing at the right time. Brace yourselves: there will be diagrams. First, here is the ‘before’ diagram. Notice that I’ve already included solar power, though it isn’t technically required for the inverter install.

Old Wiring Diagram

The A/C side of this situation is pretty simple here. Power comes into the Main panel, and is distributed as needed. Now, observe the ‘after’ diagram, as it exists at the end of my install.

New Wiring Diagram

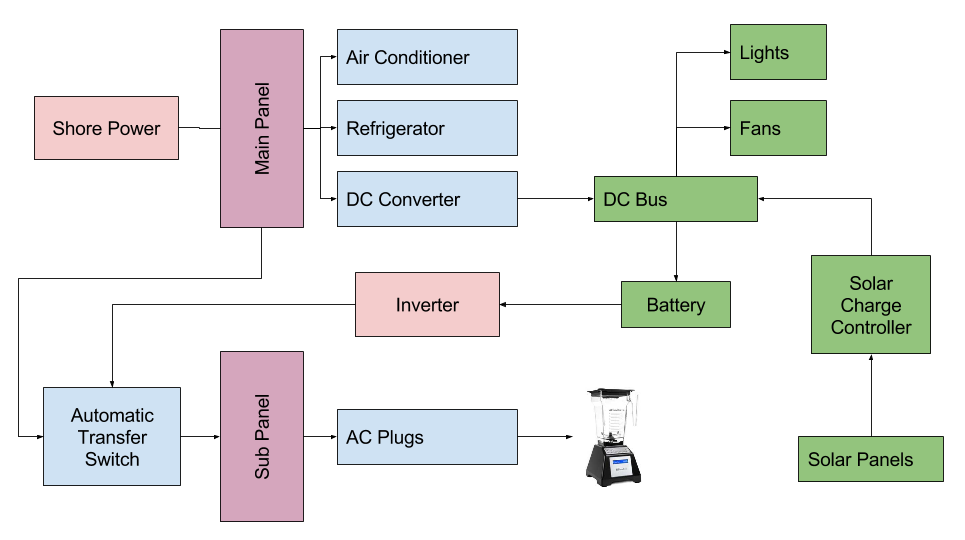
There are a few changes here, so let me guide you through what I did.

The main concept is that I split the Main Panel into two separate panels. The Main panel has the main appliances that I never want to power from the Inverter. The new sub panel only powers the A/C plugs and receives power from the Main panel (when plugged into shore power) or the inverter (when inverting from the batteries). The miracle here is the Automatic Transfer Switch, which automatically selects the input that currently has power. This switch was semi-expensive ($75), and you can just install a battery isolator switch like I used in other places in my install. You have to mount the switch somewhere, and remember to turn it to the right power source depending on where you are drawing your power from.

Remember that my primary reason for this power upgrade was laziness. I didn’t want to see a switch mounted somewhere, and I didn’t want to have to remember to switch it. The Automatic Transfer Switch solved my problem nicely. With it in place, I can just use the power button on my inverter remote to turn on the inverter, and the power is automatically connected where I need it.

The benefit of having two power panels is also laziness. I never have to worry about switching off the converter, or having the refrigerator drain my batteries if accidentally left in A/C mode.

Splitting the Panel

The diagram above looks nice and clean, but the reality is a little more complicated. Because of the location of the AC panel in the Parallax Power Center, it made a prime location for the new Sub Panel. I added a new Main Panel on the other side of the Airstream underneath the wardrobe. Moving the main panel meant re-routing the wiring for the air conditioner, refrigerator, and the converter to the other side of the Airstream.

New Main Panel

During my solar install, I routed the solar cable through the wire chases that run underneath the floor. The chase in our Airstream (2008 International 27FB) runs from under the wardrobe to behind the power center. There are two of those wire chases right next to each other, and I used them to run additional romex from side to side. The Air Conditioner and Converter both needed to be run to the wardrobe side, and the Refrigerator needed to be modified to run to the new Main Panel. The new main panel is shown in the picture above, part way through my wiring process.

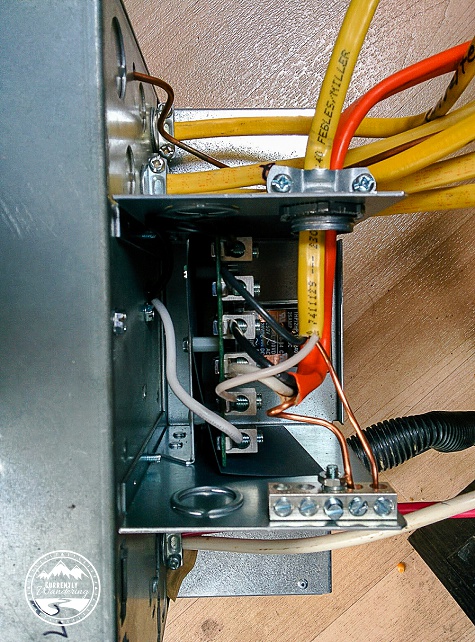
I also ran a new wire to connect the Main panel to the Automatic Transfer Switch, which mounted right to the back of the Parallax Power Center. Below is a picture taken after wiring it up, but before attaching the back cover.

Wiring the Automatic Transfer Switch

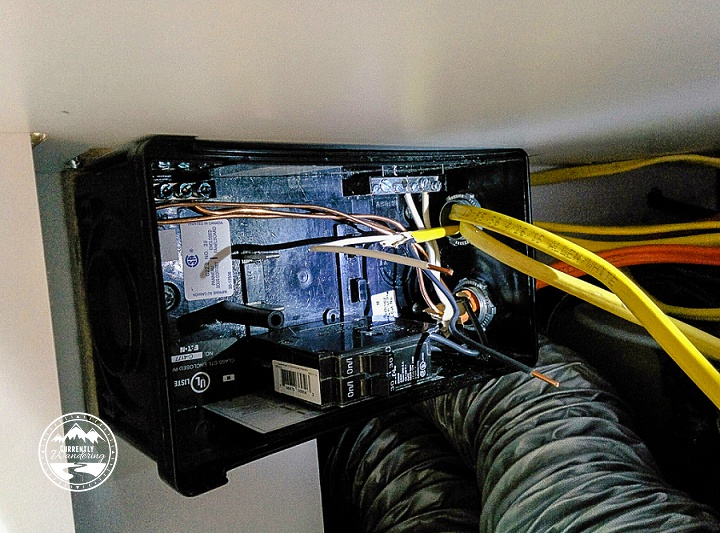
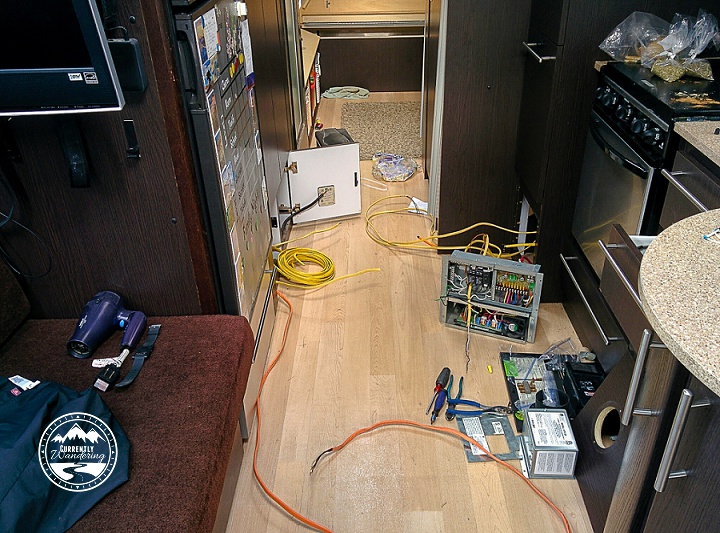
If that whole process sounds like a mess, it was. Honestly, I’m surprised it all worked out, and I didn’t make any critical mistakes. In the middle of the process, the hallway looked something like this:

IMG_20150520_173458

Maximum GFCI

In the factory configuration, the power plugs in the kitchen and bathroom were protected by a GFCI breaker. In my rewire, I added a few more so that every plug (including the refrigerator in the new main panel) was on a GFCI protected circuit. It might be overkill, but I thought a few more protections couldn’t hurt.

The Fateful Moment

I wired up everything, had all the circuit breakers in place, and all loose wires connected to the right places. To give things a test, I ran a power cord into my Brother’s garage and took a deep breath. Then, I flipped my main breaker on….. and nothing happened. After a few very confused minutes, I found out that I had tripped the GFCI outlet in my brother’s garage. A few resets and immediate faults convinced me that I had a wire fault somewhere. After isolating the main wiring components (because I have two panels now…) I discovered that I had over-tightened one of the wire stays, which pinched through the wire insulation and improperly grounded  a wire. After a quick fix, I was back up for another test. This time, everything worked. A quick celebration, and I re-mounted and closed everything up.

This brings us to the general close of Power Upgrade posts. I’ll post a cost breakdown and final thoughts, but I’ve described all the parts of our upgrade already. It was fairly hard to consolidate our experience down into just a few posts, and I’m sure I missed critical steps. Please reach out if you have questions about something I’ve missed.

Categories
Fitness & Recipes

Airstream Kitchen: Italian Turkey Meatballs Over Zoodles

I usually make the meatballs one day and we’ll eat half of them over zucchini noodles (or zoodles),  and then freeze the other half of them to make Italian Wedding Soup later in the week. The ingredients for both meals are very similar, but they are totally different meals. Works great when you have very little fridge space. Usually I will serve this with french bread or whole wheat biscuits, and then cooked carrots or broccoli.

Italian Meatballs Over Zoodles

adapted from beachbody.com
Serves 10

1/2 cup whole wheat bread crumbs
1/4 cup reduced fat milk (any kind)
2 tsp olive oil
1 medium onion, finely chopped
5 cloves garlic, finely chopped or pressed (the more the better in our family!)
2 lbs raw ground 93% lean turkey breast
2 large eggs
1/4 cup fresh parsley, or about 1 tbsp dried
2 tbsp grated parmesan cheese
1 tsp dried oregano leaves
1/2 tsp sea salt
1/2 tsp ground pepper

4 medium zucchini
Hot water
2 tbsp finely shredded fresh basil
2 Tbsp grated parmesan cheese
Your favorite Tomato Sauce (I’m lazy, and usually just do Ragu)

    1. Preheat oven to 425 degrees, and spray a large baking sheet with non-stick spray. (Most recently I cooked these in our cast iron pan and that worked great too.)
    2. Place bread crumbs and milk in a large bowl and soak for 10 minutes.
    3. Meanwhile, heat oil in medium skillet and add onions. Saute 5 or 6 minutes or until translucent.
    4. Add garlic and cook stirring frequently for about a minute.
    5. Add onion mixture, turkey, eggs, parsley, cheese, oregano salt, pepper to the bread crumbs. Mix well with a spoon, or clean hands (my preferred method). It’ll be a little stick at this point, so cover and refrigerate for an hour.
    6. Form turkey mixutre into 1-inch balls and arrange on cookie sheet or pan. You can use your hands, but I’ve found those awesome cookie scoops work really well for this. They aren’t perfectly round, but I just finish them off with my hands. Its so much faster and less messy.
    7. Bake for 13-18 minutes or until browned and cooked through.
    8. While your meatballs are cooking, boil a large pot of water.
    9. Using a cheese slicer (not the wire kind), a vegetable peeler (this never worked as well for me), or a spiralizer (if you are being super fancy) cut each zucchini into lengthwise strips about 1/8″ thick. Turn zuchinni slightly after each cut, so you are working evenly around the outside. Stop when you get to the seeds.
    10. Ideally you’d steam these, but I just throw them in the boiling water for 2-3 minutes until tender.
    11. Once your meatballs are done, pull out half to save for soup later, and add tomato sauce to the rest. Heat through.
    12. Top zucchini noodles with meatballs & sauce, basil, and cheese.

Italian Turkey Meatballs Over Zoodles

Categories
Florida

Our Dolphin Encounter at Marineland, Florida

Our Dolphin Encounter at Marineland in St Augustine Florida

Rachel has an intense love of dolphins, so when I told her we had the opportunity to visit Marineland near St. Augustine, Florida and participate in one of their dolphin encounters I’m pretty sure everyone in the campground heard her squeals of delight!

When We Visited: February 23, 2016

Ages of Kids: 10, 8, 5

Location: Marineland Dolphin Adventure – just 30 minutes south of St. Augustine on the eastern Florida coast.

Marineland offers a variety of dolphin encounters to fit different needs, and we chose to go with The Immersion which is a 30 minute encounter including time both in shallow water as well as swimming in deep water with a dolphin.

DSCF3565

Upon arrival, we were greeted warmly by all the staff. Before our actual dolphin experience began, we were treated to a tour of the grounds and facility by Terran who manages education for the facility. We loved her enthusiasm, experience, her patience and interaction with my kids, and her  knowledge of both the marine life and the history of Marineland.

DSCF3572

We learned that Marineland originally opened in 1938 as Marine Studios – a facility for Hollywood filmmakers to shoot underwater footage! How cool is that? Instead of filming out in the ocean, the founders wanted a place where they could simulate the ocean environment but still have great lighting for filming. They built the large tanks with plenty of windows to let in natural light. They were unprepared for the general public appeal, however, and since then they’ve opened their doors for millions of guests to observe marine life up close and personal.

DSCF3568

Although the facility has evolved over the years, Marineland is dedicated to conservation, science, and education. They figure if we can love and respect dolphins and other ocean life we will be more inclined to help protect them.

After our tour, Terran dropped us off near the dolphin habitat where we waited for our experience to begin. We were given some background on the dolphins, their typical day, and talked a bit about dolphin anatomy before changing into our swimming suits and donning our life jackets.

DSCF3578

Our dolphin friend for the day was named Zac, and he was great! We were able to pet him, give him kisses, feed him fish and Jello-O (for reals!) and spend time playing in the water.

DSC_0113

DSC_0143

I was also very impressed with the trainer assigned to work with us. She was fun, obviously loved her job, and was great with my kids.

Although our experience was overall incredibly positive, there were two frustrations I feel the need to mention.

One frustration was that we just had a larger group. There was a smaller group of two in the water at the same time, and they were able to move more quickly through various interactions that just took our group of 5 (with 3 kids!) longer. I’m so grateful for the photos we have, but it also just took a long time to get each of posed with Zac and I think my kids would have preferred to be interacting or playing with him instead. Plus it was just bright outside and being a photographer I knew we’d all be squinting anyway!

DSC_0045

My only other frustration was the snorkel masks. At first I thought it was a fabulous idea, but that quickly changed. We were able to go out into the deeper water and watch Zac swimming underwater. Unfortunately, even though we tested Cara’s snorkel before getting out there, she still had problems with it not sitting right or letting in some water (hello! She’s 5!).  Then she’d get frustrated because she’d miss what was going on and even threw a small tantrum that frustrated me.

We were also able to watch Zac jump pretty high and going from under the water to out was kind of cool, but mostly hard to see out of the snorkel when your face isn’t under water.

DSC_0202

DSC_0232

With kids its always to hard to gauge their abilities, so I totally understand why they have their program set up the way it was, but I think I could have skipped the deep water part and been just fine.

DSC_0216

After Zac towed us back to the shallow area, we played for a few minutes and then said good-bye! My kids were surprised how fast the time went by and were sad to leave.

DSC_0254

We did have a fabulous time, and if you ask Cara what her favorite thing in Florida was she’ll tell you “swimming with dolphins!”

DSC_0262

Being up close to such an amazing creature was fabulous, and I’ve always been impressed with the intelligence and friendliness of these aquatic animals. The staff at Marineland were very accommodating and friendly and we had a wonderful afternoon!

Sponsored post :: We were provided with a complimentary immersion experience at Marineland in exchange for us sharing our honest opinion and experience with you. As always, all opinions are our own.