Categories
Tow Vehicle

Take Your Garage With You – Retrax One Truck Bed Cover

IMG_20150213_102942After purchasing our truck, I began searching for a great way to keep items in the bed of the truck secure and out of the weather. The market is full of various truck bed covers, which turn out to be called Tonneau Covers.

They mostly fall into the categories of roll-up vinyl, hard top, folding, and roll-up. Vinyl, often secured with velcro around the edges, is the cheapest option. Hard top has the best weather protection and folding has the most durability, but I chose a roll-up cover because it would fit and operate with a low profile.

The cover locks in any position, and rolls up easily into a canister at the front of the bed. It blocks water about as well as any of the non-hardtop truck bed covers. I was able to mount Yakima tracks on the edges of the bed cover, providing us a way to mount and carry our bikes and tow our Airstream at the same time.

I usually do hardware installs myself, but I had this done for me by the folk at American Truck and Trailer Supply in Manassas, VA.

In addition to the enhanced storage area, I immediately noticed the increased gas mileage. I have not done a fully scientific test, but it appears that the addition of the bed cover increased my fuel efficiency by 10 to 15 percent. Even if you are not going to be traveling full-time, you would easily recover the cost of a cheaper bed cover in the cost of gas alone.

In addition to the cover, we also added a lock to our tailgate to keep everything secure- see that post here.

If you want to see how we load the back of the truck and what we put in it – check our YouTube video here.

Over a year later, we are still happy with our Retrax One Truck Bed Cover and would choose this one again if for some reason we needed a replacement!

Categories
Biking Outdoor Gear Tow Vehicle

Gear Review: Bike Racks for 5 on a Dodge Ram 1500

IMG_9620-Edit

We started this journey over a year ago with our bikes on a rack attached to the back of our mini van. Biking is one of our favorite family activities and we knew they would be important to have with in the Airstream as well, but that required a significant re-arrangement of our current system.

For starters, we sold the mini van and bought a truck.

Sam wrestled long and hard with the dilemma of where to put the bikes. We went back and forth on a few different systems, and there were some key deciding factors. We knew that we would want a cover over the bed of our truck and that would have an impact on which rack system we used. We also knew we’d be upgrading and changing bikes as the kids got older, so the system needed to be flexible. Lastly, we didn’t have crazy amounts of money to sink into this since we had just bought the Airstream and truck. Anything we could put off until later would be great.

Many of our Airstream friends have the Airstream Carry-Bikes by Fiamma, which is a great option for them. Designed specifically for the Airstream, it mounts to the aluminium bumper and can hold two bikes. Our problem would then be, where do we put the other 3? Plus, our bikes for the kids are not full sized and would most likely not fit in a rack like this one. The other down side is that we specifically picked our model of Airstream for the rear panorama windows and didn’t exactly want bikes blocking the view.

We loved our Yakima system on the mini van, but we sold our previous Yakima system with the vehicle since the bars and towers wouldn’t work on the truck anyway. That left us starting from scratch.

Eventually we decided to add the Yakima rails to our Tonneau cover, even if it wasn’t the cheapest option availabe.  We bought a set of Yakima 60 inch tracks from Amazon and took them to the guys over at American Truck and Trailer Supply in Manassas, VA and had them install the tracks along with the truck cover.

Once the tracks were in, we could add the towers & bars. For our Dodge Ram 1500 specifically we bought:

2 sets of Yakima Landing Pads
Yakima Control Tower Roof Rack Tower (set of 4)
2 – 78″ Yakima Roof Rack Round Crossbars

Landing pads go in the tracks, Towers go in the landing pads and crossbars go through the towers. Its a great set up, and has worked pretty flawlessly over the last year.

Once the infrastructure was in place, we just needed the racks for the bikes. We already owned two Yakima Boa Fork Mounts, so to keep costs down, we decided to start with two of those for the biggest bikes. We found a Yakima High Roller Rooftop Bike Rack on Craigslist for Rachel’s bike, and Andrew’s bike, the boot scoot, and the Co-pilot were all piled in the older model Yakima Basket case we had brought out with us from Utah.

This set up worked great for 6 momths until we got back to Utah in the spring of 2014 and upgraded Andrew to a larger bike. We also wanted to reclaim the truck bed space taken up by our bike tires due to the fork mount of the Boa racks, so we upgraded all of the racks to the High Rollers, and Sam built a wooden rack for Cara’s new Ride-aLong bike we had purchased while in San Diego last February. We strap Cara’s boot scoot to the Ride aLong with some bungee cords and it rides just fine.

So far, so good! We’ll have to do some more rework when Cara graduates to a regular bike (or one with training wheels), but we are putting that off as long as possible!

IMG_9621-Edit

Categories
Tow Vehicle

Truck Purchasing Decisions

IMG_2192

We got an email asking us about our truck purchasing decisions. The email ended up being long enough that I gave it a rework, and here it is as a blog post! Consider this an open invitation: If you want to hear about something we don’t have posted to the blog, email us!

Choosing a tow vehicle can be a complicated decision. We tow with a 2006, Dodge Ram 1500 5.7 Hemi, rated for 10,000 lbs of towing capacity. It is unlikely that you would make the same choices we did, but I’ll talk about our reasons, and hopefully that can help your own decision. We bought the truck used in Virginia over a year ago, and it has served us well.

How did we end up with this truck?

The answer isn’t quite as involved as you might think. We went truck shopping primarily by towing capacity. The max weight of the loaded Airstream (27FB) was 7,500 lbs, so I wanted a truck in the 10,000 lb towing capacity range.

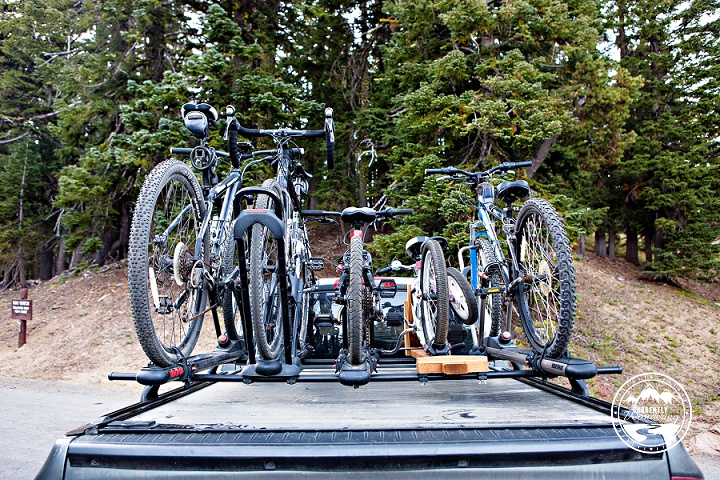
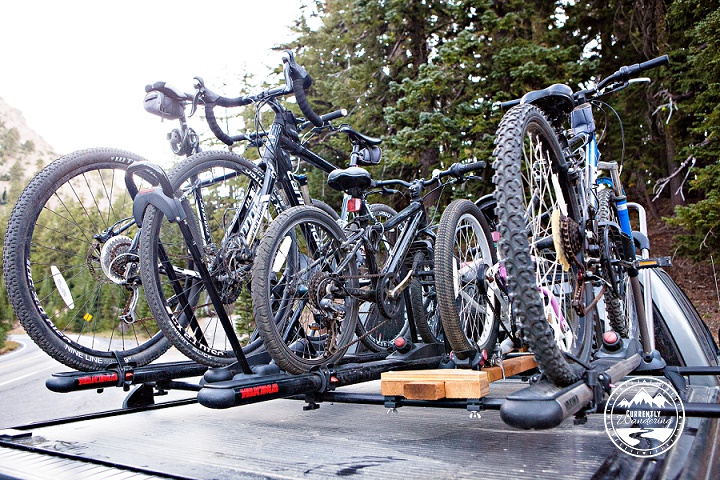
Part of that capacity difference is the stuff we have in the truck while towing: 5 humans (through 3 are smallish), 5 bikes, a generator, and other miscellaneous stuff in the back of the truck. It’s worth knowing that the auto industry is going through a conversion of towing capacity standards. My 10k rated truck would be rated lower under the new standards, though I’m not sure how much.

The truck we ended up with was the beefiest 1/2 ton Dodge Ram 1500 you can get. (The Sport models of the Ram 1500s can only tow 2.5k or thereabouts.) It has been a good truck, including towing some fairly serious grades on long highways. I have added 2000lb airbags on the truck, as the leaf springs were getting tired. Those help quite a bit, as well as the weight distribution hitch we use. The Ram 1500 has been good from a size perspective. As it is our only car, Jess drives it into cities and elsewhere (sans Airstream) when exploring with the kids, and a huge truck would make that much more difficult.

Why a truck?

You can tow with SUVs and vans, but a truck has two great advantages in our case. First, I can mount the bike rack just above the top of the bed. This leaves plenty of room up there for 5 bikes without getting insanely tall. Second, the covered bed area gives me a perfect place to store ‘garage’ items. I store a generator back there, and because it isn’t space shared with humans, I don’t have to worry about gas vapor in the vehicle interior.

Why Gas?

Because I understand gas engines better than diesel engines. That’s about my only reasons there. I’m certainly not opposed to diesel, and the low speed torque advantages are nice. Perhaps a future truck will be a diesel, but I’m not going to start with that as a requirement. I outperform semi trucks on grades while keeping the RPMs under 4k, and it has been good enough for me.

Why Dodge?

In my general opinion, Dodge does a better job at body and drivetrain, but worse at interior comforts. If I had to choose between an air vent failing and the transmission having issues, I’d go with the air vent problem… 🙂 Ford does better at interior, but seems to have more drivetrain issues. Really though, I’m not really stuck to Dodge.

Would I buy the same truck again?

Possibly. I might be tempted at a 3/4 ton truck, though I would look for one with the smallest body possible. I would go looking by towing capacity again, though against the new standards. With growing kids, I might look for a truck with a larger back seat to handle longer legs. We have the mid sized cab and it works, but larger legs would need more space.

Tow vehicles in the full time community are varied, and unique to the individuals who own them. We have friends who tow with beefy vans, Tuareg’s for the smaller Airstreams, and plenty of diesel trucks. Do you research and decide what is important to you!
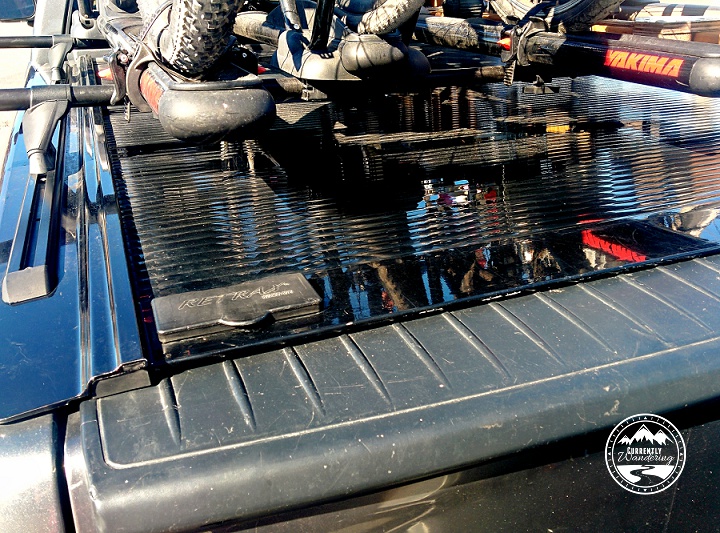
Categories
Solar & Power

Power Upgrade – What I don’t know about Installing Solar

IMG_20150112_154728_1

When I mentioned a power upgrade on Instagram, I received plenty of recommendations, and an overwhelming vote of confidence from those convinced I could do the install myself. I had been planning on having a professional installer do the work, and I thought I’d enumerate my reservations about doing a self-install here, for enlightenment, humor, and surely rebuttal.

I don’t know where to run the wires.

This is my largest issue. I’ve been up on the roof enough to be comfortable arranging, mounting, and sealing the panels to the roof. I can even run wires to a combiner box. What I don’t know is a good way to get those wires from the roof to the relevant places inside the Airstream.

One option is the fridge vent. I’ve done that before, having run my external antenna wires that route. The trouble is getting from behind the fridge over to where the solar charge controller lives, which is surely either in the front under the bed or in the galley floor panel. Either path is difficult to make work.

The other option is to drop the wires down through a hole above the pantry, but I would still need to run wire forward to the battery, and I’m not loving the external pipe route that I’ve seen on the AirForums.

In addition to the panels-to-controller box, I have the wires to run to the remote control and monitor panels. I can mount the box easy enough, but I’m not sure where the wires would need to make the trip from.

I have Zero DC Experience.

I could probably work past this one if I needed, by following diagrams and asking lots of questions. My biggest worry here is screwing something up, and either causing lots of damage or having to pay somebody serious $ to sort it all out.

I don’t travel with many tools.

I’m a pretty handy guy, but I’m not traveling with many tools. The custom work I have done I did before I sold the house (and the tools) or with the help of friends and family. I only have a basic set of tools with me, which does not include even an electric drill or screwdriver.

I can work past this one as well, enlisting the help of similarly handy friends.

Solar Rebate

Right now, I can get 30% back on a solar purchase as a tax credit, and that includes the cost of the installation. This brings the effective cost down quite a bit, and I don’t have to worry about all the complex issues. Call me lazy, but it is tempting.

Hybrid Approach?

At the moment, I’m leaning towards a hybrid install: part professional, part DIY. The portions of the install I’m least familiar with are the base system and monitor installation. A battery upgrade/replacement is doable, as is adding adding panels and wiring it to the combiner box. I’ve even already ordered a new multi-stage converter/charger that I plan to self install over the next week or so. (I ordered the Progressive Dynamics (PD4655V) 55 Amp Converter/Charger that installs as a drop in replacement for the single stage Parallax 7355 Converter Charger original to our Airstream.)

So there you have it: my concerns about self-installing solar. If you have information or guidance, please do share!

Categories
Solar & Power

Power Upgrade – Our Lifestyle and Power Needs

IMG_1792-Edit

The time has come for operation “Airstream Power Upgrade” or APU for short. When we bought our Airstream, we replaced the 5 year old batteries with flooded batteries from Costco. It was cheap, easy and we didn’t want to figure out other options or power configurations. Lately we’ve been spending more time off grid (or boondocking) and are in the market for some additional power. We have been gathering information to decide exactly what our needs are and how best to fulfill them. Here is a consolidated list of information that we are using to decide our way forward:

The Rig

We have a 2008 Airstream International 27FB, with a front bed modification. Though we pulled the queen bed, we left the electrical panel under the bed in place and unmodified. The two primary locations for electrical stuff is that panel and the fuse panel/converter underneath the pantry in between the bathroom and the stove.

Lifestyle

We are a full-time family of 5, home schooling and working on the road. We spend time both boondocking and with an electric hookup. We move roughly every 3 to 5 days. Our biggest wintertime power use is the furnace fan at night. With kids, we can’t as easily drop the temperature at night to save power. Summertime power drain switches to the fantastic fans, though the power draw doesn’t seem quite as bad.

This year we will be doing more ‘away from home’ activities, like backpacking or other trips where we will park the Airstream for a few days without hookups. Having a way to keep the batteries in good shape without hassle for a few days would be really helpful.

Batteries

We have 2 Group 27 Deep cycle marine batteries, for something like 150 or 160 Amp Hours. (When new). The batteries are only a year old but not in great shape, mostly due to neglect of the water levels.

I suspect our current use is on the order of 100 – 125 Amp Hours per day, based on how often we have to run our generator. We can really only run a day-ish on batteries, and I’m pulling out the generator far too often to be convenient.

DC Needs

  • Lots of USB charged gadgets (2 Phones, 3 Tablets, cameras, etc.)
  • Laptop power cord is a DC cord (no AC needed)
  • Nearly all lights are LED lights
  • Wifi Router (Pepwave)
  • House audio (built in sound system)
  • Fridge (electronics only, propane powered)
  • Fantastic Fans (mostly summer use)
  • Furnace Fan (mostly winter use)
  • Cooking Fan and shower vent fan (year round)

AC Needs

  • We have no inverter currently installed. We pull out the generator (Honda 2000) for use of our major electrics when boondocking.
  • Blender – 1800 Watts / Typical daily use 5 min
  • Hair Dryer – 1850 Watts / Typical use every few days 10 min
  • Hair Flatiron – ? Watts / Typical use every few days 10 min
  • TV – much lower, but we are low TV users.
  • Other misc chargers and devices, none of which is urgent while boondocking
  • We do not currently have an inverter.

Upgrade Goals

  • Run the generator less often.
  • Be able to park the Airstream for a few days without having to worry about the fridge running out of power.
  • Be able to monitor both power use to lower use and monitor drain.
  • Monitor battery state and charge to know when we are charged. (Will help reduce generator use).
  • Avoid becoming a slave to the panels.

Possible Options

My uneducated self can see a few ways to improve our power situation:

Solar Only

  • Panels (200-400 watts)
  • Solar Charge Controller
  • Battery Monitor

This is probably our best option, but also the priciest. Prices without installation are roughly $1,800 to $2,500. Install would likely be $1,200 additional. Self install is painful for a few reasons, but more on that
in a future post.

AC Charge Only

  • Multi-stage Converter
  • Battery Monitor

This would really just make our generator time more efficient, and provide better monitoring. This is an easier self-install, and somewhere in the $400 range.

Both Solar and AC

  • Panels (200-400 watts)
  • Solar Charge Controller
  • Multi-stage Converter
  • Battery Monitor

Battery Upgrade

I could upgrade the batteries, either to 6 volt or AGM, or both. This could lower the maintenance issues with the flooded batteries, but is pricy. $400 – $1,000, plus more to expand the battery box for larger batteries.

Inverter Upgrade

Use combination Multi-stage converter / Inverter to allow AC use from batteries. This is really a luxury item, but as long as we are discussing our options, let’s throw it in here. $1,000 -$2000, depending on which way we go, and it would likely need that battery upgrade!

Next Up…

I’ll discuss what I don’t know about installing my own solar kit.